Note on documentation: Information on the MOSIP architecture and design is distributed between MOSIP Documentation and the design folders of the various repositories.
As the world races towards a fully digital economy, foundational IDs and ID systems become an essential building block in establishing digital trust. They are also an essential part of Government to People (G2P) initiatives. MOSIP as a foundational ID platform delivers a key ingredient of the fabric of digital governance systems.
Pillars of a Digital Future
Digital Identity and Trust
Interoperability and Standards
Transparency and Audit-ability The above allows systems to enact digital transactions which are essentially a flow of all forms of data or money. These transactions will need to factor in identity assurance, consent, user privacy, and information security. MOSIP offers identity assurance to such transactions.
National ID systems can leverage MOSIP as the base platform and configure, customize, and extend it to build their systems just the way they need it. The picture below depicts how mosip is visualized as a national id platform.
Home
The MOSIP Program
The MOSIP program was conceived to help build global digital public goods in the space of digital governance. The flagship of the program is the MOSIP platform which provides the core for a foundational identity system that can be used by countries to build their national identity programs. Anchored at the International Institute of Information Technology, Bangalore (IIIT-B), MOSIP harnesses the power of open source and embraces the best practices of scalability, security and privacy. Learn more >>
About MOSIP
The Modular Open Source Identity Platform is an open-source, open standards-based foundational identity platform. MOSIP is an API-first platform that can be used by countries to build their own national id platform. MOSIP offers id life-cycle management features and identity verification capabilities out of the box.
The key objectives of MOSIP are to:
Provide the basic framework to create a fully functional foundational identity system
Provide flexibility for a country to choose and customize the features from the basic framework according to their requirements
Maintain privacy, security and confidentiality of an individual's data
Provide a scalable and accessible solution to cater to a wide range of population (a few thousand to several hundreds of millions)
The latest release of MOSIP, version 1.1.5 is here! We have added many interesting features as part of this release and also incorporated some software infrastructure changes as part of paring the technical debt. Check out the exciting new services and enhancements in the documentation.
Current Release
Version: 1.1.5
Release Date: March 23, 2021
You can find the release notes .
Previous Release
Version: 1.1.4
Release Date: February 12, 2021
You can find the release notes .
The MOSIP roadmap in the short term is the release of our Long Term Support Version. Our medium-term focus is to enable reference implementations of identity usage, integrations and interoperability. The long-term focus is to offer a set of core components for digital governance. Check out our and to see how you can be part of the MOSIP journey.
Auth Implementation
Please find below the sequence diagrams for auth flows.
Enter demographic data & upload supporting documents
Book an appointment for one or many users for registration by choosing a suitable registration center and time slot
Receive appointment notifications
Reschedule and cancel appointments
Resident data is sent to the designated registration center before appointment that can be used during the registration process.
For detailed functionality of Pre-registration features please view our page, .
Process flow diagram for create and update flows in Pre-registration.
Process flow diagram for cancel and discard flows in Pre-registration.
For detailed description of Pre-registration services refer to .
Below is the diagram depicts the logical architecture of Pre-registration,
Refer to the build and deploy instructions in the .
For detailed functionality of Pre-registration APIs please view our page,
MOSIP provides a reference implementation of the Pre-registration UI that may be customized as per country needs. The implementation is is available on .
Kernel
Overview
Kernel is on which MOSIP services are built. Kernel is a platform to build higher-level services as well as a secure sandbox within which the higher-level service functions. Kernel provides a bedrock to build and run the services by providing several significant necessary technical functions so that individual services are concerned with specific business functions.
Kernel is not a distinct module but a bunch of services and libraries that are shared across different modules.
Details of all services and libraries along with code, design are available in .
Refer to build and deploy instructions in .
Device Integration Specifications
This document detailed out the design approach to integrate with the list of devices used in the MOSIP platform.
Interface approach has been taken to implement the integration with external devices.
The interface should have the required method to communicate with the external devices.
An Abstract class has been defined to implement the common functionality and it should be extended by Vendor specific implementation class. The device vendor's specific implementation class should extend the Abstract class and implement the required methods using available libraries.
Devices:
Scanner
Printer
GPS
Interface: IMosipDocumentScannerService
public Boolean isConnected() - to check the scanner connection availability.
public BufferedImage scan() - to scan the document from the scanner device.
Abstract Class: DocumentScannerService
public byte[] asPDF(List bufferedImages) - to convert the captured scanned document files into pdf format.
public byte[] asImage(List bufferedImages) - to convert the captured scanned document files into image format.
public byte[] getImageBytesFromBufferedImage(BufferedImage bufferedImage) - to get the byte[] from BuffredImage object.
Use the JavaFx provided print functionality to interact with printer directly from UI layer. No additional interface is required. javafx.scene.web.WebView.getEngine().print(PrinterJob)
Interface:IMosipGPSService
public String getComPortGPSData (String comPortNo, int portReadWaitTime) - it returns GPS signal in standard format.
Abstract Class:IMosipGPSServiceImpl
public GPSPosition sigalParser(String line) Inputs: gps signal (Ex: $GPRMC,055218.000,A,1259.4845,N,08014.7602,E,0.07,120.70,171018,,,A*64)
returns the latitude and longitude from the GPS signal.
MOSIP Partner Secure Communication
Introduction
MOSIP and Partners communicate with each other when indviduals avail services of Partners. The communication must to be executed safely and securely.
Confidential: The communication should be confidential and no other parties should be able to eaves drop the communicated details.
Integrity: The integrity of the communication should be maintained.
Security at various levels
Network Layer
All communication from Partners to MOSIP is routed via the MISP.
The communication is protected via the secured network protocol suite of IPSec.
Process flow for communication at Presentation Layer:
Partner pings MOSIP.
Partner gets the MOSIP certificate which is signed by the Root CA.
Partner then verifies the MOSIP certificate with the Root CA.
The data is encrypted in the Application Layer itself before it gets into the Presentation Layer.
The Encryption certificate is shared across by both the parties (MOSIP & Partners) to decrypt the content.
Both the parties (MOSIP and Partner) have to sign the request and response in the communication.
Partner signs request and response using Partner's signature certificate. MOSIP can verify the signature using Partner's public key.
MOSIP signs request and response using MOSIP signature certificate. Partner can verify signature using MOSIP's public key.
Altogether, 3 certificates are used in the communication:
SSL certificate: Used in the Presentation Layer
Encryption certificate: Used in the Application Layer
Signature certificate: Used in the Application Layer
Administration
Overview
The MOSIP platform is configured via the Admin application. This application can be accessed only by the privileged group of administration personnel. When the MOSIP platform gets initialized, there are default configurations and seed data are setup. Post installation, following operations can be done using the Admin application:
Master data management
User management
Mapping of the master data to various resources
The module provides a single user interface to administer the MOSIP platform. On initial platform installation, data and configurations may be uploaded from CSV files.
Admin application contains UI layer and Service layer. All the components in both Services and UI are secure and authenticated. Every component should be defined with the authorization module plugged in. For example, if a component's data is not supposed to be viewed except authorized personnel, no user will be able to view it. So is for creating, editing and deleting functionalities.
The administrator uses many services available as part of Kernel in . There are a few administrator specific services available in . The code and design documentation is available in the repositories.
Reference implementation of Admin portal is available in
Build and deploy instructions available in the above repositories.
APIs from multiple services are used for Admin as follows:
First User Registration and Onboarding
Steps to generate the first User in MOSIP eco-system, refer below for the process:
1. Creating the First User in KeyCloak
First the role "Default" need to be created in KeyCloak with all other roles.
A User say 'X' has to be created in KeyCloak and the role “Default” needs to be mapped to it.
2. Creating the Relevant Master Data
All data required as part of ID Object, for example, Gender, Location hierarchy, templates, etc. should be setup in the database through the CSV Utility
Master data of user, machine, device and center should be created and uploaded through the CSV Utility (Note - the user id for the User 'X' should be present in Master data of User)
All necessary center-machine-device-user mappings should be completed through the CSV Utility for the first user.
The User 'X' should now download the latest Registration Client and login with the credentials set in KeyCloak.
The User will automatically skip Operator/Supervisor On-boarding and will reach the home page of Registration Client.
The User authentication method for User 'X' will be always User ID and Password as it is the default user.
The RID created for the User 'X' needs to be updated in KeyCloak.
The role for the User 'X' needs to be changed to Registration_Officer or Registration_Supervisor.
The role "Default" needs to be removed from KeyCloak so that no other user has the role Default.
The User 'X' can now login to Registration Client (from the mapped Machine/Centre) with the above Username/Password.
Resident Services
Overview
Resident services are the self services which is used by the resident themselves via a portal. Functionalities such as lock/unlock authentication types, reprint UIN, view authentication history etc. are available. The services use OTP method of authentication.
The back-end is a set of services with REST API interface (provided by MOSIP) and front end is a portal to be developed by the adopter according to their requirements.
For detailed description of Resident Services, code and design refer to .
Refer to build and deploy instructions in .
Authentication and Authorization Functionality
In MOSIP, Authentication largely falls into the below categories:
Authentication via web channel (for Pre-Registration web application, Admin web application and Resident portal)
Authentication via local system i.e., offline authentication (for Registration client)
In MOSIP, Authorization falls into the below categories:
Authorization of API's accessed via web channel
Authorization to access specific data
A country will have its own hierarchy of system users especially the Registration staff and system administration staff. So, instead of defining a fixed hierarchy, by default MOSIP will depend on an LDAP implementation to manage users, organizational hierarchy and roles for users in the hierarchy. MOSIP will use an open source LDAP server as the LDAP implementation. Administrators can create hierarchy and users using Apache Directory Studio.
MOSIP system can handle Authorization across core services and restricts access to Web-services as per the roles defined.
For details on the APIs for authentication and authorization please view our documentation on .
Guiding Principles
The MOSIP philosophy is to provide a "Good ID". As part of this MOSIP embraces a core set of design and architecture principles that allow the platform to offer best practices for a Good ID system. MOSIP is built on the following architectural principles
MOSIP must follow a platform-based approach so that all common features are abstracted as reusable components and frameworks into a common layer
MOSIP must follow API first approach and expose the business functions as RESTful services
Biometric SDK
MOSIP uses biometrics - fingerprint, iris, face - in registration and authentication processes. This requires specialized processing of biometrics data for biometric quality check and matching two biometric images. Biometric SDK consists of software libaries that provide these functions. Note that MOSIP platform does not include such an SDK.
Shares information about the SDK and performs any one time activities including initialization of internal variables and algorithms.
Checks the quality of input biometrics and returns quality score for the same.
When a biometric image is received by MOSIP in the registration client using a forced capture, this method is used to check the quality of the image
UIN and VID Generation Service Functionality
MOSIP generates a pool of UINs before the registration process and stores them. The UIN generation policies can be defined or modified by country as per their requirement.
The UINs generated for the current implementation, follow the following policies:
UIN should not contain any alphanumeric characters
UIN should not contain any repeating numbers for 2 or more than 2 digits
ABIS
Providing unique identity for a resident is one of key features of any identity platform. To achieve this, MOSIP interfaces with an Automated Biometric Identification System (ABIS) to perform de-duplication of a resident's biometric data.
MOSIP is designed to integrate with multiple ABISs to leverage expertise of different ABIS providers. A country may use one ABIS for fingerprint and another for Iris or use multiple ABISs for the same biometric data and evaluate the best ABIS based on de-duplication quality.
The ABIS system never comes to know about resident's identity. Any Personally Identifiable Information (PII) such as demographic details or RID (Request ID for Registration) is not shared with the ABIS system. Internally, MOSIP maintains a mapping between the ABIS specific referenceID and RID of the resident.
MOSIP's ABIS middle-ware has the following components
public List pdfToImages(byte[] pdfBytes) - to convert the pdf document to image format in order to show in the document preview.
MOSIP must not use proprietary or commercial license frameworks. Where deemed essential, such components must be encapsulated to enable their replacement if necessary (to avoid vendor lock-in)
MOSIP must use open standards to expose its functionality (to avoid technology lock-in)
Each MOSIP component must be independently scalable (scale out) to meet varying load requirements
MOSIP must use commodity computing hardware & software to build the platform
Data must be encrypted in flight and at rest. All requests must be authenticated and authorized. Privacy of Identity Data is an absolute must in MOSIP
MOSIP must follow the following manageability principles – Auditability & monitor ability of every event in the system, testability of every feature of the platform & easy upgradeability of the platform
MOSIP must follow the principles of Zero-Knowledge which means that the services know nothing about the Personally Identifiable Information (PII) data stored.
MOSIP components must be loosely coupled so that they can be composed to build the identity solution as per the requirements of a country
MOSIP should work with different locales so that ID systems can be localized for languages and cultures easily.
All modules of MOSIP should be resilient such that the solution as a whole is fault tolerant
The key sub-systems of MOSIP should be designed for extensibility. For example, if an external system has to be integrated for fingerprint data, it should be easy to do so.
The key design aspects considered for MOSIP are
The MOSIP platform is a framework and an end-to-end solution that needs additional components. For example, biometric devices and ABIS solutions are key to processing an individual's data and proving uniqueness. Through a well-defined set of standard interfaces, MOSIP allows for the integration of such components and offers a choice of providers for the same. MOSIP also needs to cater to a diverse set of institutions wanting to authenticate an Individual against the data stored in MOSIP. So, the key parameters are
All public/external facing interfaces of MOSIP must be standards-based for interoperability.
3rd party components should be integrated via standard interfaces and offer a provider model where needed.
MOSIP should be flexible for countries to configure the base platform according to their specific requirements. Some examples of configurations in MOSIP are
A country should be able to choose the features required. For example, it must be possible for a country to turn off Finger Print capture
A country should be able to configure the attributes of an ID Object
A country should be able to define the length of the UIN number
MOSIP should be flexible to extend functionality on top of the basic platform. Some examples of extensibility are
A country should be able to introduce a new step in processing data
Integrate MOSIP with other ID systems and include it as part of the MOSIP data processing flow
All components in MOSIP should be modular and their features exposed via interfaces such that the implementation behind the interface can be changed without affecting other modules. Some examples of modularity are
The UIN generator algorithm provided by the platform can be replaced by a country with their own implementation
The default demographic de-duplication algorithm provided by MOSIP can be changed to a different one without impacting the process flow
Ecosystem approach
Configurability
Extensibility
Modularity
UIN should not contain any sequential number for 3 or more than 3 digits
UIN should not be generated sequentially
UIN should not have repeated block of numbers for 2 or more than 2 digits
The last digit in the number should be reserved for a checksum
The number should not contain '0' or '1' as the first digit.
First 5 digits should be different from the last 5 digits (example - 4345643456)
First 5 digits should be different to the last 5 digits reversed (example - 4345665434)
UIN should not be a cyclic figure (example - 4567890123, 6543210987)
UIN should be different from the repetition of the first two digits 5 times (example - 3434343434)
UIN should not contain three even adjacent digits (example - 3948613752)
UIN should not contain admin defined restricted number
Note: The number of UINs to be generated in a pool depends on a configuration to be done by the country depending on the peak registration requirements. UIN generation service will receive a request by Registration Processor to get a UIN. The service responds with an un-allocated UIN from the generated pool. When the pool reaches a configured number of minimum UINs, MOSIP generates another pool of UIN.
MOSIP will generate a pool of VIDs through a Batch Job. The number of VIDs generated will be configurable by the country. All the VIDs generated will be assigned a status “Available” which means that the VID is available for allocation to a UIN. Any request for VID allocation will pick up VIDs which have this status. The Batch Job to generate the pool will run every time the number of VIDs in the pool reduces to a configured number.
VID generation will happen according to the below logic:
VID generated should contain the number of digits as configured.
A generated VID should follow the below logic a. The number should not contain any alphanumeric characters b. The number should not contain any repeating numbers for 2 or more than 2 digits c. The number should not contain any sequential number for 3 or more than 3 digits d. The numbers should not be generated sequentially e. The number should not have repeated block of numbers for 2 or more than 2 digits f. The number should not contain the restricted numbers defined by the ADMIN g. The last digit in the number should be reserved for a checksum h. The number should not contain '0' or '1' as the first digit.
MOSIP has a VID generator service which will receive a call to generate a VID. The service will also support receiving an expiry period (optional Parameter). This service when called will pick up a VID from the pre-generated pool and respond it to the source. The Service will also mark that VID in the pool as “Assigned” and attach the expiry period to the VID if received. The service will also make an asynchronous call to the batch job to check the remaining VIDs and generate the pool if needed.
MOSIP also has a VID revoke service which will receive a VID and expire it. When received a request along with the VID, the service will change the status of the VID as “Expired”.
MOSIP also has a batch Job to auto-expire VIDs and mark expired VIDs as to be available to be allocated again.
All the VIDs will be marked as ‘Expired’ through the batch job based on the expiry period assigned to them
All the VIDs which are in expired state for a configured amount of days should be marked as ‘Available’ through a daily batch job thus enabling re-usability of them
UIN Generation
VID Generation
Other Installation Guides
Once validated, the Partner shares its SSL certificate to the MOSIP. This SSL certificate is already signed by MOSIP as Root CA.
MOSIP verifies the SSL certificate.
Once both the SSL certificates are validated, the communication channel is established and communication happens.
The User now can register himself/herself in MOSIP and will get an RID and UIN.
The User now would need to On-board as his/her role would be changed.
Once on-boarding is completed User 'X' can register the subsequent Officers and Supervisors.
The User details of the subsequent Officers and Supervisor must be created in KeyCloak with appropriate roles assigned (as per Step 1) and their RIDs should be mapped in KeyCloak (as per Step 4) so that they can login to Registration Client.
3. Creating the First User in MOSIP
4. Allocating the RID to the User Created in KeyCloak
5. User On-boarding
Flow chart describing first user onboarding
First-user-onboarding
Server side validation of quality of biometric images uses this method
When external biometric images are received to be put on record this method is used to determine the quality of the received biometric image
Matches the captured biometric record or a list of biometric records (based on single match or composite match), matches it against list of stored biometric records. It then returns a matching score against each stored biometric record or a composite matching score for the list of input biometric records.
Used for matching one or multiple modes of biometric received in an auth transaction with a list of biometrics record
Used for authentication of operators in offline mode
Used for prevention of erroneous submission of operator biometrics in place of registrant’s biometric on registration client
Match is expected to be capable of image-image, extract-extract and extract-image comparisons
Extracts salient features and patterns of input biometric record to use in fast comparison. It returns the extracted biometric record.
Used to extract salient features and patterns of a biometric to use in fast comparison
In case of fingerprints this is called Minutiae and a standard representation of minutiae is an ISO template for FMR
Segments single biometric record into multiple biometric records and returns list of segmented biometric records. Eg: Split thumb slab into multiple fingers and eyes into left and right eye.
Used to split images into individual biometric segments when received from external sources
Converts images in all segments in the biometric record.
For details about biometric specifications in MOSIP please view the page Biometric Specification.
Introduction
Biometric SDK is primarily used for 1:1 authentication and quality check while [ABIS](Automated-Biometric-Identification-System-ABIS.md) is used for 1:N deduplication. MOSIP does not recommend using an ABIS system for 1:1 authentication.
Biometric SDK Functions
SDK Initialization
Quality Checker
Use Cases
Matcher
Use Cases
Extractor
Use Cases
Segmenter
Use Cases
Converter
Biometric SDK integration points
Biometric SDK API Specification
Biometric Specification
MOSIP ABIS request handler
Request router (based on routing policy, an ABIS request is routed to the correct ABIS system)
ABIS response handler
Below is the MOSIP ABIS middle-ware process flow,
MOSIP interacts with ABIS only via message queues. JSON format is used for all control messages in the queue. MOSIP ABIS middle-ware sends requests to inbound queue address and receives responses from outbound queue address. For details refer to the ABIS API Specifications.
ABIS must support the following types of biometric images:
This section contains details related to MOSIP data model design.The section also provides the data dictionary of the tables and columns defined by MOSIP databases.
Data Model Considerations
Meaningful Naming: DB objects that are being created will have a meaningful naming.
Flexible model: No business rules are set at the database level other than few mapping data. Most of the business logic is applied at application layer.
Database specific features: Use of DB specific features like defaults, DB sequences, identify fields are not used
No business logic at DB: No business logic implemented at database level other than PK, UK, FKs.
Data Security: Individual and security related information is encrypted
Databases inventory in MOSIP.
Sl No
Database Name
Schema Name
Description
Cryptography in MOSIP
Background
The data level encryption is handled in the DTO layer in the application.
Solution
The key solution considerations are
Following are the key considerations of the encryption in the DTO layer,
The data are classified into,
Sensitive
Non-Sensitive
The Sensitive data is encrypted in the DTO layer.
AES-256 algorithm is used for the encryption.
The data are classified and kept in the configuration file. The application layer reads this configuration and the sensitivity property is injected into the DTO layer.
Hibernate interceptors are used to intercept the fields in the DTO layer.
During the reading of these fields, once again Hibernate interceptors are called to decrypt the data.
The key expiration is in-built into the key store.
Following are the various components in the system,
Keys are stored in the "Key Store". This is a database table in which the keys are maintained along with the index.
Indexes are persisted in a separate store. When a request comes to a system to encrypt, the current index is retrieved and using this index, the key for encryption is taken. Indexes are stored along with the encrypted data as the prefix separated by a colon. For example, 4:sdf*)(8S@#YFLSJ&*hfdlkj23h
Encryption:
The properties in the entities which are supposed to be encrypted are configured in the config server.
During the encryption, a listener is installed in the DAO layer to intercept the incoming entity objects. If those properties are supposed to be, encrypted or not, are received from the config server.
Encryption
Decryption:
When a request is received, the DTO fields are checked for sensitivity, from the config server.
If the DTO field is sensitive, the decryption() method is called.
Decryption
Key rotation
On-Demand:
The keys are stored with the expiry date.
ID Authentication
Overview
ID Authentication (ID Auth) provides an API based authentication mechanism for entities to validate individuals. ID Authentication is the primary mode for entities to validate an individual before providing any service.
Following are the pre-requisites for an entity to do authentication of an individual
ID Authentication requests must come to MOSIP only via trusted parties who are white listed in MOSIP. The trusted parties are referred to as partners in MOSIP.
The biometric devices used for authentication must be registered with MOSIP.
ID Auth allows only partners to make authentication requests. The requests are cryptographically secured and verified. A partner that captures data from a biometric device must conform to standards to ensure interoperability.
An individual is authenticated based on the following:
Demographic data
name
date of birth
To enhance security a second factor of authentication is supported:
OTP based
Static pin based
Challenge response
To analyze and generate authentication patterns, all authentication requests are audited. These audit logs may be used to determine any frauds during authentication process.
For detailed description of ID Auth services, code and design refer to .
Refer to build and deploy instructions in .
Registration Processor
Overview
Registration Processor processes the data (demographic and biometric) of an Individual for quality and uniqueness and then issues a Unique Identification Number (UIN). It also provides functionality to update demographic and biometric data and issue a new UIN if lost. The source of data are primarily from
MOSIP Registration Client
Existing ID system(s) of a country
Important considerations are as follows:
Once the packet is received on the server packets should not be lost.
MOSIP defines and implement the basic registration packet processing flow. However, every country will have their own processing requirements like integration with their existing ID system and fetch data for validation. Registration processor provides options to add such stages.
Registration processor has the capability to integrate with multiple ABIS providers.
For detailed description of Registration Processor Services refer to .
For high level and low level design refer to
Refer to build and deploy instructions in .
VID Generator
Background
A virtual ID can be requested by an Indivudual against his UIN. The request is received to fetch a VID, which is unallocated yet at the time of request. There are many types of VIDs such as Perpetual VIDs, Transactional, Long term, short term.
Solution
The key solution considerations are
A pool of the VIDs are maintained for the faster dispatch of the VIDs to the requestor.
Vert.x REST Services: Following are the services which are available for the VID generator component,
VID Fetcher Service
This service requests for an unassigned VIDs.
Expiry days is passed as a parameter to this service. So, the VID pool knows when to expire this VID.
In case of perpetual VIDs, the expiry days is not passed. So that, the expiry of the VIDs have to be called back specifically.
Flowchart diagram for fetcher
VID Revoke Service
This service revokes the VID and allocates the VID in the free pool.
This service accepts the VID as input.
Flowchart diagram for revoker
Vert.x Verticles: Following are the various verticles which are available,
VID pool size checker
This vertical checks whether the pool has the available sufficient VIDs.
The configuration for the Shrink pool size, number of VIDs to be generated etc., are retrieved from the config server.
Vert.x expirer:
The expired VIDs status' have to be changed back to available. This scheduler runs at night when the traffic is minimal. The entire database have to be scanned for the expired VIDs.
The VID's status is changed back to AVAILABLE, if the VID is expired and crossed the cool-off period.
Flowchart diagram for expirer
Database:
A separate schema is needed for the VID.
VID Statuses are maintained in the database.
Module diagram
Registration
Overview
The registration client is a thick Java-based client where the resident's demographic and biometric details are captured along with the supporting documents in online or offline mode. The captured information is packaged in a secure tamper-proof way and send to the server for processing.
Registration client must provide the following :
Secure way of capturing an individual's demographic and biometric data. The captured data must be cryptographically secure such that the data cannot be tampered with. This is called a registration packet.
Interfaces to biometric devices that comply to industry standards. This ensure that any device manufactured as per standards will work with MOSIP.
Works in online and offline mode. In remote areas where internet connectivity is a challenge, the registration client must work in offline mode.
Remote software update capability. There must be a way to self-update to latest patches/upgrades (bug fixes/enhancements) in a remote way. There could be hundreds of client instances running on laptops/desktops. Updates on all of them must be controlled a central server.
Tamper-proof client software. The registration client must have an ability to validate the structure of the information captured so that it could detect any anomoly due to a possible manual tampering and reject the captured packet.
All the registration information is zipped and encrypted in a packet and sent to the server. The structure of the packet is given .
MOSIP provides an Windows-based reference implementation of the client that has a UI and the business logic to perform the above process flows. The code, design, App setup, build documentation is available in . The App may be modified according to a country's need.
TBD
MOSIP Architecture
Design choices
The MOSIP architecture decisions have been based on the Guiding Principles defined in the charter. The design choices are in line with the need for modularity, loose coupling and scalability of its components, and being API first.
Micro-service based architecture for all platform services for modularity and scalability.
Staged Event Driven Architecture (SEDA) for processing Registration data for extensibility.
Thick client architecture for the registration client to support offline operations as well as process security.
The sections below provide different views of the logical architecture of MOSIP.
From a MOSIP perspective, several actors are involved in the ID system.
The Individual or the Resident is at the centre of it all. It is their identity that the system deals with.
The Officer is a representative of the ID issuer. There are several specialized roles for the officer.
The Operator assists the individual during registration.
The diagram shows the functional architecture of mosip with the actors.
Mosip has several modules that offer related functionality. These include the core modules of
Pre-registration
Registration client
Registration processor
and the support modules
Partner Management
Administration
Reporting
Note: All user interface modules are reference implementations and can be used as is, refactored or customized or replaced with alternative implementations in the actual deployment.
The diagram below shows the various modules of mosip with their respective service bouquets and their interaction.
Resident Services Functionality
The Resident Service module will provide a host of services to an individual which can be availed after the creation of their Unique Identity Number (UIN). The list of services are as follows:
Update of Demographic Data (UIN update)
Track Request Status
Anonymous Profiling Support
When a country is implementing and running the ID program, people at the forefront like policymakers and other executives will need to monitor the progress. Progress can be measured with the help of various attributes like:
total enrollment count
gender profile for enrollment
Registration Packet
This document describes the registration packet structure and the packet encryption procedure.
Once a resident visits the registration center and provides their demographic & biometric details an encrypted zip file is created which is called a "Packet". This packet can only be decrypted by the registration processor using a private key available in the Kernel Key Manager.
The below diagram depicts the packet creation flow using the packet manager.
The packet is created using the Commons Packet Manager, which creates a packet in the below structure using the .
The packet name here is also the request ID that is generated for a request created when a resident enrolls into MOSIP, requests for updating data or request for finding his/her lost id. The request ID is a 29 digit number derived from the Center ID (5 digits), Machine ID (5 digits), sequence number (5 digits), timestamp (14 digits).
Deduplication and Manual Adjudication
Providing unique identity for a resident is one of key features of any identity platform. Hence, in MOSIP, we provide features like demographic and biometric de-duplication followed by manual adjudication to identify the uniqueness of a resident's demographic and biometric details.
De-duplication is the process to find a duplicate by comparing the individual’s details (biometric and demographic data) with the data stored in the system.
In demographic de-duplication the MOSIP system compares some of the demographic data (i.e. Name, Date of Birth and Gender) of the resident against the data present in MOSIP System (the resident's those who have already registered in MOSIP). If any potential match is found, the MOSIP system sends the resident's biometrics to the ABIS system to confirm if the biometrics are also matching.
MOSIP System receives a request to perform demographic de-duplication for Person A.
ID Repository
ID Repository contains the record of identity for an individual, and provides API based mechanism to store, retrieve and update identity details by other MOSIP modules. ID Repository is used by:
Registration Processor
ID Authentication
Partner Management Functionality
Partners in MOSIP are created in a self-service mode. The partner visit the MOSIP partner management portal and requests for collaborating with MOSIP by providing basic details such as organization name & email id, purpose of registration (how they want to collaborate with MOSIP - as a device provider, authentication partner, print partner, etc), basic credentials and performing an OTP based verification.
Once these details are filled by the partner and a request is sent to MOSIP, the Partner Admin verifies the details of the partners and allows the partner to integrate with MOSIP.
Once the partner is registered in MOSIP and is able to login to the partner management portal, MOSIP provides basic features such as,
Adding more contact information
Guide to Configure MOSIP for Biometrics
MOSIP can be configured to work with proxy implementation and multiple biometric modalities (fingerprint, iris and face). Below are configurations to enable biometrics in MOSIP.
Biometric Windows SDK (jar file) should be placed in lib folder after extracting Registration-Client zip file, and then execute run.bat file.
The below property should updated to enable MDS integration. This property is present in file.
Register Device Provider
Glossary
The MOSIP narrative and documentation uses terminology which can be hackneyed, cryptic or loaded at times. The ID industry also uses this terminology in different contexts will different shades of meaning. Here we provide a set of such terms and their interpretation in the context of mosip.
Note: This document is work in progress.
A Assurance Level
Authentication
AuthN and AuthZ
B
C Consent
D Demographic Auth
E
F
G
H
I Identity Verification
J
K
L
M
N
O
P
Q
R
S
T
U
V
W
X
Y
Z
Coding Standards
Build & Deploy
Contribute
APIs
Testing Attachments Kernel
master
All the master data defined by a country / organization is maintained in mosip_master database.
3
mosip_idrepo
idrepo
ID repository database stores all the data related to an individual for which an UIN is generated.
4
mosip_prereg
prereg
Pre-registration database to store the data that is captured as part of pre-registration process and appointments booking.
5
mosip_reg
reg
Registration client database to capture registration related data. The needed data from MOSIP system will be synched with this database.
6
mosip_regprc
regprc
The data related to Registration process flows and transaction will be maintained in this database.
7
mosip_ida
ida
ID Authentication related requests, transactions will be stored in this database
8
mosip_audit
audit
Audit related logs collected from all modules are stored in this database
9
mosip_credential
credential
Credential request from MOSIP applications related entities and its data is stored in this database
10
mosip_idmap
idmap
Database to store and manage all the data related to mapping between various IDs, like vid with UIN of an individual
11
mosip_keymgr
keymgr
Key Manager database maintains common system configurations, data related to key services like encryption, decryption keys, certificates..etc
12
mosip_regdevice
regdevice
Database to store all registration device management data, look-up data, configuration data, metadata...etc.
13
mosip_authdevice
authdevice
Database to store all partner authentication device management data, look-up data, configuration data, metadata...etc
14
mosip_pms
pms
Partner Management Service related entities and its data is stored in this database
1
mosip_kernel
kernel
Kernel database store security key details, data related to kernel services like sync process, OTP, etc.
2
Data Model
mosip_master
Lock/Unlock AUTH types
Download e-UIN
Retrieve Lost Request ID(RID)/UIN
Reprint UIN
View Authentication Transaction History
Generate/revoke Virtual ID (VID).
All these features are detailed in the following features section.
This feature will allow an individual to track status of his/her UIN generation. The individual needs to provide the RID (Request ID received during UIN registration) as input. The system will validate this RID. On successful validation, the system will send the status of UIN generation to the individual's registered mobile number and/or email ID. The system will also send a notification message to individual’s mobile number and/or email ID after a successful transaction or appropriate error message if the transaction was not successful.
This feature will allow an individual to download his/her electronic UIN. The individual needs to provide the UIN/VID, full name, postal code, and security code as input. The system will validate the provided data, trigger an OTP to individual's registered mobile number and/or email ID, validate the OTP and then authenticate the individual. On successful authentication, system will send a link to the individual's registered mobile number and/or email ID to download his/her password-protected e-UIN in PDF format. The system will also trigger a notification message to the individual's registered mobile number and/or email id after the transaction or appropriate error message if the transaction was not successful.
After the UIN application is submitted by an individual providing the required demographic, biometrics and supporting documents and filling up the enrollment form by visiting a registration center, the system generates a unique RID (Request ID) as an acknowledgment number. If the individual misplaces this RID, this feature will allow an individual to retrieve his/her lost RID to subsequently trace the associated UIN. The individual needs to provide his/her Full Name, Mobile Number and/or E-Mail ID, Postal Code that was provided during registration as input. The system will first validate the individual's provided data, trigger an OTP, and perform OTP validation on the given mobile number and/or email ID. On successful validation, the system will send a link to password protected PDF containing the RID to individual's registered mobile number and/or email ID. The system will also trigger a notification message to the registered mobile number/email ID after a successful transaction or appropriate error message if the transaction was not successful.
This feature is not yet developed in MOSIP.
This feature will allow an individual to retrieve his/her lost UIN. The individual needs to provide the Full Name, Mobile Number and/or E-Mail ID, Postal Code as input. The system will first validate the individual's provided data, trigger an OTP, and perform OTP validation on the given mobile number and/or email ID. On successful validation, the system will send a link to the individual's registered mobile number and/or email ID to download his/her password-protected UIN in pdf format. The system will also trigger a notification message to the registered mobile number and/or email ID after a successful transaction or appropriate error message if the transaction was not successful.
This feature is not yet developed in MOSIP.
This feature will allow an individual to raise reprint request of his/her UIN. The individual needs to provide the UIN/VID as input. The system will first validate the individual's UIN/VID, trigger an OTP to individual's registered mobile number and/or email ID, validate the OTP and then authenticate the individual. On successful authentication, the system will take the UIN reprint request and acknowledge the request with a Request ID (RID) to the individual. The system will also trigger a notification message to the registered mobile number and/or email ID after a successful transaction or appropriate error message if the transaction was not successful.
This feature will allow an individual to initiate update of his/her demographic details. Currently, an individual can initiate an update of the address associated to the provided UIN/VID. However, this service can be extended to further update any other aspect of the demographic data (EG: Mobile, Email, etc). The individual needs to provide the UIN/VID as input. The system will first validate the individual's UIN/VID, trigger an OTP to individual's registered mobile number and/or email ID, validate the OTP and then authenticate the individual. On successful authentication, the system will generate and send a Request ID (RID) for UIN update to individual's registered mobile number and/or email ID. The system will also trigger a notification message to the registered mobile number and/or email ID after a successful transaction or appropriate error message if the transaction was not successful.
This feature will allow an individual to track status of his/her UIN update. The individual needs to provide the RID ( Request ID for UIN Update) as input. The system will first validate the RID, trigger an OTP to individual's registered mobile number and/or email ID, validate the OTP and then authenticate the individual. On successful authentication, the system will send the status of UIN Update to individual's registered mobile number and/or email ID. The system will also send a notification message to individual’s mobile number and/or email ID after a successful transaction or appropriate error message if the transaction was not successful.
This feature will allow an individual to view history of the authentication request(s) associated to his/her UIN. The individual needs to provide the UIN/VID as input. The system will first validate the UIN/VID, trigger an OTP to individual's registered mobile number and/or email ID, validate the OTP and then authenticate the individual. On successful authentication, the system will send unarchived Authentication History data of the individual associated to the provided UIN and all its associated VIDs. The system will also send a notification message to individual’s mobile number and/or email ID after a successful transaction or appropriate error message if the transaction was not successful.
An individual can decide to lock specific Authentication Types (Demographic/Biometrics) of his/her UIN/VID for security reasons. It can be for one or more Authentication types. The locked Authentication Type(s) cannot be used for any future authentication request. Similarly at any point he/she may also request to unlock one or more locked Authentication types which was locked earlier.
This feature will allow an individual to lock the requested Authentication Type (Demographic, Biometrics (FP/Iris/Face/All)) associated with his/her UIN/VID. The individual needs to provide the UIN/VID as input. The system will first validate the individual's UIN/VID, trigger an OTP to individual's registered mobile number and/or email ID, validate the OTP and then authenticate the individual. On successful authentication, the system will first send the details of all Authentication Types to the individual. The individual will then select which Authentication Type(s) will need to be locked. The system takes the request, locks the specified Authentication Type(s) and then notifies the individual. The system will also send a notification message to individual’s mobile number and/or email ID after a successful transaction or appropriate error message if the transaction was not successful.
This feature will allow an individual to unlock requested Authentication Types (Demographic, Biometrics (FP/Iris/Face/All)) which is/are in locked status associated with his/her UIN/VID. Once unlocked, the individual can again use these Authentication Type(s) for any future authentication purpose. The individual needs to provide the UIN/VID as input. The system will first validate the individual's UIN/VID, trigger an OTP to individual's registered mobile number and/or email ID, validate the OTP and then authenticate the individual. On successful authentication, the system will first send the details of all Authentication Type(s) to the individual which is/are in locked status. The individual will then select which Authentication Type(s) need to be unlocked. The system takes the request and accordingly unlocks the Authentication Type(s) and notifies the individual. The system will also send a notification message to individual’s mobile number and/or email ID after a successful transaction or appropriate error message if the transaction was not successful.
To safeguard the confidentiality of a UIN and for its security, Virtual ID (VID) service is provided. Based on the VID policy (defined by Country), an individual will be provided a VID during UIN registration and also he/she can create this using 'Resident Services'. The VID policy attributes defines the type of the VID, Country can name the VID as desired. VID policy constitutes time validity, no of instances, no of transactions, regeneration mode.
VID services comprise of the below.
An individual can request to generate a Virtual ID via Resident Service by providing his/her UIN. The system will first validate the individual's UIN, trigger an OTP to individual's registered mobile number and/or email ID, validate the OTP and then authenticate the individual. On successful authentication the VID is generated based on the VID policy of the respective Country. The system will also send a notification message to individual’s mobile number and/or email ID after a successful transaction or appropriate error message if the transaction was not successful.
This feature allows the system to maintain the status of all VIDs from the perspective of Time Validity, Transactions, and VID Revocation. The feature will be used by system's authentication module (called IDA - ID Authentication) whenever a VID is used for an authentication transaction (VID status will change to ‘USED’). Also when Resident Services is used for VID Revoke feature the status of VID changes to ‘REVOKED'.
To prevent misuse of VID, an individual can request to revoke his/her VID using Resident Service if the individual feels his/her VID has been compromised. The individual provides the VID as input. The system will then validate the individual's VID, trigger an OTP to individual's registered mobile number and/or email ID, validate the OTP and then authenticate the individual. On successful authentication, the system revokes the provided VID. Based on the VID policy of the Country a new VID will be generated during revocation and provided to the individual on the registered mobile number and/or email ID. If validation fails, the system triggers the appropriate error message.
This feature allows for a VID to be auto regenerated and given to an individual after he/she requests for an existing VID to be revoked. The VID regeneration happens based on the VID policy defined by Country (the regeneration policy for the revoked VID should be "Auto-restore").
Auto-restore a VID on Revocation and with Auto-restore Policy
List of Configurable Parameters and Processes
Resident Services API
Process View
Viewing user details
Managing credentials
The device providers is one who partners with MOSIP to provide MOSIP complaint devices for authentication and registration.
A device provider needs to upload his/her certificate using which he/she would be generating their device keys. These certificates are verified by MOSIP. Once the verification is done the root for these certificates are changed to MOSIP and can be downloaded back by the partner.
A device provider needs to upload a single certificate for all his/her devices.
This certificate needs to be upto date in MOSIP system before anyone performs any authentication using the device. During authentication, MOSIP would verify the device certificate using which the device info in authentication request is signed.
Using the partner management portal a device provider can add, update or view their device model details. Once the device provider registers the model details a request is sent to the partner admin for approval of the model.
During device registration MOSIP verifies the make and model detials. If a model details for a device is not available or approved by the partner admin, then registration for that device would fail.
Using the partner management portal a device provider can add, update or view their device model details. Once the device provider registers the SBI details a request is sent to the partner admin for approval of the SBI.
The foundational trust providers is one who partners with MOSIP to provide MOSIP complaint foundational trust modules (chips) for authentication devices.
Using the partner management portal a foundational trust provider can add, update or view their chip model details. Once the partner registers the model details a request is sent to the partner admin for approval of the model. As part of registration of the chip model, the partner needs to upload an associated certificate which would be used to generate keys for the particular type of chip.
The chip key will be used to sign the digital id in the authentication request. So, when the auth request reaches MOSIP, MOSIP would verify the certificate using which the digital id is signed.
The authentication partner is one who partners with MOSIP to provide authentication services to individuals.
An authentication partner need to upload an encryption & a signatire certificates using the partner management poratl. The signature certificate will be used in MOSIP to verify the signature when any request is received from the partner; where as, the encryption certificate would be used when any PII data is sent to the partner during e-KYC.
The authentication partner can view associated API keys and request for an API key for against a policy which is available for his/her policy group. Once a requeste is initiated a request is generated but a request is also sent for approval to the partner admin. The partner admin needs to approve the request before it can be used in MOSIP. This API key is one of the manadatory attributes in the authentication request using which MOSIP verifies the partner and policy mapping.
An credential partner need to upload an encryption & a signatire certificates using the partner management poratl. The signature certificate will be used in MOSIP to verify the signature when any request is received from the partner; where as, the encryption certificate would be used when any PII data is sent to the partner based on policy to issue a credential.
The authentication partner can view associated API keys and request for an API key for against a policy which is available for his/her policy group. Once a requeste is initiated a request is generated but a request is also sent for approval to the partner admin. The partner admin needs to approve the request before it can be used in MOSIP. This API key is one of the manadatory attributes in the authentication request using which MOSIP verifies the partner and policy mapping.
A MISP would be providing services to multiple authentication partners. The audit trails on which partner & when used MISP's licence key to perform authentication would be avaialable for the MISP to monitor.
The partner admin receives approval requests for various scenarios. The list of scenarios are mentioned below:
When a partner registers in MOSIP.
When a device model is registered by a device provider.
When a secure biometric interface is registered by a device provider.
When a chip model is registered by a foundational trust provider.
When an authentication partner requests for an API key.
When a credential partner requests for an API key.
The partner can choose to activate or deactivate various entities in the partner management portal.
Activation or deactivation of partner.
Activation or deactivation of device model.
Activation or deactivation of chip model.
Activation or deactivation of SBI.
Activition or deactivation of API Keys.
The partner admin can choose to hotlist a device by marking a device as hotlisted.
The partner admin can create a new partner or update details of a partner in the Partner Management portal.
The partner admin can associate new API keys to an authentication or crential partner and re-issue their API keys.
In order to create a policy we must have a policy group first. The policy admin needs to first create a policy group using the partner management portal.
Once the policy group is created the policy admin can create policies and associate these policies to various policy groups. After these policies are created, they would be in draft state. These policies need to be published by the policy admin. Once published these policies can be used by the partners.
The policy can be activated or de-activated anytime by the policy admin.
A policy can be updated multiple times when it is in draft state. Only the validity date can be updated once the policy is published.
Common Functionality
Self Registration
User Management
Device Provider
Upload & Download of Device Certificate
Manage Device Make and Model
Manage Secure Biometric Interface
Foundational Trust Provider
Manage Chip Make and Model
Authentication Partner
Upload & Download of Signature & Encryption Certificates
Manage API Keys
Credential Partners
Upload & Download of Signature & Encryption Certificates
Manage API Keys
MISP (MOSIP Infrastructure Provider)
View Transaction Logs
Partner Admin
Approvals
Activation or Deactivation
Hotlisting of Devices
Create or Update Partners
Associate & Re-Issue API Keys
Policy Admin
Create Policy Group
Create and Publish Policies
Activate or Deactivate a Policy
Update a Policy
Testing
The scheduler runs a job at some specific time when the necessity for re-encryption arises.
HSM devices are used to store the Master keys. These master keys are used to encrypt the keys in the Key store.
The data is encrypted and prefixed with the index of the key, which is used for the encryption and stored in the data store.
The key itself is encrypted with the master key from HSM and stored in a separate data store.
The index is incremented if the old index is expired.
During the decryption, the index is calculated by the delimiter. This index is used to find the Key, which was used for the encryption.
The Key itself has to be decrypted by the master key from HSM, before decrypting the content.
When a request comes to the system, the key is checked for expiry.
If the old key had expired, then a new index is generated and persisted in the Indexes. If there is no key exists in the Key store, a new key is created for the encryption. And the new key is used for further encryptions.
Bulk:
There are times, that the total encrypted data are re-encrypted again. A scheduler is maintained to oversee this. During the scheduled time, the encrypted data is read and re-encrypted once again and saved. The newly encrypted data will have the new index in front of the encrypted content separated by a delimiter.
Bulk mode is used to remove the expired keys and data is encrypted with the new key.
TODO: How do we handle failures during the bulk re-encryption?
TODO: How to handle the load, if it is extremely high?
Each processing stage is scalable independently based on the load.
Each stage in the processor is independent of other stages such that logic of a stage can be changed to improve efficiency without affecting the overall flow.
Each time when this service is called, a call is triggered to the "VID pool size checker"
Once the VID assigned, the status is changed to ASSIGNED
The requested VID status is changed to EXPIRED
The expired VID can be reallocated after the configured cool-off period
If the pool had shrunk below the configured size, the next "VID Pool Populator" vertical is notified.
The "VID pool size checker" vertical is called whenever a request is received for the VID generator.
VID Pool Populator
When the notification is received from the "VID pool size checker", this vertical is notified to generate the next set of VIDs are generated and placed in the pool.
When this vertical runs, it creates a lock. So that no multiple populator runs.
The worker verticle size is double as "VID Genertor Service".
The status of the new generated VIDs is AVAILABLE
Flowchart diagram for fetcher
Flowchart diagram for revoker
Flowchart Diagram
Module Diagram
The Supervisor verifies and attests exceptional cases in registration.
The Adjudicator carries out manual verification or comparison of an individual's data in the ID issue process.
The Auditor performs an audit or forensic analysis of specific enrollments.
The Administrator is a super user who manages the configuration data of the system.
The Partner represents a 3rd party service or application that interacts with MOSIP. There are specialized partners in the ecosystem.
The Relying Party is an Authentication Partner who relies on the ID system for their business transaction. This could be a social scheme for benefits disbursement or a bank for opening accounts.
The Credential Provider is a print service provider for the credential issue.
The Device Provider is a partner who provides biometric devices.
The FTM Provider is a partner that provides foundational trust modules for devices.
The Partner Application is a system that relies on mosip or one that mosip relies on. This could be a CRVS system or a Functional ID system such as a Passport or a driver's License.
The ID System is a system that mosip integrates with for inter-operable ID
ID Repository
Authentication
Resident Services
Functional Architecture
Modular Architecture
age group profile
enrollment numbers and profile per registration centre
quality of biometric data captured
Information like this will allow policymakers to take corrective measures as and when required.
Some examples are given below:
Example 1: If registration centres are set up for enrolling residents and if they see that the number of women enrolling in a particular area is less because of cultural factors, they can introduce a door-to-door enrollment process to increase coverage.
Example 2: The quality of biometrics captured for a particular registration centre or region can be monitored. And if it is found to be unacceptable, they can proceed to replace the biometric devices in that centre.
Example 3: They can compare the total number of enrollments against the total number of UINs issued. If there is a big gap, they can then address this by increasing the capacity of the registration processor module to handle and process more packets.
In order to achieve this, we have published a fixed anonymized profile of the users and ensured the same is accessible to a search engine such as elastic search so that it can be used for analytics. The basic guideline followed to create these profiles is that the limited dataset should not violate the privacy of the person or point to specific individuals. These JSON profiles are not configurable in the current design and a code change is required to change them.
This dataset is called an anonymous profile and is captured during the ID issuance stage.
As a part of this implementation, a new anonymous_profile table is created for the ID issuance module and is populated as per the JSON structure given below.
Module
Table name
Profile name
ID Repository
anonymous_profile
Anonymous Identity Issuance profile
Note: New DB tables are added for the anonymous profile because data in existing tables (except the pre-registration module) are encrypted and cannot be used to create reports and dashboards.
This profile data will be captured during the identity issuance process when an entry is made in the ID repository.
The profile data is captured in a anonymous_profile table under the mosip_idrepo schema.
The profile will be available from 1.1.5.5 and above.
JSON structure of the identity issuance profile is given below:
Below is the image for the Anonymous profile table created in the ID repository schema
Anonymous profile table created in ID repository schema
Overview
{
"processName": "", //New, Update or Lost. Correction is not included here
"date": "", //Occurance of the event date. Just date with no time.
"oldProfile": {
"yearOfBirth": "", //Only the year of birth is kept.
"gender": "", // Code for - Female, Male, Transgender, ...
"location": [""], //hiearchy except last 2 (means no personal address) maintained as per the array. JSON array remembers the order
"preferredLanguages": [""], // list of preferred languages
"channel":["list of channel names eg: phone,email"],
"exceptions": [{
"type" : "", //eg: Finger
"subType": "" //eg: Right Thumb
}],
"verified":[""] // list of all the verified id schema atribute names
"biometricInfo": [ {
"type" : "",
"subType": "",
"qualityScore": "",
"attempts": "",
"digitalId": "" //Digital Id of the device
}],
"documents": [""] //type of the documents eg: driving license, passport.
},
"newProfile": {
"yearOfBirth": "",
"gender": "", // Confidential, Female, Male, Transgender, ...
"location": [""], //hiearchy except last 2 (means no personal address) maintained as per the array. JSON array remembers the order
"preferredLanguages": [""], // list of preferred languages
"channel":["list of channel names eg: phone,email"],
"exceptions": [{
"type" : "", //eg: Finger
"subType": "" //eg: Right Thumb
}],
"verified": [""] // list of all the verified id schema atribute names
"biometricInfo": [ {
"type" : "",
"subType": "",
"qualityScore": "",
"attempts": "",
"digitalId": "" //Digital Id of the device
}],
"documents": [""] //type of the documents eg: driving license, passport
}
}
Design
Anonymous Identity issuance profile
Container: The container is the base folder in which the sub-packets are stored with their respective JSON files containing meta information.
Sub-Packets: Inside the container we ideally have three packets named as ID Packet, Evidence Packet and Optional Packet. Data inside each packet is stored based on a property in ID Schema called "Field Category".
Packet JSON: Each sub packet has a JSON file associated with it which contains the meta information of the respective sub-packet.
ID Object: Each packet has an ID JSON attached with it which has basic demographic data of the resident, document names that were uploaded, information about the introducers or guardians, biometrics file names (of applicant, introducer, guardians) and the version of the ID schema used. Data for each ID JSON is populated based on the ID Schema property, "Field Category".
Biometric Files: The biometric data of the resident, officer, supervisor, intorducer or guardian is stored in respective CBEFF XML and in respective folders as driven by ID schema.
Documents: The documents uploaded by the resident during registration or pre-registration is stored in respective folders as driven by ID schema.
Packet Meta Information: A bunch of meta data is generated during the registration process like the officer's or supervisor's id, machine details, device details, gps location, etc. which is stored in the Packet Meta Info file in JSON format.
Audit: The audit trails created during packet creation is logged and sent to registration processor to be uploaded in the audit database for analytics.
Packet Hash: During the packet creation a hash of the data being collected is stored in these files so that the data can be verified when the packet reaches the server. We have two types of hash file, Packet Data Hash file & Packet Operation Hash file.
Before writing the packet into the local disk, the zipped content should be encrypted using Session and RSA public key (center specific) to secure the data. The same data can only be decrypted at server end where the private key is available.
Session Key Encryption:
Session key generation is a randomly generated and sent to client as part of sync from server.
Pass the created Zip object [in-memory] through the AES-256 bit encryption.
Pass the Random Session Key as a seed to this AES encryption.
Get the Registration Officer Id from user context object.
RSA Public Key Encryption:
AES Session key bytes pass through the RSA public key encryption.
Use the "#KEY_SPLITTER#" as a key separator for the AES encrypted bytes and the RSA Public key encrypted Session key seed.
Append the RSA Public key Encrypted Session Key, Key Separator to the AES encrypted bytes.
Append the EO and machine information as a META-INFO JSON file and create another ZIP out of it. [Packet Zip + META-INFO JSON]
Save the encrypted data as a ZIP in local file system under the defined location in configuration file.
You can find the more about ID Object in our document.
No PII (Personally Identifiable Information) data is captured in the audit logs.
Packet Encryption Procedure
MOSIP System performs demographic de-duplication for Person A by, i. Adding Person A's hashed demographic details (i.e. name, date of birth and gender) in the database. ii. Comparing Person's details against all the records in the database.
Let's say the MOSIP System find duplicates against three records - Person B, Person C and Person D. i. If Person B's registration has failed we consider Person B not to be a potential match for Person A. ii. If Person C's registration process in not complete, i.e. UIN is not generated for person C yet, we do not consider Person C to be a potential match for Person A in Demo Deduplication. iii. If Person D's registration is completed and a UIN is associated then we consider Person D to be a potential match for Person A.
Now the list of Potential Matches for Person A (here, we only have Person D as the only potential match, there can be a scenario where there are multiple potential matches for Person A) are sent to ABIS to perform de-duplication against the potential matches.
Here, we ask ABIS to just perform match of Person A's biometrics with Person D's biometrics, we call this process a Gallery Match in ABIS. As we are asking ABIS to perform biometric de-duplication of Person A against the gallery that we have sent. i. If the ABIS confirms that Person D's biometrics matches with Person A's biometrics, MOSIP would REJECT Person A's packet. ii. If the ABIS says that Person A's and Person D's biometrics are different, we move the packet for biometric deduplication.
In biometric de-duplication the MOSIP system sends the biometrics of the resident to an ABIS System (Automated Biometrics Identification System). Here, the expectation from the ABIS system is to perform biometric de-duplication (1:N match) against all the records that it has stored earlier.
MOSIP system receives a request to perform biometric de-duplication for Person A.
MOSIP system sends an insert request to the ABIS system to insert Person A's biometrics in ABIS via. MOSIP-to-ABIS queue.
ABIS system processes the request sent by MOSIP and sends a response back to MOSIP via. ABIS-to-MOSIP queue.
MOSIP system now sends a identify request to the ABIS system to perform de-duplication for Person A in ABIS via. MOSIP-to-ABIS queue.
ABIS System processes the request and sends the list of potential matches back to MOSIP via. a ABIS-to-MOSIP queue.
Let's say the ABIS system has found duplicates against three records - Person B, Person C and Person D. i. If Person B's registration has been REJECTED, we consider Person B not to be a potential match for Person A. ii. If Person C's registration is under processing, we consider Person C to be a potential match for Person A. iii. If Person D's registration is completed and a UIN is associated, we consider Person D to be a potential match for Person A.
Now the list of Potential Matches for Person A (here, we have Person C and Person D as the potential matches) are sent to Manual Adjudication System to take the final decision.
When biometric duplicates are found in ABIS, MOSIP system sends a request for Manual Adjudication to the Manual Adjudication System via. a queue. The system integrator can build the Manual Adjudication System, which would be listening to the MOSIP-to-ManualAdjudication queue for any Manual Adjudication requests and send a response back in the ManualAdjudication-to-MOSIP system after verifying the data.
The data sent to the Manual Adjudication system is driven by a policy defined in MOSIP and the specification is similar to ABIS identify request.
{
"id": "mosip.manual.adjudication.adjudicate",
"requestId": "4d4f27d3-ec73-41c4-a384-bf87fce4969e",
"responsetime": "2021-01-19T13:16:22.930Z",
"returnValue": "1",
"candidateList": {
"count": "1",
"candidates": [
{
"referenceId": "10002100741000120210107111325",
"analytics": { //This section is optional and can be decided by the System Integrator.
"primaryOperatorID": "110011",
"primaryOperatorComments": "<comments provided by operator>",
"secondaryOperatorID": "110012",
"secondaryOperatorComments": "<comments provided by operator>",
"key1": "value1",
"key2": "value2"
}
}
],
"analytics": { //This section is optional and can be decided by the System Integrator. This is used when there is no match found.
"key1": "value1",
"key2": "value2"
}
}
}
Biometric De-Duplication
Any Packet irrespective of it has gone through demographic de-duplication or ABIS gallery match, will have to go through the biometric de-duplication stage.
Process Flow
Manual Adjudication
Request sent to Manual Adjudication System
Response received from Manual Adjudication System
Process Flow for Biometric Deduplication
Resident services
Store identity information for a given UIN.
Update identity information partially or status of UIN.
Read identity Information associated with a valid UIN.
Read identity Information for a given RID.
Check status of UIN for validating a UIN.
The identity data stored inside the ID Repository is encrypted. This is the most critical storage repository and is configured keeping the following non-functional aspects in mind:
Scalability
Performance
High availability
Upon receiving the request to store identity details of an individual, the system validates input ID attributes in the request against MOSIP ID defined for the country.
Stores ID JSON, biometric documents, proof documents of an individual generated during registration.
On successful storage of identity for an individual, status of UIN of the individual by default is marked as 'ACTIVATED'.
Upon receiving a request to retrieve identity details of an individual based on input UIN or RID and type as an optional parameter, the system performs the following steps:
Validates if input UIN is 'ACTIVATED'.
Retrieves latest ID attributes of the individual.
The system retrieves and sends demographic or biometric details or both.
Upon receiving a request to update identity details of an individual, the system performs the following steps:
Validates if input UIN is 'ACTIVATED'
Updates input ID attributes of the individual.
Updates demographic/biometric/both
Updates status of UIN as 'DEACTIVATED' or 'BLOCKED' if requested.
Sends the response with updated ID details of the individual.
An individual's UIN/VIDS can be de-activated or re-activated.
An individual can lock or unlock a particular authentication type using resident services, for example, locking demographic and/or biometric authentication, the system locks the requested authentication type after certain validations. After the requested authentication type is locked for the individual, then he/she will not be able to authenticate himself/herself by using locked authentication type. Similarly, the individual can choose to unlock these authentication types.
Map Biometric Devices to Device Specifications using Device API
Map White-listed Device to a Center ID to which Registration Client is tagged using
Register Device - Biometric device can be registered using MOSIP using Register Device API
Biometric authentication for officer and supervisor can be enabled by updating the is_active column to true in mosip_master.app_authentication_method table. List of processes for which biometric authentication can be enabled in registration client
packet_auth (Authentication when packet is created)
login_auth (Login to registration client)
exception_auth (Authentication when an exception packet is created)
eod_auth (Authentication for apporoving EOD packets)
By default, username password based authentication is enabled for all the above processes.
Below properties should be enabled for performing local de-duplication. These properties are present in config file registration-env.properties
ABIS queue can be configured in RegistrationProcessorAbis-env.json file. registration-processor-abis-middleware-stage communicates to ABIS through queue configured. It sends request to inbound queue address and receives response from outbound queue address. If there are multiple ABIS, then it can be added in same file.
Below properties should be set in id-authentication-{env}.properties. The classes configured below will be loaded in classpath during application initialization.
Register MDS - MDS can be registered with MOSIP using Register MDS API
Register Device - Biometric device can be registered using MOSIP using
Update the code of the registered device to the serial number of the device in register_device_master and register_device_master_h table.
In order to capture encrypted biometrics from MDS, MDS should use Mosip Public Key. This key should be generated in MOSIP with IDA-FIR as reference-ID for Parter-based Individual Authentication and 'INTERNAL' as reference-ID for Internal Authentication.
MOSIP deals with sensitive information pertaining to the identity of people. It is a central repository of identity data and extra attention is paid to ensure the security and privacy of this data. MOSIP advocates minimalism in the data collected and incorporates features to minimise the interpretation of this data as information. A low-to-zero knowledge design paradigm is used to achieve this.
Data Sets in MOSIP
Master Data - This includes lookups, locations, centres, devices, zones etc. This is not sensitive information
Configuration Manager Data - This includes system configuration information and must be protected. It does not contain any personal information.
Registration Client Database - This is a local database in the registration client. This contains local copies of the relevant master data, downloaded pre-registration information and some transactional information. The pre-registration information is sensitive and encrypted and stored.
Registration Packets - Registration packets are created and encrypted in memory on the registration client and then persisted in the encrypted form. The sync process moves these packets to the server for processing. These packets are the source of truth and are digitally signed.
Registration Processor Database - The registration processor contains transactional information about the RIDs being processed and does not contain any personal information.
ID Repository Entries - The ID Repository contains the identity data. This includes biographic/demographic information and biometric information. The actual storage of these is distributed between RDBMS and object storage.
Authentication Entries - It has encrypted records with one-way linkage to the ID using cryptography. The information can be decrypted for return as part of the KYC response. Biometrics stored here are only non-reversible extracts. A low-resolution photograph can be stored for KYC purposes.
Partner Management Data - This contains protected information such as the API Key and Public Key of the partner. There is no personal information here.
Audit Trail - This does not contain any personal information. It does contain a transaction id for traceability.
Application Logs - These logs do not contain any personal information.
Resident Services Data - This has a transaction history with ID numbers but does not contain any personal information.
Pre-Registration Data - This has personal information and is stored in an encrypted form.
IAM Data - The mosip system user list is present here and this is protected information as it controls access to the system.
PII of an individual like name, age, gender, address etc... and other sensitive information must be signed and stored in an encrypted form.
Documents and images must not be stored in a database table. They must be stored in an object store and referenced in DB.
Object Store should have only encrypted data present in it with access control.
In MOSIP, the following users are defined to perform various activities and have control over the DB objects that are defined
sysadmin: sysadmin user is a super administrator role, who will have all the privileges to perform any task within the database. Currently, all the objects are owned by the sysadmin.
dbadmin: dbadmin user is created to handle all the database administration activities like monitoring, performance tuning, backups, restore, replication setup, etc.
appadmin: appadmin user is used to performing all the DDL tasks. All the DB objects that are created in these databases will be owned by appadmin user.
The MOSIP platform is being built for multiple countries, there is a need to support multiple languages. So as per the requirements, MOSIP will support multiple languages as configured by the country-level administrator. Multi-language support is needed for the following datasets.
Master Data
ID data of an individual
Transaction comments
From the database side, the data will support the UTF-8 Unicode character set to store data entered in multiple languages.
There will not be any in-built support to translate data at the database level. Any translation or transliteration will be handled at API or UI layer. Internationalization support is available to handle multiple language needs in the user interface and communication templates. For master data, the information can be stored in multiple languages. For user data, MOSIP supports the storage of data in two languages.
To support performance, the following database design features are to be considered
Database sharding: By default, the sharding algorithm is not applied in the MOSIP system. SI can define the sharding algorithm based on the deployment setup
All tables will have a primary key index on the primary key field. This will help in faster retrievals and joins
All foreign keys will have indexes defined so that they will help in faster joins
Meaningful Naming: DB objects that are being created will have meaningful naming.
Flexible model: No business rules are set at the database level other than a few mapping data. Most of the business logic is applied at the application layer.
Database-specific features: The use of DB-specific features like defaults, DB sequences, identify fields are not used.
Partner Self Service Portal
Upon receiving a request to create a partner with input parameters (Partner ID, Partner Organization Name, Partner Contact Number, Partner Email ID, Partner Address, IsActive), the system stores the data in the database.
Throws an error message if mandatory parameters are missing.
Upon receiving a request to fetch a Partner with input parameters (Partner ID and/or Partner Organization Name), the system fetches the data existing against the input parameter received.
If only Partner ID is received, fetches data against the Partner ID from the database
ID Authentication Audits
ID Authentication (ID Auth) provides an API based authentication mechanism for entities to validate individuals. ID Authentication is the primary mode for entities to validate an individual before providing any service.
ID Auth allows only partners to make authentication requests. The requests are cryptographically secured and verified. A partner that captures data from a biometric device must conform to standards to ensure interoperability.
The following events are triggered as part of User Event Type in ID Authentication Service module
Event ID
Event Type
Event Name
ID Authentication Functionality
Authentication is the process of verifying an identity claim against the registered identity information. Such information could be a personal identification information (PII) such as demographic details, biometric data such as a fingerprint, iris or face and OTP on the registered email or phone number. MOSIP provides APIs using which an individual can perform such authentications after registering in MOSIP.
Authentication can be performed in MOSIP by a registered authentication partner over a secure network provided by MOSIP Infrastructure Service Provider (MISP). You can know more about these MOSIP partners on MOISP's Partner Management.
MOSIP's authentication service allows a registered MOSIP authentication partner to perform various types of authentications. The types of authentications that can are currently allowed are mentioned below and the API specification for services is available in document.
Using the MOSIP's authentication service a registered authentication partner can request for biometric authentication. Currently, we support biometrics authentication using face, finger and iris. MOSIP adopters can choose to add more biometric types to perform biometric authentication.
Hardware Security Module HSM Specifications
HSM stands for Hardware Security Module and is an incredibly secure physical device specifically designed and used for crypto processing and strong authentication. It can encrypt, decrypt, create, store and manage digital keys, and be used for signing and authentication. The purpose is to safeguard and protect keys.
MOSIP highly recommends the following specifications for HSM:
Must support cryptographic offloading and acceleration.
Should provide Authenticated multi-role access control.
Gitub Workflow
The recommended Github work flow here is for developers to submit code and documentation contributions to MOSIP open source repositories.
Fork MOSIP repository of interest from https://github.com/mosip/
Clone the fork to your local machine. Eg:
Code of Conduct
In the interest of fostering an open and welcoming environment, we as contributors and maintainers pledge to making participation in our project and our community a harassment-free experience for everyone, regardless of age, body size, disability, ethnicity, sex characteristics, gender identity and expression, level of experience, education, socio-economic status, nationality, personal appearance, race, religion, or sexual identity and orientation.
Examples of behaviour that contributes to creating a positive environment include:
Using welcoming and inclusive language
Auth SpringBoot User Guide
This document lists out the instructions on how to use the in a Spring Boot application.
Step 1:
Step 2:
Must have strong separation of administration and operator roles.
Capability to support client authentication.
Must have secure key wrapping, backup, replication and recovery.
Must support 2048, 4096 bit RSA Private Keys, 256 bit AES keys on FIPS 140-2 Level 3 Certified Memory of Cryptographic Module.
Must support at least 10000+ 2048 RSA Private Keys on FIPS 140-2 Level 3 Certified Memory of Cryptographic Module.
Must support clustering and load balancing.
Should support cryptographic separation of application keys using logical Partitions.
Must support M of N multi-factor authentication.
PKCS#11, OpenSSL, Java (JCE), Microsoft CAPI and CNG.
Minimum Dual Gigabit Ethernet ports (to service two network segments) and 10G Fibre port should be available.
Should have the ability to backup keys, replicate keys, store keys in offline locker facilities for DR. The total capacity is inline with the total number of keys prescribed.
Clustering minimum of 20 HSMs.
Less than 30 seconds for key replication across the cluster.
A minimum of 30 logical partitions and their license should be included in the cost.
If Partner Organization Name is received, fetches data against the Partner Organization Name from the DB
If both Partner ID and Partner Organization Name are received, fetches data against the combination of both the input parameters
If the input parameter received is null or empty, fetches all the data
Fetches only active data from the database
If the data does not exist for input parameters received, throw the appropriate message.
In case of exceptions, the system should trigger relevant error messages.
Upon receiving a request to update a Partner with input parameters (Partner ID, Partner Organization Name, Partner Contact Number, Partner Email ID, Partner Address, IsActive) the system updates the data as per the below steps:
Partner ID serves as search criteria to update the record in the database
Updates the data received against the data already existing in the database against the Partner ID received
If the mandatory input parameters are missing, throws the appropriate message.
In case of exceptions, the system triggers relevant error messages.
Upon receiving a request to deactivate a Partner with input parameters (Partner ID), the system deactivates the data as requested
Responds to the source with the required message
If the mandatory input parameters are missing, throw the appropriate message
In case of exceptions, the system triggers relevant error messages
Upon receiving a request to create a Policy with input parameters (Policy ID, Policy Name, Policy Description, Policy Json File, IsActive), the system stores the data in the database and responds to the source with the required message
If the mandatory input parameters are missing, throw the appropriate message
In case of exceptions, the system should trigger relevant error messages
The system receives a request to fetch a Policy with input parameters (Policy ID and/or Policy Name)
Fetches the data existing against the input parameter received
Responds to the source with the required data
If only Policy ID is received, fetches data against the Policy ID from the database
If Policy Name is received, fetches data against the Policy Name from the database
If both Policy ID and Policy Name are received, fetches data against the combination of both the input parameters
If the input parameter received is null or empty, fetches all the data
Fetches only active data from the database
If the data does not exist for input parameters received, throw the appropriate message.
In case of exceptions, the system triggers relevant error messages
Upon receiving a request to update a Policy with input parameters (Policy ID, Policy Name, Policy Description, Policy Json File, IsActive), the system updates the data and responds to the source with the required message
Policy ID serves as search criteria to update the record in the database
Updates the data received against the data already existing in the database against the Policy ID received
If the mandatory input parameters are missing, throws the appropriate message
In case of exceptions, the system triggers relevant error messages
Upon receiving a request to delete a Policy with input parameters (Policy ID) the system deletes the data as requested and responds to the source with the required message
If the mandatory input parameters are missing, throws the appropriate message
In case of exceptions, the system triggers relevant error messages.
Upon receiving a request to create a Partner-Policy Mapping with input parameters (Partner ID, Policy ID, IsActive), the system stores the data in the database and responds to the source with the required message:
Input parameters must be present as mentioned below:
Partner ID - Mandatory
Policy ID - Mandatory
IsActive - Mandatory
There can only be one Policy mapped to a Partner
If the mandatory input parameters are missing, the system throws the appropriate message
In case of exceptions, the system triggers relevant error messages.
Upon receiving a request to fetch a Policy with input parameters (Partner ID), the system fetches the data existing against the input parameter received and responds to the source with the required data as per the below steps:
Fetches the Policy mapped to the Partner ID received in the input
Fetches only active data from the database
If the mandatory input parameters are missing, throws the appropriate message.
If the data does not exist for input parameters received, throw the appropriate message
In case of exceptions, the system triggers relevant error messages.
Upon receiving a request to update a Partner-Policy Mapping with input parameters (Partner ID, Policy ID, IsActive), the system updates the data and responds to the source with the required message as per the below steps:
Input parameters must be present as mentioned below:
Partner ID - Mandatory
Policy ID - Mandatory
IsActive - Mandatory
Partner ID serves as search criteria to update the record in the database
There can only be one Policy mapped to a Partner
Updates the data received against the data already existing in the database against the Partner ID received
If the mandatory input parameters are missing, throw the appropriate message
In case of exceptions, the system triggers relevant error messages.
Upon receiving a request to delete a Partner-Policy Mapping with input parameters (Partner ID, Policy ID), the system deletes the data as requested and Responds to the source with the required message
Input parameters must be present as mentioned below:
Partner ID - Mandatory
Policy ID - Mandatory
If the mandatory input parameters are missing, throw the appropriate message
In case of exceptions, the system triggers relevant error messages.
An Authentication partner can generate an API key for a policy which is mapped with the partner.
Once a MISP partner is active it can generate a license key that can be shared with Relying Parties for authentication.
Upon receiving a request to validate the Digital Certificate provided by a Partner with Input (Digital Certificate), the system does the following:
Validates the Digital Certificate
Signs the Digital Certificate with MOSIP's Certificate and issue a Certificate Chain
Responds with the signed certificate to the source
If the mandatory input parameters are missing, throws the appropriate message.
In case of exceptions, the system triggers relevant error messages
Upon receiving a request to get Public Key with an input parameter (Date Time-stamp) the system performs the following steps:
The system calls the Key Manager Service to get the Public Key with Input Parameter (Application ID, Reference ID, Date Time-Stamp)
Retrieves the Public Key as per the timestamp.
Responds to the source with the Private Key
The Public Key should be a valid and active key for the time-Stamp received
The Public Key corresponds to the Private Key used by the IDA
If the mandatory input parameters are missing, the system throws the appropriate message.
In case of exceptions, the system triggers relevant error messages.
1. Partner Management
A. Create a Partner
B. Read Partner
C. Update Partner
D. Deactivate Partner
2 Policies Management
A. Create a Policy
B. Read Policy
C. Update Policy
D. Delete Policy
3 Partner Policy Mapping
A. Create Partner-Policy Mapping
B. Read Policy Json File based on Partner ID
C. Update Partner-Policy Mapping
D. Delete Partner-Policy Mapping
4 Generate API Key
6 MISP License Key Generation
7 Validate and Re-issue Digital Certificate to Partner
8 Distribution of Public Keys to Partners
Being respectful of differing viewpoints and experiences
Gracefully accepting constructive criticism
Focusing on what is best for the community
Showing empathy towards other community members
Examples of unacceptable behaviour by participants include:
The use of sexualised language or imagery and unwelcome sexual attention or advances
Trolling, insulting/derogatory comments, and personal or political attacks
Public or private harassment
Publishing others' private information, such as a physical or electronic address, without explicit permission
Other conduct which could reasonably be considered inappropriate in a professional setting
Project maintainers are responsible for clarifying the standards of acceptable behaviour and are expected to take appropriate and fair corrective action in response to any instances of unacceptable behaviour.
Project maintainers have the right and responsibility to remove, edit, or reject comments, commits, code, wiki edits, issues, and other contributions that are not aligned to this Code of Conduct, or to ban temporarily or permanently any contributor for other behaviours that they deem inappropriate, threatening, offensive, or harmful.
This Code of Conduct applies both within project spaces and in public spaces when an individual is representing the project or its community. Examples of representing a project or community include using an official project e-mail address, posting via an official social media account, or acting as an appointed representative at an online or offline event. Representation of a project may be further defined and clarified by project maintainers.
Instances of abusive, harassing, or otherwise unacceptable behaviour may be reported by contacting the project team at conduct@mosip.io. All complaints will be reviewed and investigated and will result in a response that is deemed necessary and appropriate to the circumstances. The project team is obligated to maintain confidentiality with regard to the reporter of an incident. Further details of specific enforcement policies may be posted separately.
Project maintainers who do not follow or enforce the Code of Conduct in good faith may face temporary or permanent repercussions as determined by other members of the project's leadership.
This Code of Conduct is adapted from the Contributor Covenant, version 1.4, available at https://www.contributor-covenant.org/version/1/4/code-of-conduct.html
For answers to common questions about this code of conduct, see https://www.contributor-covenant.org/faq
Add the Auth Adapter module to your project as a maven dependency
Add ComponentScan annotation as shown below to your project. This is to create auth adapter bean.
To restrict access to your endpoints, you need to add the @PreAuthorize annotation. Look at the below example for reference.
There are few more methods available apart from hasAnyRole like hasRole. Look in to the @PreAuthorize documentation for more details.
Note: Now we support only hasRole and hasAnyRole methods.
To make any kind of HTTP or HTTPS calls to a mosip's micro service that also injected the Auth Adapter, use the standard RestTemplate capabilities as shown below.
Intially autowire the RestTemplate in the class where you are going to make an API call.
Now make the call using the autowired restTemplate as shown in the sample below:
Note: Do not create a new instance of the RestTemplate instead use the autowired one.
final String uri = "http://localhost:3001/api/location";
LocationDao response = restTemplate.getForObject(uri, LocationDao.class);
No business logic is applied at the database level, only Primary, Unique, foreign keys and not-null are applied. Foreign keys are applied within the same database, if a table is referenced in another database then no FK is applied.
Database-specific features like triggers, DB functions like sequence generators etc.… must not be used in MOSIP. This avoids vendor lock-in
The surrogate key, wherever used, must be a random number and not be generated based on the record data or sequence number.
Direct queries on the database by a human must not be made. Database administrators must ensure this control during database configuration setup
The database is setup in UTF-8*** file format to support multiple languages
The following data types are used
Character Varying
Timestamp
Date
Integer
Number
Bytea/blob
Boolean
Application User: Each module will have a user created to perform DML tasks like CRUD operations. Will have masteruser, prereguser, idauser, idrepouser, idmapuser, kerneluser, audituser, regprcuser, keymgruser, regdeviceuser, authdeviceuser to perform tasks in respective modules.
Labels used in UI
Messages and notifications
No referential integrity is applied on tables across databases
Partitioning: Partitioning design is database-specific. Depending upon the chosen database, the country may employ the partitioning approach as prescribed by the database engine"
Data in object stores should be easily addressable with hierarchical path conventions
No business logic at DB: No business logic implemented at the database level other than PK, UK, and FKs.
Data Security: Individual and security-related information is encrypted.
Data Storage Guidelines
Logical view of MOSIP data system
Access Control to Data
From the above set of roles, only the application user is specific to a module. The other users are common and need to be created per PostgreSQL DB instance.
Multi-Language
Performance
Data Model Consideration
Description
Reference ID
Reference ID Type
IDA_001
User
Authentication Request
This event triggers an API call to Authenticate applicant request.The status is either true or false
UIN/VID
UIN/VID
IDA_002
User
OTP Request
This event triggers an API call to Authenticate OTP request.The status is either true or false
The following events are triggered as part of System Event Type in ID Authentication Service module
Event ID
Event Type
Event Name
Description
Reference ID
Reference ID Type
IDA_004
System
Internal Authentication Request
ID Authentication Service
User Event Type
System Event Type
MOSIP connects with a biometric SDK, to perform biometric authentication. Refer our page on
for various interfaces using which adopters can connect their biometric SDKs with MOSIP.
Using the MOSIP's authentication service a registered authentication partner can request for demographic authentication. Currently, we support demographic authentication for the following id attributes - Name, DOB, Age, Gender, Address and FullAddress.
Name - the name received in authentication request is compared with the individual's name saved in the authentication database
DOB - the DOB received in authentication request is compared with the individual's date of birth saved in the authentication database
Age - the age received in authentication request is compared with the age of the individual which is derived from the date of birth stored in the authentication database
Gender - the gender received in authentication request is compared with the individual's gender saved in the authentication database
Address - the address attributes received in authentication request is compared with the individual's address attributes saved in the authentication database
MOSIP supports only exact match for the demographic authentication of the individual and does not perform any validations related to partial match and phonetics match. No error messages related to partial match and phonetics match are triggered.
Using the MOSIP's authentication service a registered authentication partner can request for OTP authentication. Before performing OTP based authentication the Partner needs to request for an OTP using the individual's ID and use it for OTP based authentication.
Using various combination of above authentication modalities (fingerprint, face, iris, demographics or OTP based authentication) we can also perform authentication using the same authentication service.
The partner who is requesting for these authentications must make sure that all the below mentioned rules are taken into account before sending an authentication request to MOSIP.
The authentication request should have signature of the request in the header signed by the authentication partner.
The biometric data should be sent in as a JWT token where the payload base64URL encoded and the signature is signed using the device key. More details of the biometric data block is available in the document.
The request should be sent to the authentication server, within a set time period in the configurations (i.e. time period between the current time stamp and the request time stamp is <= time period set in configurations).
Based on the policy linked to a MOSIP authentication partner, a partner can be eligible to perform e-KYC. In an e-KYC request, the MOSIP authentication partner can request to fetch the KYC details of the individual based on a pre-defined policy. KYC details in MOSIP is only provided to the partners after the individual's consent using OTP or biometric authentication.
The request for e-KYC service is similar to that of authentication service, you can view the details about the API specification in our ID Authentication API Specification document.
Various internal MOSIP modules for need to use the authentication services. The scenarios where authentication of biometrics are needed are,
Authenticating an officer or supervisor when they on-board into the registration client.
Processing of packets in registration processor where,
The officer or supervisor has performed biometric authentication.
The introducer's biometrics are collected for authentication in the server side.
The individual's biometrics are collected for authentication when he/she is trying to update his/her demographic details.
The internal authentication service supports authentication for all the modalities mentioned as part of authentication service but is only accessible bby the internal modules post authorization. The details about the internal authentication API specification is available in our ID Authentication API Specification document.
Below are the various validations that are performed in the authentication server when MOSIP's authentication service receives an authentication or e-KYC request from a Partner.
Verify if the Partner ID, MISP ID and Partner API Key is valid
Verify if the signature of the request is valid
Verify if the request has reached the authentication server with in the time period configured
Verify if the environment details, domain URI & consent token is valid
Verify if the authentication request has data as per the authentication mode selected
Verify if the partner is eligible for performing the authentication as per the partner's policy linked to the Partner API key
Verify if the VID or UIN details received is valid
In case of biometric data,
Verify if the biometric block is signed using the device key
Verify if the digital ID block is signed using the foundational trust module's key
After every authentication performed in MOSIP, an authentication token is generated in MOSIP. This token is generated based on policy defined for the partner. The token is basically a random id which can be unique per authentication transaction, unique per partner and individual or unique per partner policy group and individual.
After every authentication a notification is trigger to the registered email id or phone number of the individual based on the configuration defined for mode of communication. The notification to be sent to the individual can also be single or bi-lingual based on the configurations and template used.
The address attributes are generalized as location 1, location 2 and location 3
The adopter has to define and map the address specific attributes against addressLine2, addressLine3, and location specific attributes against location1, location2, location3 of a country. For example: addrLine1 means House No, addrLine2 means Street No, and addrLine3 means Locality; similarly loc1 means Local Administrative Authority, loc2 means Province and loc3 means Region.
The Audit Manager in MOSIP captures all the information about the actions performed by various MOSIP applications. This information can further be used for data analysis which will help in inspecting, cleansing, transforming, and modeling data to discovering useful information, informing conclusions, and decision-making.
Audit Log Parameters
The following parameters are captured as a part of the audit service,
Parameters
Description
Example
Abbreviation
Definition
ID Repository Audits
ID Repository contains the record of identity for an individual, and provides API based mechanism to store, retrieve and update identity details by other MOSIP modules.
ID Repository Service
The ID Repository functionality will store identity data and documents and also retrieve stored identity details by UIN or VID upon receiving the request.
User Event Type
The following events are triggered as part of System Event Type in ID Repository Service module
Event ID
Event Type
Event Name
Description
Reference ID
Reference ID Type
Auth Adapter
Auth adapter is a package that needs to be injected into Mosip's applications exposing REST API's inorder to secure them.
Auth Adapter Flow
Auth Adapter includes following class definitions:
This template is used in email notification sent to the applicants when they completes their pre-registration appointment booking. This email is sent to the applicant's email id which is collected as part of pre-registration data collection.
Template type code: Email-Acknowledgement
Sample template:
Dear $name,
Your Pre-Registration for UIN is Completed Successfully on $Date at $Time. Your ID is #$PRID.
Appointment is scheduled for $Appointmentdate at $Appointmenttime.
you will also receive the details on your registered Mobile Number
Attributes:
$name - Name of the applicant
$date - Date when pre-registration was done
$time - Time when pre-registration was done
$PRID - Pre-registration ID of the applicant
$Appointmentdate - Appointment date
$Appointmenttime - Appointment time
This template is used in sms notification sent to the applicants when they completes their pre-registration appointment booking. This sms is sent to the applicant's mobile number which is collected as part of pre-registration data collection.
Template type code: SMS-Acknowledgement
Sample template:
Attributes:
$date - Date when pre-registration was done
$time - Time when pre-registration was done
$PRID - Pre-registration ID of the applicant
This template is used to set the subject of the email notification sent to the resident.
Template type code: Acknowledgement-email-subject
Sample template:
Attributes:
$PRID - Pre-registration ID of the applicant
This is a template for taking consent of the applicant before he/she provides his/her demographic details.
Template Type Code:
Sample Template: consent
Attributes: This template doesn't support any attributes.
This template is used in the SMS or Email notification sent to resident when their appointment is cancelled.
Template type code:
Sample template:
Attributes:
$name - Name of the applicant
$PRID - Pre-registration ID of the applicant
$Appointmentdate - Appointment date of the applicant
Template type code: Onscreen-Acknowledgement
Sample template:
Attributes: This template doesn't support any attributes.
File Name:
For details about the pre-registration UI specification, please go through page.
This is a mapping file for the Pre-registration ID object. The fields name, proofOfAddress, and postalCode are the only attributes that are used internally in Pre-registration.
name - Name of the applicant. It is used in notification templates & the Pre-registration dashboard screen.
proofOfAddress - Document containing Proof of Address. It is used in the document upload screen to fetch the address document from another applicant.
postalCode - Postal Code in the Address. To fetch the list of centers for the postal code provided by the individual while providing the demographic details.
File Name:
Issue Reporting Guideline
Pre-requisite
MOSIP issues are maintained in Github. File the issue against the right repository.
Reporting Issues
Check if the issue is already reported.
Check if the issue is already fixed.
If not, just go and file the issue
Template for filing new issues
Describe the issue A clear and concise description of what the bug is.
To Reproduce Steps to reproduce the behavior:
Expected behavior A clear and concise description of what you expected to happen.
Actual behavior A clear and concise description of what you see.
Screenshots If applicable, add screenshots to help explain your problem.
Environment (please complete the following information): Hardware and software details such as client OS, Server OS, Browser details etc
Attach logs Helps in faster resolution of data
Additional context Add any other context about the problem here.
Check if the feature is already reported.
Check if the feature is already fixed.
If not, just go and file the feature request
What is the current limitation without the feature
Describe the feature request
What would the key benefits of this feature
Do you have any recommendations and solutions that are existing in the field
Any technology/solution recommendation would be highly appreciated
Deployment Architectures
Introduction
Running a national ID system is no mean task and involves numerous challenging aspects. The software system at the core is a critical infrastructure and needs to address high availability, reliability, scalability, security, resilience, and manageability. Choosing the right deployment architecture plays an important role in helping achieving architectural goals while also catering to the law of the land. Cost of implementing such an architecture also matters.
Mosip has a micro-services architecture that organizes functionality into myriad small services and execution units. Each of these can be scaled separately as well as replaced / upgraded. This makes the platform powerful and provides plenty of flexibility and configurability in the hands of the implementor. There is also the corresponding complexity of dealing with a higher number of components in the system in the areas of configuration, security, deployment, dependency management, monitoring and testing.
Deployment architecture choices
In order to get the best out of mosip and keep manageability high the deployment architecture plays a crucial role. Let us take a look at a few of the common deployment architecture options available based on various perspectives.
Packaging choices
Option 'Jar' - Spring boot services in Virtual Machines|
Option 'Docker' - Dockers on a Kubernetes container management setup
Infrastructure choices
Option 'On-Premise' - Deploy in a private or own data center
Option 'Cloud' - Deploy in a cloud
Platform choices
Option 'Open Source' - Proven community favored platforms
Option 'Cloud Native' - Cutting edge supported cloud technologies from AWS, Azure, GCP et al
The architecture proposed may be deployed on-premise or cloud. Here, all MOSIP modules are installed with clear separation between militarised and demilitarised zones.
For linear scaling of capacity and provisioning of hardware, a cell based architecture (along with secure zones) may be preferred.
A hybrid architecture may be considered where benefits of cloud and on-premise are leveraged. While cloud provides rapid deployment and ease of management, on-premise can facilitate data localization and any other policy requirements.
An example of hybrid architecture is given below:
Cell Based Deployment Architecture
Context
Scalability of complex systems is non-trivial especially when there are multiple running components like microservices, databases, storage clusters etc. with complex interactions. End-to-end performance modelling of such a system poses significant challenges as the performance of the 'whole' does not have a straight-forward linear relationship to its 'parts'.
MOSIP recommends a cell architecture where hardware and software within a cell is fixed (canned), and the cell is benchmarked for input/output capacity. Such cells, then, may be replicated to scale up capacity in a production depolyment with traffic diverted to them via a load balancer. Ideally, each cell must be islolated from each other without any cross-dependencies. Practically, however, they may share certain resources. Scalabilty of such common resources needs to addressed separately.
This document presents cell architecture for all major MOSIP modules for production deployment.
Registration Processor Cell
The following resources are shared across cells:
ABIS Queue
Registration Process DB
ID Repository HDFS/CEPH cluster
ID Repository DB
The communication between Demilitrized Zone (DMZ) and Militarized Zone (MZ) is strictly via a firewall.
The encrypted packets from registration client first land into Packet Landing Zone in the DMZ. Some of the Registration Processor stages run in the DMZ for initial packet handling.
UIN/VID
UIN/VID
IDA_003
User
eKYC Request
This event triggers an API call to Authenticate eKYC request.The status is either true or false
UIN/VID
UIN/VID
This event triggers an API call to Authenticate internal applicant request.The status is either true or false.
UIN/VID
UIN/VID
IDA_005
System
Internal OTP Request
This event triggers an API call to Authenticate internal OTP request.The status is either true or false..
UIN/VID
UIN/VID
IDA_006
System
Retrieve Authentication Type Status Request
This event triggers a request to retrieve authentication type status.
UIN/VID
UIN/VID
IDA_007
System
Update Authentication Type Status Request
This event triggers a request to update authentication type status to true or false.
UIN/VID
UIN/VID
IDA_008
System
Retrieve Authentication Transaction History Request
This event triggers a request to retrieve authentication transaction history.The authentication transaction history status is either true or false.
UIN/VID
UIN/VID
IDA_009
System
Credential Issued
This event describes that the credential issuance for mosip partner is successful.
UIN/VID
UIN/VID
IDA_010
System
Remove ID
This event describes that the removal of mosip partner is successful.
UIN/VID
UIN/VID
IDA_011
System
Deactivate ID
This event describes that the deactivation of mosip partner is successful.
UIN/VID
UIN/VID
IDA_012
System
Activate ID
This event describes that the activation of mosip partner is successful.
UIN/VID
UIN/VID
Template for filing new feature request
Features/Enhancement request guidelines
Verify if the timestamp in the digital ID block has reached the authentication server within the configured time period
Once all the above validations are completed the biometrics are sent to the SDK for finding the match
$ git commit -m "[MOS-2346] Adding new upload feature in Pre registration module for POA documents"
$ git pull upstream <branch>
$ git push
Your Pre-Registration for UIN is Completed Successfully on $Date at $Time.
Your ID is #$PRID.
Appointment is scheduled for $Appointmentdate at $Appointmenttime.
You will also receive the details on your registered email address.
Pre-Registration $PRID: Acknowledgement
I understand that the data collected about me during pre-registration by the said authority includes my -
• Name
• Date of birth
• Gender
• Address
• Contact details
• Documents
I also understand that this information will be stored and processed for the purpose of verifying my identity in order to access various services, or to comply with a legal obligation. I give my consent for the collection of this data for this purpose.
Dear $name,
Your appointment for pre-registration id, $PRID and appointment date and time, $Appointmentdate $Appointmenttime has been canceled due to a government emergency/holiday. Please re-book another slot for Registration.
Thanks
Test Rig represents a one click automation to build, deploy and test a software module. Successful execution of test rig would ascertain complete setup of the MOSIP platform.
Test-Rig comprises of multiple components starting from:
Kubernetes env setup
Pulling the source code from the GIT repository
Running sonarqube tests for static code analysis
MOSIP platform architecture is mainly based on Micro services and SEDA architecture. Therefore it predominantly comprises of Rest & JAVA APIs. Therefore test automation best serves the purpose of detailed API level testing. Test automation is the key to the successful testing of individual APIs and their interrelation with interdependent APIs. It ensures comprehensive test coverage and test data.
Automation deliverables mainly comprises of individual module level suites for the individual MOSIP modules:
Pre-Registration
Registration Client
Registration Processor
Additionally there will be an end to end, system level test suite that will cut across all modules covering the functionality
The below diagram depicts the various building blocks of the module level suite.
Salient features
The automation suite is configurable to selectively execute tests such as Sanity or/and Regression
Each module level suite covers API and inter API automation
The individual module level test suites and the end to end suite are triggered via the CI/CD pipeline and run post application deployment
The user guides listed below detail the usage of individual module level automation suites
End to end system level Test Rig covers the functionality across the modules starting with Pre-Registration and ending in Registration Processor or IDA.
The below diagram depicts the overall design of the end to end suite.
Security Tools
Product Name
Description
Purpose
Com/Open Source
CI
find_sec_bugs
Scans source code for vulnerable code, Has the abilty to integrate into developer machine. Effective with Java
The has some basic ethics that must while operating within the MOSIP community. Make sure you read it completely. If you have any queries/suggestions, direct them to .
If you are a developer willing to contribute to MOSIP, take a look at .
Congratulations! You've successfully bootstrapped yourself into the world of MOSIP. Welcome aboard!
Curious about where you can contribute? There are plenty of ways to get involved with MOSIP :
Requirements and Design
Share new requirements and ideas
Review and provide feedback on design and architecture
Coding
Fix issues and enhance features
Review code contributions
Triage and resolve bugs
Testing
Run tests on unstable builds
Create and add new tests
Fix test scripts and generate test data
Documentation
Correct and improve documentation
Test documentation and report any issues
Fix documentation issues
Localize documents (French, Arabic, and Spanish are currently in high demand!)
Fantastic! Submit a pull request by following our .
Fantastic! We'd love to hear your feedback. If you've discovered an issue or have an idea for an enhancement, please submit it to our . Be sure to follow the to help us address it efficiently. Your contributions are invaluable in helping us improve!
For the quality gurus and the testing geeks! Join the MOSIP testers group where you get to contribute towards improving the quality of MOSIP releases making it stable and better adoptable. Lots of material about the such as building and running the test rig, documentation to modify code, test scripts, and test data generation have been made available.
We're here to assist you every step of the way!
Join the: Stay up-to-date with the latest announcements, discussions, and support from the MOSIP developer community.
Join Our Community Room via : Connect with fellow community members, ask questions, and get support from experienced developers. It's a great place to collaborate and learn from others!
Steps to Install Clam AntiVirus Version 0.101.0
ClamAV is a free, cross-platform and open-source antivirus software toolkit able to detect many types of malicious software, including viruses.
Steps to install ClamAV in RHEL-7.5
To install clamAV first we need to install EPEL Repository:
After that we need to install ClamAV and its related tools.
After completion of above steps, we need to configure installed ClamAV. This can be done via editing /etc/clamd.d/scan.conf. In this file we have to remove Example lines. So that ClamAV can use this file's configurations. We can easily do it via running following command -
Another thing we need to do in this file is to define our TCP server type. Open this file using -
Auth Angular User Guide
Guidelines to implement Authorization and Authentication techniques in the Angular application are detailed in this document.
Before going in to the components let us discuss the following flows of Authorization and Authentication.
Initially a login request is made passing user credentials to a REST API as specified in the SPECS of that API.
In the response of a successful authentication you will receive user details and an auth_token as the value of the header "Authorization"
here this we need to uncomment line with #LocalSocket /var/run/clamd.scan/clamd.sock. Just remove # symbol from the beginning of the line.
Now we need to configure FreshClam so that it can update ClamAV db automatically. For doing that follow below steps -
First create a backup of original FreshClam Configuration file -
In this freshclam.conf file, Here also we need to remove Example line from the file. Run following command to delete all Example lines-
Test freshclam via running-
After running above command you should see an output similar to this -
We will create a service of freshclam so that freshclam will run in the daemon mode and periodically check for updates throughout the day. To do that we will create a service file for freshclam -
And add below content -
Now save and quit. Also reload the systemd daemon to refresh the changes -
Next start and enable the freshclam service -
Now freshclam setup is complete and our ClamAV db is upto date. We can continue setting up ClamAV. Now we will copy ClamAV service file to system service folder.
Since we have changed the name, we need to change it at the file that uses this service as well -
Remove @ symbol from .include /lib/systemd/system/clamd@.service line and save the file.
We will edit Clamd service file now -
Add following lines at the end of clamd.service file.
And also remove %i symbol from various locations (ex: Description and ExecStart options). Note that at the end of the editing the service file should look something like this -
Now finally start the ClamAV service.
If it works fine, then enable this service and test the status of ClamAV service -
Now in MOSIP we require ClamAV to be available on Port 3310. To expose ClamAV service on Port 3310, edit scan.conf
and Uncomment #TCPSocket 3310 by removing #. After that restart the clamd@scan service -
Since we are exposing ClamAV on 3310 port, we need to allow incoming traffic through this port. In RHEL 7 run below command to add firewall rule -
Now the received auth token has to be stored and re-used. For example let us use sessionStorage to store the auth_token under the key "TOKEN".
Now any kind of HTTP/HTTPS requests we make from the application has to be sent by adding a header "Authorization" and value of auth_token stored in sessionStorage with key by name "Token" for the purpose of authentication.
If the response comes back with a new token which might be because of previous token getting expired or refresh token mechanisms that happen in the backend, we need to replace the old token with the new one in the session storage.
After successful login the user details are sent to the client(Angular application/ Browser).
Now store the userDetails in the sessionStorage for example under the key "UserDetails".
Now we need to hide some pages/components/user action elements etc. based on the roles that the user possess.
To implement the Authentication and Authorization flows mentioned above, all we need to do is implement an Interceptor and a Directive which were mentioned above and detailed below.
Tasks to be implemented in a Client/UI Http interceptor are:
Append "Authorization" header to the request using the token value stored in the session storage.
Replace/Add the session storage token value with the one received in the response "Authorization" headers.
Below code implements the requirements mentioned above:
Role of the Roles directive is to fetch roles from UserDetails stored in the session storage and verify if the user has required roles to perform some action or read some details and restrict access accordingly.
Below code implements the requirements mentioned above:
Now inject the above interceptor and directive in the app.module.ts as follows
To activate/deactivate => show/hide element all we need to do is add the appRole attribute to the HTML element as shown below:
In the above sample, the add button will only be visible for users with DIVISION_ADMIN or SUPERVISOR role.
Authentication flow:
Authorization flow:
Implementation of above flows:
Http Interceptor
Roles Directive
Note: Above mentioned code snippets are not the final implementations. Based on the API specs and a few other factors the method implementations might change a bit. However, the component structures remain the same.
ClamAV update process started at Thu May 23 07:25:44 2019
.
.
.
.
main.cvd is up to date (version: 58, sigs: 4566249, f-level: 60, builder: sigmgr)
Downloading daily-25584.cdiff [100%]
daily.cld updated (version: 25584, sigs: 1779512, f-level: 63, builder: raynman)
bytecode.cld is up to date (version: 331, sigs: 94, f-level: 63, builder: anvilleg)
Database updated (6345855 signatures) from database.clamav.net (IP: 104.16.218.84)
$ vim /usr/lib/systemd/system/clam-freshclam.service
The printing and delivery of cards in a foundational ID system highly depend upon the printing capacity and postal infrastructure of the country. The last mile delivery of the resident's card is unreliable in many developing countries. Based on the need of the hour, in MOSIP we have added a new feature to download the resident's card using the resident service APIs or receive the card at an assisted kiosk using the admin portal.
Download cards using the admin portal
The admin with the role "DIGITALCARD_ADMIN" has the privilege to download the digital copy of the UIN card for the residents (currently as a PDF). Here the resident reaches the centre and requests the admin to provide a PDF version of their ID card.
To download the card,
The admin logs into the admin portal and navigate to the Download Card option on the left navigation pane.
The admin now enters the registration ID shared by the resident and clicks on the search icon to check if the registration ID exists and proceeds for further verification. The admin can use a QR code or barcode scanner to scan the registration ID from the registration slip available with the resident instead of typing the same to avoid mistakes.
If a card is available for that registration ID, the photograph along with the date of birth of the resident is displayed on the screen.
Now the admin can perform a manual verification to confirm the identity of the resident or the country can customize this section to add an SDK to perform local authentication.
If the identity of the resident can be verified, the admin has to provide consent by clicking on the "I have verified the face" option and downloading the card.
If the face does not match then the request for downloading the card is rejected.
The card downloaded here can be printed and a physical copy of the same can be shared with the resident.
The admins who have the additional role "DIGITALCARD_ADMIN" only have the privilege to see the option to download a card.
There is a limit added for the admins per day to search a registration ID but the limit doesn't reduce when there is a failed attempt. The limit here is configurable by the country.
All the transactions successful or failed are logged in the audit table which can be further used for analytics.
If this API is added to the resident portal of the country, then the resident should be able to download the digital copy of his/her card using OTP authentication. The details about the API are listed below:
Request URL
POST https://{base_url}/resident/v1/req/rid-otp
Request body
Response body
Request URL
POST https://{base_url}/resident/v1/req/rid-digital-card
Request body
Response
A password-protected PDF file containing the digital version of the resident's ID card.
Docker Images required on top of 1.1.5.5 version of MOSIP.
digital-card-service : 1.1.5.6
id-repository : 1.1.5.6
resident-services : 1.1.5.4
Add key policy for DIGITAL_CARD in key_policy_def and key_policy_def_h tables.
Add a new partner and policy for digital card where the partner ID is "mpartner-default-digitalcard" and the credential type is "PDFCard". The partner management APIs can be used to add the below details.
A new database "mosip_digitalcard" has to be created to store the details of the digital cards that are getting generated. The details for the same are .
A new table has been created in "mosip_master" called "applicant_login_details" to track the details of number of times the admin is performing a search. The details for the same are
The configuration changes can be picked up from the below github branch: https://github.com/mosip/mosip-config/tree/qa3-1.1.5/sandbox/
application-mz.properties
digital-card-mz.properties - is newly added
identity-mapping.json
The attribute which are part of the PDF card should be part of available in identity-mapping.json
Even though the digital card service is part of MOSIP code, it is considered as a different module separate from MOSIP core modules and registred as a partner like IDA. Hence, we need to do a certificate exchange between the two systems. The steps to do the same are:
Hardware Sizing
The hardware compute and storage requirements for MOSIP core platform are estimated as below.
Production
Compute
Compute hardware estimates for a production deployment:
Module
Capacity
Servers
Configuration
* Average throughput
** VCPU: Virtual CPU
We estimate 30% (approx) additional compute capacitiy for administration, monitoring and maintenance. This may be optimized by the System Integrator.
Notes
High availability is taken into consideration with assumed replication factor of 2 per service pod/docker
The above estimates do not include compute servers needed for
Database
Storage estimates for production deployment:
Database and HDFS/CEPH
Appication and system logs
Application logs
Module
Unit
Raw log size
The above estimates are approximate, and may inflate if, for example, there are too many exception traces.
The logs may be compressed and archived after a week or so. The compression ratio achieved with tar+gz utility is 15-20.
System logs
To be estimated by System Integrator according to the deployment
Additional compute and storage is needed for the following setups.
As of now there are no time restrictions on the availability of the registration ID but there is a restriction on the number of times a particular registration ID might be shared in the policy.
The PDFs that are generated are password protected. The passwords are configurable.
artifactory-ref-impl : 1.1.5.6
admin-ui : 1.1.5.1
admin-services : 1.1.5.4
mosip-context.json
The attributes shared in the VC should be avaialable in mosip-context file and available for public consumption
//Create a new policy group called "mpolicygroup-deafult-digitalcard".
INSERT INTO pms.policy_group
(id, "name", descr, user_id, is_active, cr_by, cr_dtimes, upd_by, upd_dtimes, is_deleted, del_dtimes)
VALUES('mpolicygroup-deafult-digitalcard', 'mpolicygroup-deafult-digitalcard', 'mpolicygroup-deafult-digitalcard', 'superadmin', true, 'superadmin', '2020-12-16 12:30:14.100', 'superadmin', '2020-12-16 12:30:14.100', NULL, NULL);
//Create a new partner with partner ID as "mpartner-default-digitalcard".
INSERT INTO pms.partner
(id, policy_group_id, "name", address, contact_no, email_id, certificate_alias, user_id, partner_type_code, approval_status, is_active, cr_by, cr_dtimes, upd_by, upd_dtimes, is_deleted, del_dtimes)
VALUES('mpartner-default-digitalcard', 'mpolicygroup-default-digitalcard', '<Partner Orgnaization Name as per Certificate>', '<Address of the Partner>', '<Phone Number of the Partner>', '<Email ID of the Partner>', '94d4ae61-31f0-42ca-97ae-8f4953f41fb6', 'mpartner-default-digitalcard', 'Credential_Partner', 'approved', true, 'superadmin', '2020-12-16 12:30:13.973', '110006', '2022-06-01 08:01:35.025', false, NULL);
INSERT INTO pms.partner_h
(id, eff_dtimes, policy_group_id, "name", address, contact_no, email_id, certificate_alias, user_id, partner_type_code, approval_status, is_active, cr_by, cr_dtimes, upd_by, upd_dtimes, is_deleted, del_dtimes)
VALUES('mpartner-default-digitalcard', '2020-12-16 12:30:14.306', 'mpolicygroup-deafult-digitalcard', '<Partner Orgnaization Name as per Certificate>', '<Address of the Partner>', '<Phone Number of the Partner>', '<Email ID of the Partner>', '94d4ae61-31f0-42ca-97ae-8f4953f41fb6', 'mpartner-default-digitalcard', 'Credential_Partner', 'approved', true, 'superadmin', '2020-12-16 12:30:14.306', 'superadmin', '2020-12-16 12:30:14.306', NULL, NULL);
//Insert a policy for mpolicygroup-deafult-digitalcard
INSERT INTO pms.auth_policy
(id, policy_group_id, "name", descr, policy_file_id, policy_type, "version", policy_schema, valid_from_date, valid_to_date, is_active, cr_by, cr_dtimes, upd_by, upd_dtimes, is_deleted, del_dtimes)
VALUES('mpolicy-default-digitalcard', 'mpolicygroup-deafult-digitalcard', 'mpolicy-default-digitalcard', 'To Share Data', '{"dataSharePolicies":{"typeOfShare":"Data Share","validForInMinutes":"250","transactionsAllowed":"1000","encryptionType":"none","shareDomain":"datashare-service","source":"Print"},"shareableAttributes":[]}', 'Datashare', '1.0', 'https://schemas.mosip.io/v1/auth-policy', '2022-04-04 12:48:58.193', '2022-10-01 12:49:05.712', true, '110068', '2022-04-04 12:48:58.193', '110068', '2022-04-04 12:49:05.712', false, NULL);
INSERT INTO pms.auth_policy_h
(id, eff_dtimes, policy_group_id, "name", descr, policy_file_id, policy_type, "version", policy_schema, valid_from_date, valid_to_date, is_active, cr_by, cr_dtimes, upd_by, upd_dtimes, is_deleted, del_dtimes)
VALUES('mpolicy-default-digitalcard', '2020-11-14 05:59:00.000', 'mpolicygroup-deafult-digitalcard', 'mpolicy-default-digitalcard', 'mpolicy-default-digitalcard', '{"dataSharePolicies":{"typeOfShare":"Data Share","validForInMinutes":"30","transactionsAllowed":"2","encryptionType":"none","shareDomain":"datashare-service","source":"Print"},"shareableAttributes":[]}', 'DataShare', '1', 'https://schemas.mosip.io/v1/auth-policy', '2020-12-16 12:30:14.343', '2025-05-02 09:37:00.000', true, 'admin', '2020-12-16 12:30:14.343', 'admin', '2020-12-16 12:30:14.343', NULL, NULL);
//Insert a policy for mpolicygroup-deafult-PDFCard
INSERT INTO pms.auth_policy
(id, policy_group_id, "name", descr, policy_file_id, policy_type, "version", policy_schema, valid_from_date, valid_to_date, is_active, cr_by, cr_dtimes, upd_by, upd_dtimes, is_deleted, del_dtimes)
VALUES('mpolicy-default-PDFCard', 'mpolicygroup-deafult-digitalcard', 'string', 'string', '<Policy for the Data to be added in the PDF>', 'DataShare', 'string', 'https://schemas.mosip.io/v1/auth-policy', '2020-12-16 12:30:14.183', '2025-04-28 09:37:00.000', true, 'admin', '2020-12-16 12:30:14.183', 'service-account-mosip-creser-client', '2021-02-09 06:50:22.065', false, NULL);
INSERT INTO pms.auth_policy_h
(id, eff_dtimes, policy_group_id, name, descr, policy_file_id, policy_type, "version", policy_schema, valid_from_date, valid_to_date, is_active, cr_by, cr_dtimes, upd_by, upd_dtimes, is_deleted, del_dtimes)
VALUES('mpolicy-default-PDFCard', '2020-11-13 05:58:00.000', 'mpolicygroup-deafult-digitalcard', 'mpolicy-default-PDFCard', 'mpolicy-default-PDFCard', '<Policy for the Data to be added in the PDF>', 'DataShare', '1', 'https://schemas.mosip.io/v1/auth-policy', '2020-12-16 12:30:14.343', '2025-05-01 09:37:00.000', true, 'admin', '2020-12-16 12:30:14.343', 'admin', '2020-12-16 12:30:14.343', NULL, NULL);
//Create an entry for mapping partner and policy
INSERT INTO pms.partner_policy_request
(id, part_id, policy_id, request_datetimes, request_detail, status_code, cr_by, cr_dtimes, upd_by, upd_dtimes, is_deleted, del_dtimes)
VALUES('mpartner_policy_PDFCard_req', 'mpartner-default-digitalcard', 'mpolicy-default-PDFCard', '2022-02-21 07:02:26.292', 'mpolicy-default-PDFCard', 'approved', 'admin', '2022-02-21 07:02:26.292', 'admin', '2022-02-21 07:02:26.292', NULL, NULL);
INSERT INTO pms.partner_policy_request
(id, part_id, policy_id, request_datetimes, request_detail, status_code, cr_by, cr_dtimes, upd_by, upd_dtimes, is_deleted, del_dtimes)
VALUES('mpartner_policy_digitalcard_req', 'mpartner-default-digitalcard', 'mpolicy-default-digitalcard', '2022-02-21 07:02:26.292', 'mpolicy-default-digitalcard', 'approved', 'admin', '2022-02-21 07:02:26.292', 'admin', '2022-02-21 07:02:26.292', NULL, NULL);
//API key for the partner & policy mapping
INSERT INTO pms.partner_policy
(policy_api_key, part_id, policy_id, valid_from_datetime, valid_to_datetime, is_active, cr_by, cr_dtimes, upd_by, upd_dtimes, is_deleted, del_dtimes)
VALUES('mpolicy_part_digitalcard_api', 'mpartner-default-digitalcard', 'mpolicy-default-digitalcard', '2022-04-04 13:21:20.172', '2022-07-03 13:21:20.172', true, 'service-account-mosip-regproc-client', '2022-04-04 13:21:20.172', NULL, NULL, false, NULL);
INSERT INTO pms.partner_policy
(policy_api_key, part_id, policy_id, valid_from_datetime, valid_to_datetime, is_active, cr_by, cr_dtimes, upd_by, upd_dtimes, is_deleted, del_dtimes)
VALUES('mpolicy_part_PDFCard_api', 'mpartner-default-digitalcard', 'mpolicy-default-PDFCard', '2022-02-21 07:02:26.223', '2025-12-01 05:31:00.000', true, 'admin', '2022-02-21 07:02:26.223', 'admin', '2022-02-21 07:02:26.223', false, NULL);
//Add extractor details if needed for the policy
INSERT INTO pms.partner_policy_bioextract
(id, part_id, policy_id, attribute_name, extractor_provider, extractor_provider_version, biometric_modality, biometric_sub_types, cr_by, cr_dtimes, upd_by, upd_dtimes, is_deleted, del_dtimes)
VALUES('146110', 'mpartner-default-digitalcard', 'mpolicy-default-PDFCard', 'photo', 'mock', '1.1', 'face', NULL, 'admin', '2022-02-21 07:02:26.256', 'admin', '2022-02-21 07:02:26.256', false, NULL);
INSERT INTO pms.partner_policy_bioextract
(id, part_id, policy_id, attribute_name, extractor_provider, extractor_provider_version, biometric_modality, biometric_sub_types, cr_by, cr_dtimes, upd_by, upd_dtimes, is_deleted, del_dtimes)
VALUES('146111', 'mpartner-default-digitalcard', 'mpolicy-default-PDFCard', 'iris', 'mock', '1.1', 'iris', NULL, 'admin', '2022-02-21 07:02:26.256', 'admin', '2022-02-21 07:02:26.256', false, NULL);
INSERT INTO pms.partner_policy_bioextract
(id, part_id, policy_id, attribute_name, extractor_provider, extractor_provider_version, biometric_modality, biometric_sub_types, cr_by, cr_dtimes, upd_by, upd_dtimes, is_deleted, del_dtimes)
VALUES('146112', 'mpartner-default-digitalcard', 'mpolicy-default-PDFCard', 'fingerprint', 'mock', '1.1', 'finger', NULL, 'admin', '2022-02-21 07:02:26.256', 'admin', '2022-02-21 07:02:26.256', false, NULL);
//Map the credential type
INSERT INTO pms.partner_policy_credential_type
(part_id, policy_id, credential_type, is_active, cr_by, cr_dtimes, upd_by, upd_dtimes, is_deleted, del_dtimes)
VALUES('mpartner-default-digitalcard', 'mpolicy-default-PDFCard', 'PDFCard', true, 'service-account-mosip-regproc-client', '2022-04-04 13:29:10.383', NULL, NULL, false, NULL);
#----------------------- CBEFF Util--------------------------------------------------
# Cbeff URL where the files will be stored in git, change it accordingly in case of change of storage location.
mosip.kernel.xsdstorage-uri=${spring.cloud.config.uri}/${spring.application.name}/${spring.profiles.active}/${spring.cloud.config.label}/
# Cbeff XSD file name in config server
mosip.kernel.xsdfile=mosip-cbeff.xsd
# Language Supported By Platform - ISO
mosip.supported-languages=eng,ara,fra
#iam adapter
mosip.auth.adapter.impl.basepackage=io.mosip.kernel.auth.defaultadapter
Pre-Registration Functionality
Login/create a user account
Login using email or phone number
Residents can login to the pre-registration portal by providing their email id or mobile number. The system validates the email id or phone number, once validated sends an OTP which the resident enters. The system validates the OTP redirects the user to enter or edit the details for booking an appointment.
Automatic user id creation on first login
The resident logs in to the pre-registration portal with their mobile number or email id. After successful Authentication, the system checks if the user is first-time user or not. If the user is first-time user, the system creates a new record in the database. All the pre-registration ids created from there on will be mapped to this user id.
Logout/session timeout
If the resident wishes to logout of the pre-registration system, he/she can opt to select the Logout option. The token issued during the Authentication of user Login is deleted and the user gets logged out of the system. If the user is inactive for X minutes (X is configurable), the system notifies the user one minute before the configured timeout limit and logs out after a minute. In such case, the system will not save any user data.
Creating an application
Provide demographic data
The user is provided with demographic form based on the ID Object Definition & UI Specification for new pre-registration application, user fills demographic details (e.g., Full Name, Age/DOB, Gender, Residential status, Address, mobile number, email id, etc.). The system validates the fields entered, the system also checks for the mandatory fields. Additionally, the system validates for any blacklisted words entered (as configured by the country). Once validated a pre-registration request id (PRID) is generated and the demographic details provided gets mapped to that PRID.
Before filling the application form, the user is advised to provide their consent for storage and utilization of their personally identifiable information (PII). The consent is sought from the user for every new application created in the system. On providing their consent, the system redirects the user to start the pre-registration application (demographic details). The data as part of the consent form is rendered as setup by the administrator.
In case of closure of the Consent Pop-up, the following scenarios may arise:
First-time login: On closure, then system alerts the user that he will be logged out due to not providing consent.
Existing user login
Scenario 1: Create new application from Dashboard: On closure, the user will be redirected to Dashboard page.
Once the demographic details are filled and the Documents are uploaded, if the user wishes to add an applicant, he/she can opt to select 'Add An Applicant' option on the preview page or 'Create New Application' option on the Dashboard. The system associates unique pre-registration id to the new application(s) created.
The user can select their language of preference, which is referred as Primary (from a list of 2 languages as set by the administrator) from the login screen, the other language from the list is considered as secondary. The user can then provide data in the preferred language (primary) as selected. The data in the right side of the demographic page will be transliterated to secondary language. The labels in the right hand side will be translated to the Secondary language. The user can verify the transliterated data and edit if required. The data will subsequently be stored in the database along with the respective language codes.
In the below listed scenarios, system will render an error message on the Login page and inhibit pre-registration, and hence, the language configurations should be appropriately setup by the administrator.
If Primary Language is set to a specific value and Secondary Language is marked as null/not set by administrator, or
If Secondary Language is set to a specific value and Primary Language is marked as null/not set by administrator, or
If both Primary and Secondary Language is marked as null/not set by administrator.
Example: Primary set to English and Secondary not set or vice-versa, then system will render the stated Error Message: "The system has encountered a technical error. Administrator to setup the necessary language configuration(s)." The error message will not have an option to exit, hence not allow the user to proceed further. On page refresh, the system will render the error message again and hence, inhibit pre-registrations.
Considering a scenario, wherein if Primary language and Secondary language is configured to be the same, eg. English; then: *The system will render the demographic page (with both left and right side for Primary and Secondary lnaguage) in the same language
Values entered on the left side (Primary Language) will not be transliterated but auto-copied on the right side
Values on the right side will remain un-editable
As part of the packet, system will send/store data in one language only, if language code is identified to be the same – eg. en (English)
The pre-registrations created will be associated with user id. The user can view all the pre-registrations created by him/her in the Dashboard. The pre-registration can be in three different status (Pending appointment, Booked, Expired)
Status
Explanation
User Action
The applications are sorted and displayed by the order of creation of application. The first application created appears first, latest created/modified application appears at the end. If the user visits the registration center and consumes the appointment, then the application will be removed from the list. If the appointment date has passed, the status changes to "Expired" and is retained on the dashboard for further rebooking/modification as required.
The user can modify the pre-registration data by opting to select the "Modify" option for a specific application. The system provides the demographic form with pre-filled demo details and allows the user to edit the details as required. The system associates the modified demo details with the pre-registration id for which Modify information is initiated.
The user can discard the pre-registration by clicking on the Delete icon for the pre-registration id for which he/she wishes to discard. The system provides the user with two options: 'Discard entire Application' or 'Cancel appointment'. The user chooses to discard entire application. The system deletes all the data mapped to the pre-registration id and cancels the appointment (if any).
When user provides their demographic data, the pre-registration system captures the data.
Based on the parameters (from the configuration) for example - gender, age and residential status (Foreigner, National) from the demographic data, applicant types are determined. The pre-registration system then sends the id to the mapping.
Based on the Applicant type, the Applicable Document categories are received from the mapping. The pre-registration system then displays only applicable categories.
The POA (Proof of Address) document could be uploaded or can be referred to an already uploaded POA of an existing applicant
The user could select a particular applicant document to which he wants to refer
When Pre-registering for a family living at the same address it is not required to upload same POA again and again,instead could refer to the document as uploaded by the first family member saving space and time.
The system recommends registration centers based on the postal code(s) of all the applicants for whom the appointment is to be booked
The search results have the following information about the registration center: name, address, working hours, contact person, center type, and contact number
The first registration center as per the search criteria is shown to the user on map by default
An user can enable location services, in the device/machine in order to select nearby centers
The system checks for the lattitude and Longitude values of the user and fetches all the registration centers within 2 Km radius (configurable)
The first registration center as per the search criteria is shown to the user on map by default.
An user may opt to perform text search to find a center based on which the system displays the registration centers
It is a contextual search where the user selects a search criteria and based on the selected search criteria enters relevant text.
The first registration center as per the search criteria is shown to the user on map by default
An user logs in to the pre-registration system and opts to book appointment for pre-registration application or Modify appointment
The system presents a list of Centers to the user to select the required registration center
The time selection with calendar days along with number of slots available per calendar day will be displayed
The user opts to view the available slots for a selected registration center.
The system displays 7 calendar days (configurable) for the user to select a slot in the chosen center
Calendar days which are Holidays or non-working days for the selected registration center are greyed out or not shown to the user
For a selected registration center 8 hours (configurable) are considered as working hours
An user can opt to cancel selected appointment\s against application which is/are in Booked Status.
In such case the system notifies the user about the successful cancellation
Following a successful appointment cancellation the system unlocks the time slot of the registration center so that someone else can book it.
The system provides the user with the list of available appointment Slots
An user can select any of the appointment Date available and any of the appointment Slot available
The user has to select against which pre-registration id the appointment slot is being booked
An Acknowledgement is triggered after successful completion of pre-registration (booking an appointment)
The acknowledgement contains the following information: name, pre-registration id, age/DoB, mobile number, email id and registration center details, appointment date, appointment time)
A QR code which contains the pre-registration ID.
User can choose to print or download the acknowledgement as PDF.
The system sends an acknowledgement to the applicant to the registered phone (SMS) or email as per the details provided in demographic form. In case of multiple applications, the system sends notifications for each applicant to the details provided in the demographic form of that applicant.
Additionally, user can opt to manually trigger notification(s) to the contact details of additional recipients. However, this is driven by the Notification configuration setup by the administrator, to allow a notification to be triggered by SMS/email/both or none.
The confirmation acknowledgement is also rendered on screen with a confirmation message of the notification being triggered. (Subject to the notification parameter configuration and if any mobile/email id was provided)
Upon receiving the registration center id, date range (start date, end date) for the List of pre-registrations, user id (Registration Officer/Supervisor) from Registration client, the pre-registration system processes the information.
The system generates a Transaction id
The system then fetches all the pre-registrations within the Date Range (Start Range, End Date) and for the registration center id received and calculates the count of the pre-registration ids being sent.
The system sends the List of pre-registration ids along with count of pre-registrations.
There are three batch jobs that run in Pre-registration based on a cron scheduler.
This batch job identifies the Pre-Registrations for which registration packets are created and are under processing in server. The details about these Pre-registration are removed from pre-Registration database and are moved to an Archival tables in pre-registration called as consumed tables.
Later the data in consumed tables can be archived or removed based on the adopter's need.
This batch job identifies the pre-registrations which have expiered and updates the status of these pre-registrations as "Expiered".
Booking batch job, runs every day to perform some standard tasks:
Creating the booking slots (if not available) for next 140 days (configurable) using the details available for the centers like, center working hours, lunch breaks, no. of Kiosks, slot booking times & holidays.
Canceling bookings & sending notifications to the residents, if any emergency holiday has been declared for a center.
When any transaction is performed, then the same is captured as part of MOSIP Audit Trails, which can be further used for reporting and analytics as required.
Common Services Functionality
OTP Manager
OTP Generation
OTP Manager Component handles OTP Generation and OTP Validation
For OTP Generation, system receives a request to generate an OTP along with a Key in input parameter.
This Key can be a Mobile number, Email ID or a combination of Mobile Number and Email ID.
The component generates an OTP as per the configured length and responds back with the OTP to the source. OTP manager maps an expiry period with the OTP as configured by the Administrator.
For OTP Validation, system receives a request to validate an OTP with a Key and OTP in input parameter.
The component validates the OTP against the expiry and then validates the OTP against the Key if the OTP is not expired.
If the OTP is not expired and is valid against the Key, it will respond with message “Valid” else responds with “Invalid”.
QR code generator takes the content received along with the version number and converts the content into a QR code. The version number is configurable and determines how much data a QR code can store. The more the version number, the more data can be stored in a QR Code.
Crypto service encrypts or decrypts data across MOSIP with the help of Public/Private Keys.
The Crypto Service receives a request from an application with input parameters – Application ID, Reference ID, Timestamp and the Data which needs to be encrypted. The Service then calls the Key Generator API to get a symmetric Key and encrypts the data using that symmetric Key.
The Service then calls the Key Manager Service with the Application ID and timestamp received in the input parameters and gets the public key.
The Service then encrypts the symmetric key using the Public key and joins the Encrypted data and Encrypted Symmetric Key using a Key splitter and respond to the source with the joined data.
The Crypto Service will receive a request from an application with input parameters – Application ID, Reference ID, Timestamp and Data that needs to be decrypted.
The Application ID received will be the one, which was sent for encryption of data in the above flow.
The Crypto Service then splits the received data into Encrypted Content and Encrypted Symmetric Key using the Key Splitter and then calls the Key Manager Service with the Encrypted Symmetric Key, Application ID and Timestamp to decrypt the data using private key.
The Key Manager instead of responding with the private key, decrypts the symmetric itself and send it back to the crypto service. The service then uses this symmetric key to decrypt data and send the decrypted data back to the source.
Upon receiving a request to generate symmetric key pair the system generates a key pair (public and private key) as defined below and responds with the symmetric key
The symmetric key generated supports AES algorithm
The symmetric key generated is of 256 bit size
The symmetric will be returned as a byte array
Upon receiving a request to generate asymmetric key pair the system generates a key pair (public and private key) as defined below and responds with the Asymmetric key
The asymmetric key pair is generated using the RSA encryption
The asymmetric key pair generated is of 2048 bit size
The asymmetric is returned as a byte array
The Key Manager Service works together with the Crypto Service.
It receives a request from Crypto Service from Public Key with the Application ID and Timestamp.
Key Manager Service then sends a valid Public key against the application ID received to Crypto Service.
The crypto utility is supports encryption and decryption. It provides a utility called as key splitter which performs following functions:
It combines the encrypted data and encrypted the symmetric key while sending encrypted content to the source
It also splits the encrypted data and encrypted the symmetric key while receiving the content for decryption
Identifies hash util methods
Creates wrapper class for methods defined in apache-commons hash util
Raises an alert in case of listed
A HMAC/checksum function is a way to create a compact representation of an arbitrarily large amount of data
OTP Notification Services is a combined service, which receives a request to generate an OTP and responds directly to the User using SMS or Email Notification.
The service receives a request to generate and send OTP with User ID, OTP Channel (MOBILE and/or EMAIL), Template Variables, and Template Context (SMS and/or Email).
It then calls OTP Generator Service to generate an OTP against a Key (Mobile Number or Email).
This service triggers an Email Notification upon receiving a request to trigger notification with Recipient Email-ID, CC Recipients Email-IDs, Subject, Email Content, and Attachment as input parameter.
The restriction on Attachment and its size is configurable.
The Third-Party Email Vendor is configurable and any country specific vendor can be used.
This service triggers an SMS Notification upon receiving a request to trigger notification with Phone Number and Content as input parameter. The third-party SMS Vendor is configurable and any country specific vendor can be used.
This utility enables creation of PDF from the content received. It will receive a content in input parameter, convert it into a PDF document, and respond with it to the source.
PDF Generator also supports the feature to generate a Password Protected PDF with an additional input parameter “Password”, which is an optional parameter.
NOTE: If a Password is not received, then PDF Generator will generate the PDF of received content without the password protection.
This utility merges a Template with Placeholders with the dynamic values to form the content to be sent as Notifications or Acknowledgement. The Utility will receive a template and dynamic values from a source. It will merge the values and template and respond with the processed content.
MOSIP system can facilitate transliteration by integrating with a third party service provider. Receive a request for transliteration with the required input parameters (Word, Input Language Code, and Output Language Code)
Validates if all required input parameters have been received as listed below for each specific request
User Input Word - Mandatory
Input Language Code - Mandatory
Upon receiving a request to validate a mobile number against configured mobile number policy, the system validates the mobile number against the policy
Validates if all required input parameters have been received as listed below for each specific request
Mobile number
Validates if the mobile no. against the following policies
Upon receiving a request to validate an Email ID against the standard Email ID policy, system validates the Email ID against the Standard Email ID format
Validates if all required input parameters have been received as listed below for each specific request
Email ID
Validates if the Email ID contains the minimum no. of characters as configured
MOSIP system provides base exception framework.
Identifies Calendar util methods
Creates wrapper class for methods defined in apache-commons Calendar util
Raises an alert in case of listed exceptions
Identifies File util methods
Creates wrapper class for methods defined in apache-commons date and time util
Raises an alert in case of listed exceptions
Identifies File util methods
Creates wrapper class for methods defined in apache-commons File util
Raises an alert in case of listed exceptions
Identifies JSON util methods
Creates wrapper class for methods defined in apache-commons JSON util
Raises an alert in case of listed exceptions
Identifies Math util methods
Creates wrapper class for methods defined in apache-commons Math util
Raises an alert in case of listed exceptions
Identifies String util methods
Creates wrapper class for methods defined in apache-commons String util
Raises an alert in case of listed exceptions
Upon receiving a request to generate UUID the system generates UUID as per default UUID generation logic
UUID generated should be as per UUID Version 5
UUID generated should be of 36 characters (32 alphanumeric characters and four hyphens e.g. 123e4567-e89b-12d3-a456-426655440000)
Identifies Zip-Unzip util methods
Creates wrapper class for methods defined in apache-commons Zip-Unzip util
Raises an alert in case of listed exceptions
Generate logs across the application
Store generated logs in configured location
Raises an alert in case of listed exceptions
Validate the Attributes in ID object against the Pre-Defined pattern and Master data values
Validate Gender Types against country defined Masterdata
Validate Document Categories against country defined Masterdata
Virus Scanner utility allows for virus scanning across MOSIP at various places. This includes:
Scanning of Document uploaded in Pre-registration
Scanning in Registration Client Software
Scanning of Registration packet in Registration Processor
Currently for Virus Scanner, MOSIP has integrated with Clam Antivirus which allows for 290 concurrent users. A Country may integrate their own Licensed version of antivirus as per their requirement.
Partner Management
Introduction
Partner Management provides services for various types of partners associated with the MOSIP system. Currently, in MOSIP we have identified some types of partners, but the adopters can choose to add many more partners.
Authentication Partners who provide authentication services to individuals who have registered in the MOSIP system.
MISP (MOSIP Infrastructure Service Provider) who provide infrastructure to send authentication request through as secure channel.
Device providers to provide MOSIP compliant devices for authentication & registration.
Foundational Trust Providers to provide chips in SBI 2.0 devices.
Credential or Print partners to generate ID Cards for the residents.
ABIS (Automated Biometric Integration System) to perform de-duplication. ... and many more,
Registered Partners are only allowed to access MOSIP services based on the roles provided to them by the MOSIP Partner Admin. These partners need to self register through MOSIP's Partner Management portal before the Partner Admin verifies their details and provides them access to MOSIP services. MOSIP services for a partner will work only when the Partner's credentials are registered in MOSIP and are verified by the service.
Partner Management also involves policy management for Partners. Each partner can access various services only based on a defined policy.
Based on partner type, MOSIP provides various services to respective partners.
For detailed functionality of partner management please view our page,
A Policy is a document in MOSIP which dictates various actions between the partner and MOSIP system. Policies for various partners may differ based on various use cases. Generally in MOSIP we have two types of Policies,
Authentication Policy, used by Authentication Partners
Credential Issuance Policy, used by Credential Partners
A Policy Group is a sector or domain like banking, insurance, telecom etc, specific to a country. Any policy manager, partner manager and partner can belong to a specific policy group. MOSIP would require Policy Group master data prepared and defined beforehand by country, before creation of Partner, Partner Manager and Policy Manager.
Policy Manager would be creating and managing policies for the policy group he/she belongs to.
For a partner to opt for an authentication policy, they have to generate PartnerAPIKey request with following sample parameters - PartnerCode, UseCaseDescription, SupportingInfo, Status etc. Once the PartnerAPIKey request is approved by Partner Manager, Partner is provided PartnerAPIKey that contains details like - PartnerAPIKey (combination of PartnerCode, policy group and policy), issuedOn, validTill, isActive etc)
For detailed description of Partner Management Services, high and low level design refer to .
Refer to build and deploy instructions in .
MOSIP REST API guidelines
1 Introduction
1.1 Context
MOSIP is developed as an open source framework project. The code developed complies with the Java standards and best practices.
1.2 Purpose of this document
This document gives various RESTful webservice standards which have to be followed during the MOSIP development.
1.3 Scope of this document
This document covers the coding standards, which are followed by the RESTful webservice developers.
2 URL structure
2.1 General structure
The syntax of the URL of the RESTful webservice should be as follows for all the modules except Kernel,
The convention is, before <RESOURCE_NAME>, we should have the version number.
The URL is the sentence, the resources are nouns and the HTTP methods are verbs. The URL, before the parameters, should contain only spinal case ( - ). The URL, before the parameters, should not contain snake case ( _ ) or camel case. NOTE: The parameters can contain snake case or camel case.
Use nouns for CRUD operations.
Resource GET read POST create PUT update DELETE delete /preenrolments Returns list of pre enrolments Creates a new pre enrolment Bulk updates Delete all preenrolments /preenrolments/123 Returns a particular pre enrolment Updates a specific car Deletes a specific car
For operations, wherever applicable the operations can be added as part of the URL itself. For example,
/getAllPreenrolments /createNewEnrolment /deleteAllPreenrolments
Use the plural nouns in the resource names if there is CRUD operations. For example,
Use only the intended purpose of the HTTP methods. For example, do not use POST to update a resource or PUT to create a resource.
In all the success cases and failure cases, 200 HTTP Status code is returned. Based on the "errors" JSON element in the response, the caller can decide whether the call is success or failure.
When the caller want to identify the resource, the path param is used. For example,
Always go with the design first approach. First, define the Swagger specification and publish to the Swagger UI after getting it reviewed. The coding should be started after the design is completed and the specification is completed in Swagger.
There are 3 sections in the Request.
15.1. Request headers: This will contain 3 mandatory fields. They are "id", "version" and "requesttime". The "requesttime" have to be in UTC standard ISO8601 format
15.2. Request meta data: This is an optional field. If the service is expecting any metadata, they can be passed here.
15.3. Request payload: This is an optional field. The request payload goes here.
For example,
Request:
There are 4 sections in the Response.
16.1. Response headers: This will contain 3 mandatory fields. They are "id", "version" and "requesttime". The "requesttime" have to be in UTC standard ISO8601 format
16.2. Response meta data: This is an optional field. If the service is expecting any metadata, they can be passed here.
16.3. Response payload: The response payload goes here.
16.4. Errors: The Errors array goes here. Even, in case of single error, the error have to be in an array. This is an optional field. In case if the service doesn't contains error, this element will not be there in the response.
For example,
Response:
In case, there is no request payload or path params or URL params, only the version will be present in the URL.
Data Services Functionality
Data mapper is used across MOSIP to facilitate mapping between DTO (Data Transfer Object) and entity.
Data Access Manager provides a DAO (Data Access Object) interface to do the following:
Provide an interface for connection to a Database
Provide an interface to support Database CRUD (Create, Read, Update, Delete) operation
Registration Processor Functionality
When an individual visits a registration center to get an ID or update his/her ID details, a registration officer captures the individual’s demographic (name, date of birth, gender, etc.) and biometric (face, iris, fingerprint image) details in a Registration Client. The Registration Client packages the captured information in a secure way (in the form of encrypted packets) and sends it to Registration Processor for further processing.
The packet received from the Registration Client goes through various sanity checks and validations to perform various life cycle events. The various life cycle events that can be processed by Registration Processor are:
New ID Issuance
Privacy & Security
In MOSIP, privacy and security are the highest priorities and this document details the measures that have been implemented in the platform so far. As an open-source project, we aim to continuously improve the security features and incorporate new developments through collaborations and community contributions. We use a variety of to assess security, discover vulnerabilities and address them.
MOSIP's approach to privacy and security is determined by the under which it operates.
Direct access to data stored in the database is not permitted - data is accessed via APIs only.
A user will have a maximum configured number of tries to get the OTP wrong after which he/she will be blocked for a configured amount of time. During this blocked period, he/she cannot generate or validate another OTP.
In case, the public key is expired against that Application ID, it will generate a new Public Key and respond with it.
When there is a request to decrypt data, the private key of the application id or reference id is used. The Key manager will not respond with Private Key but instead takes the encrypted data from the source and decrypts it itself and responds with decrypted content
It calls the Template Merger Service to merge OTP with the Template (SMS and/or Email).
It calls SMS and/or Email Notification Service to send the notification as per the template.
The choice of sending SMS and/or Email depends on the Notification Type Flag received in Input.
The system responds with the error message if a particular User ID does not have an Email or Mobile number registered against it if the otp channel received is Email or Mobile number respectively
Output Language Code - Mandatory
Transliterates the Word received from Input Language to Output Language
In case of Exceptions, system triggers relevant error messages.
Mobile no. should contain no of digits configured by the ADMIN
Mobile no. should only be numerical.
In case of Exceptions, system should trigger relevant error messages. Refer “Messages” section
Responds to the source with the result (Valid/Invalid)
Raises an alert in case of exceptions.
Validates if the Email ID contains less than 254 max length
Validates if the Email ID only contains following characters
Digits 0 to 9
Uppercase and lowercase English letters (a–z, A–Z)
Characters ! # $ % & ' * + - / = ? ^ _ ` { | }
~ .
Validates if the Email ID contains "@" and domain name within the Email ID.
Responds to the source with the result (Valid/Invalid)
Raises an alert in case of exceptions
Any application in MOSIP can use this UUID utility
Responds with the UUID to the source
Raises an alert in case of listed exceptions
Validate Document Types country against defined Masterdata
Validate Location and Location hierarchy against country defined Masterdata
Validate Date of Birth against country configured pattern
Validate Phone Number against country configured pattern
Validate Email ID against country configured pattern
Validate Age against country configured pattern
Validate Full Name against country configured pattern
Validate Address line 1,2 and 3 against country configured pattern
Validate Reference Identity Number against country configured pattern
Validate Country Code against country configured pattern
Respond with proper error messages in case of any validation faliure
OTP Validation
QR Code Generator
Crypto Services
Cryptography Services
For Encryption
For Decryption
Key Generator
Generate a Symmetric Key
Generate an Asymmetric Key
Key Management
Crypto Utility
Hash Utility
HMAC Utility/Checksum Utility
Notification
OTP Notification Services
Email Notification
SMS Notification
PDF Generator
Template Merger
Transliteration
MOSIP Utils
Mobile Data Validator
Email Data Validator
Exception Framework
Calendar Utility
Date Utility
File Utility
JSON Utility
Math Utility
String Utility
UUID Utility
Zip-Unzip Utility
Log Utility
ID Object Validator Utility
Virus Scanner
Scenario 2: Add Applicant from Preview Page: On closure, the user will be redirected to Preview Page.
Booked
Filled demographic details, uploaded documents, and booked appointment
Visit the registration center on the appointment date and time
Expired
Appointed date has passed
N/A
The Document Category and type of documents in each category to be uploaded varies based on the applicant type. pre-registration system displays only those types to the applicant.
Once the documents are uploaded by applicant the system performs virus scan to check the integrity of the document. Once the virus scan is successful, the document is encrypted and stored in the object store.
The user can select any of the calendar day which he/she wishes to book an appointment.
Time slots of 15 minutes each are displayed (configurable).
Each time slot with available slots will be displayed.
The user can select a slot and proceed to book appointment or can go back to select another registration center
A user can view time slots of 15 minutes (configurable) each for the selected calendar day and view available slots for every time slot shown in the selected calendar day
An applicant can further choose the preferred timeslot
An user can confirm the appointment selection of the preferred/chosen time slot – Subsequently the timeslot(s) are locked
The system maps appointment slot with all the pre-registration ids, which are selected for appointment booking
If any pre-registration id does not have booking mapped, the user is notified if he wants to continue without booking
An user at this stage may opt to search registration center. In this case the appointment-booking (Time Slot selected) done is removed
An user cannot Re-book the appointment if the appointment booking is less than 48 hours (configurable) from time of booking
This QR code can be scanned at the registration center to fetch the details to be used during the registration process.
The system receives the pre-registration id/ids for which pre-registration Data has to be sent.
The system sends the zip file per pre-registration id consisting of Demo Data, Files, and appointment Time.
Pending appointment
Filled only demographic details
Upload documents and book an appointment
Pending appointment
Filled demographic details and uploaded documents
Consent is sought from the user for every new application created in the system.
Provide consent
Create multiple applications
Provide data in preferred language
Language Configuration
Viewing "My Applications" (covers status)
Modify application data
Discard application
Attaching documents to the application
Document Categories and Applicable Document Types
Referring to already uploaded documents
Booking an appointment
Choosing a registration center for appointment
Recommended centers based on postal code
Nearby centers based on user geo-location
Find a center
Get appointment for the day
Choosing appointment slots
Get slots availability
Cancel appointment
Re-book appointment
Appointment acknowledgement
Download acknowledgement
Send acknowledgement to email/phone
Registration Client Services
Retrieve application data by PRID
Batch Job Services
Consumed Status Batch Job
Expiered Status Batch Job
Booking Batch Job
Audit
Book an appointment
Update individual’s Information
De-activate individual’s ID
Re-activate individual’s ID
Find an individual’s ID
A new ID issuance requires an individual to visit a registration center and provide the required information to register himself/herself in MOSIP for the first time.
When a registration officer captures an individual’s information, the Registration Client packages the captured information in the form of encrypted packets and sends it to Registration Processor. After the encrypted packet reaches the Registration Processor, the system tries to find a duplicate using the individual’s information (i.e. demographic and biometric information) in the system (this process is known as De-duplication). If the system does not find any duplicates of the individual’s information, then the system registers the individual and allocates a unique ID and sends his/her ID credential through the country's configured printing and postal service .
During the allocation of the Unique Identification Number (UIN), the system also allocates a Virtual Identification Number (VID) to the individual. VID is an alternative to UIN and is a temporary number that can be used for authentications of an individual. The individual can provide the VID instead of UIN to authenticate themselves and protect their UIN from being accessed by someone else.
MOSIP generates two types of VID such as Perpetual VID and Temporary VID.
Perpetual VID: Registration Processor will create a new perpetual VID once UIN is generated successfully.
Temporary VID: As the name goes, it is shortlived which expired after a pre-defined period after which a new temporary VID has to be re-generated. Temporary VIDs are generated by residents using resident services.
After an ID is created for an individual, then he/she can choose to update his/her demographic or biometric information. The system provides two different channels by which an individual can update his/her information - by visiting a registration center and by using the resident services.
In both the cases, the individual’s information is securely packaged and sent to Registration Processor. After all successful validations, the system updates the individual’s information and sends his/her updated ID credential through the country’s configured printing and postal service.
Information that can(not) be updated that includes both biometric and demographic data can be customized. In the current implementation,
An individual can update his/her demographic and biometric information when he/she visits the registration center.
An individual can update his/her demographic information when he/she uses the resident services.
This feature is used to de-activate an individual’s ID. When an individual’s ID is deactivated, then he/she will not be able to authenticate himself/herself by using UIN or VID.
If a country wants to deactivate an individual’s ID due to any specific reason, the system deactivates the individual’s ID after certain validations are performed in Registration Processor.
This feature is used to re-activate an individual’s deactivated ID. When the individual is re-activated then he/she will be able to authenticate himself/herself by using UIN or VID.
If a country wants to reactivate an individual’s deactivated ID due to any specific reason, the system reactivates the individual’s deactivated ID after certain validations are performed in Registration Processor.
When an individual forgets their ID information he/she can find it by providing their biometric information in the Registration Center. Registration processor then uses the captured biometrics to find the individual’s ID and sends his/her ID credential to their registered address through the country's configured printing and postal service.
Orchestration is the process of configuring various independent services, which will coordinate and manage to achieve a business goal.
In Registration Processor, there are various independent stages (such as Packet Receiver Stage, Packet Validator Stage, Operator Supervisor and Introducer Validator Stage, Demographic Deduplication Stage, Biometric Deduplication Stage, UIN Allocator Stage, Notification Stage, Printing and Postal Stage, etc.), which will perform their own set of validations or operations.
These stages are connected to each other using a workflow manager to perform various ID lifecycles events for an individual.
Registration Processor interacts with multiple external systems where there is a certain probability of failures due to various reasons such as network issues, unavaibility of external systems etc.
Registration Processor retries processing of the stage after a configurable period of time.
MOSIP system has the capability to recover and continue packet processing if any incident happens which stops processing of some of the packets. These incidents can be: an external/internal stage is not responding, database connection is lost, dependent packets have not been processed, etc.
In case of such incidents, the system have a mechanism in place which identifies any packets that are stuck at a particular stage for a long period of time and resume processing at a configured time.
Packet processing is divided broadly into three sections such as pre-processing, processing and post processing. Each section has a set of stages which are orchestrated together to create workflow. A System Integrator can customize workflow by adding or by removing stages.
If a country wants to integrate MOSIP with their system to share information to/from MOSIP then MOSIP has provision for system integrator to plugin external system to pull or push data very easily with some customization in the workflow.
Registration processor architecture gives flexibility to customize the workflow to plug-in additional stages and exclude existing stages as per the business need.
An ID goes through various lifecycles (ID issuance, update of ID information, activating or deactivating an ID) and each lifecycle has its own set of stages to achieve the end goal.
These stages are glued together to form a workflow. Hence, based on the ID lifecycle, Registration Processor has multiple workflows.
Having multiple workflow increase reusability of stages, readability of workflow configured for each event and maintainability of each workflow which also involve customizing workflow based on the country’s need.
MOSIP is scalable so that it can handle any kind of processing load or request in the future without disturbing the base architecture. MOSIP infrastructure can handle additional processing request based on the requirement of a country. The architecture is designed in such a way that it is flexible to support scalability and holds the request until the end goal is achieved.
When Registration Processor receives a packet, the system performs various sanity checks on the packet, such as:
Authentication of the request: If the request is coming from a verified source.
Virus scan: In-memory virus scan of the packet received.
Packet integrity check: If the packet received was not tampered during transit by performing checksum validation.
Packet size check: If the packet received was not tampered during transit by validating the size of the packet.
Packet format check: If the packet format is per the configured format.
Duplicate check: If the request received is not a duplicate request.
Virus Scanning is an important process, which helps to detect and move the virus infected packets to the quarantine zone. With a good virus scanner integrated in MOSIP will prevent virus interference.
Whenever virus scanning is performed in Registration Processor, the encrypted packets are first scanned and then the packets are decrypted in-memory and scanned.
Virus scanning is performed twice in Registration Processor:
When a packet is received by Registration Processor.
When Registration Processor stores the packet in its internal secure file system.
When a packet is created in Registration Client, the packet will be created using a registered machine, devices, registration officer, registration supervisor, and registration center.
To make sure that the packets are created as per the defined rules, the system performs the following validations:
Registration Center must be active when the packet was created.
User (registration officer/registration supervisor) must be active when the packet was created.
Machine and devices, in which packet was created must be active when the packet was created.
User, machine and center must be mapped when the packet was created.
Packet must be created in working days and not in holidays.
The GPS must be captured when a packet is created.
When a packet is created in Registration Client, the officer or supervisor will authenticate himself/herself, and the same is captured in the packet. There are three modes by which an officer or supervisor can authenticate himself/herself, which are listed below:
Biometric authentication
Password based authentication
OTP based authentication
In the case of biometric authentication, the Registration Processor authenticates the officer/supervisor again after receiving the packet from the Registration Client.
Data quality check
The system provides a feature to integrate with an SDK to identify and validate the age and gender captured by the registration officer against the photo of the resident.
This validation helps the system to identify the mistakes, that are performed by the registration officer.
This is factored for future releases and is not part of the current implementation.
Biometrics quality check
The biometrics captured (face, fingerprint, or iris) for an individual is used to authenticate the individual. If the quality of the biometric image captured during registration is low, then authentication for the individual using biometrics will not be accurate.
Hence, the system provides a feature to integrate with an SDK to validate if the quality of biometrics captured of an individual is above the configured threshold. If the quality of the biometric captured is lower than the threshold configured, then the Registration Processor does not allow ID generation for the individual.
Doc validation - OCR*
When an individual visits the Registration Center to get an ID or update his/her information, the officer manually enters various demographic information for the individual, which might cause a human error. To avoid such issues, the system provides the feature to integrate with an SDK, which validates the fields that are manually entered against the corresponding documents.
This is factored for future releases and is not part of the current implementation.
File & document validation
When the Registration Packets are received from the Registration Client, the system checks if all the files listed in the packet are available. If available, the system verifies if the documents required for an individual are present in the packet as per the data captured. To perform this validation, the mapping of the data captured and the mandatory document required can be configured by the country.
For Example:
If the name is captured, the country can add a validation for Proof of Identity.
If the address is captured, the country can add a validation for Proof of Address.
Introducer validation
An Introducer in MOSIP introduces someone attempting to register without any valid document or proof of identity. In the current implementation, in the context of Minor's registration, the Introducer is the parent or guardian of the minor (child) who approaches the center for registration.
A minor is not mature enough to provide biometrics (like fingerprints or iris) as they are underdeveloped during the time of registration, hence, the parent or guardian acts as the Introducer to register the minor in MOSIP.
When a minor is registered, the Registration Client mandates the capture of the ID and biometrics of the parent or guardian, which is used for authenticating the parent or guardian in the Registration Processor.
To support the Principle of Inclusion, an Introducer can be any individual whose biometrics are registered in MOSIP.
Deduplication – demographic, biometrics
Deduplication is the process of finding a duplicate by comparing the individual’s details (biometric and demographic data) with the data stored in the system.
Demographic deduplication
The system compares the demographic details (name, gender, and date of birth) of the individual with the data available in the system to find a potential match.
If a potential match is found, then the system sends the packet to ABIS to perform a 1:1 biometric match (it is an additional check to confirm that it is a duplicate).
If a potential match is not found in ABIS or demographic deduplication, then the system sends the packet to perform biometric deduplication.
Biometric deduplication
The system performs biometric deduplication (1:N, where N indicates the whole set of biometric available in the system) by sending the data to ABIS
ABIS compares the biometric data received with the whole set of data to find a potential match based on a configured threshold.
If a potential match is found in the ABIS, then the system sends the packet for manual adjudication.
If a manual adjudicator (experts who know more about biometrics) finds a duplicate, then the system rejects the packet.
If the manual adjudicator or ABIS does not find a duplicate, then the system sends the packet for UIN generation.
All the below functions can be plugged in by a System Integrator into the MOSIP system. MOSIP provides interfaces for integration.
Data verification
Data verification is a process in which the system can verify the data captured during registration with the data received from an external system to ensure accuracy and consistency. It helps to determine whether data was accurately translated, is complete, and supports the interoperability standards.
The System Integrator can plug-in a stage in the workflow, where the stage can communicate with any external system to receive some information and validate it with the information captured at the Registration Center.
Data Enrichment
Data enrichment is a value-adding process, where external data from multiple sources is added to the existing data sets in MOSIP to enhance the quality and richness of the data. MOSIP receives some data from the external system in the form of a Packet (as per MOSIP Standards). The system can receive this updated packet from external sources and process it with the packet received from the Registration Client.
Manual verification for external system data update
When there are any discrepancies between the data received from the external system vs. the data captured during registration, a country may opt to manually verify the data. The System Integrator in such case may build a Manual Verification Module for external system data mismatch.
Manual adjudication
When biometric duplicates are found in ABIS, the System Integrator can plug in the Manual Adjudication Stage, which would send the biometric and demographic data of the duplicates to a Manual Adjudicator. The Manual Adjudicator now can perform various validations on the duplicate data and inform the MOSIP system if the two records are duplicates or not.
ABIS integration
The MOSIP System, to perform biometric de-duplication (validate if there are no biometric duplicates in the system), integrates with an ABIS.
ABIS Middleware which is designed by MOSIP and MOSIP Middleware designed by ABIS is used to communicate between the MOSIP system and ABIS.
Identity generation - UIN generation and association
After all the business validations are completed, the system gets a Unique Identification Number (UIN) from the UIN generation API and allocates the UIN by sending the new UIN number and the individual's information to the ID Repository.
Store/update ID Repository
After all the business validations are performed for a new ID issuance or updating an individual’s information, this information is sent to the ID Repository for storing or updating the information respectively.
Data extractor for ID authentication
The system extracts the latest copy of an individual’s data after the individual has registered in MOSIP or has updated their data in MOSIP and sends it to ID Authentication. Now, ID Authentication can use the latest copy of the individual’s data for authentication.
When any transaction is performed in the MOSIP system or the packet fails any validations or any system-level exception happens, then the same is captured as part of MOSIP audit trails, which can be further used for reporting/analytics as required.
Notification (SMS/Email as configured), which is received by an individual is the final step of all the life cycle processes. The system sends a notification to the individual for various life cycle scenarios such as successful or unsuccessful issuance of UIN, update of UIN data, activate or deactivate UIN, finding a lost UIN, etc. using templates defined in the system.
When an individual’s ID is created or an individual’s data is updated, the system sends the individual’s physical ID credential to the individual’s registered address.
This feature is the post processing integration point for the Registration Processor, where a country can generate the PDF of the individual’s ID and sends it to the country’s configured printing and postal service provider. The printing and postal service provider in turn would print the physical ID credential and deliver it to the individual’s registered address.
After the Registration Client sends the packet to Registration Processor, it starts processing the packet. Registration Processor enables the Registration Client to know the processing status of such packets. The probable packet statuses are as follows:
PROCESSING: The packet is under processing.
PROCESSED: The packet has been processed and Registration Client deletes the packet from its storage location.
RESEND: Initial validation like virus scan and packet integrity check have failed for the packet for a configured number of times and Registration Client needs to resend the packet for processing.
RE-REGISTER: The packet has failed a business validation like center-machine check, supervisor and officer validation, etc., due to which the system will not be able to process the packet. The registration officer will intimate the individual to come back to the center and re-register, post which registration client can delete the packet from its storage location.
REJECTED: A duplicate packet was found against the individual’s biometrics. As processing of the packet is completed, Registration Client can delete the packet from it storage location.
ID Life cycle Management
New ID issuance
Update individual’s information
De-activate individual’s ID
Re-activate individual’s ID
Find an individual’s ID
Configurable workflow
Orchestration
Retry processing
Resume workflow
Integration
Multiple workflows
Scalability and throughput
Processing of packet
Pre-processing validations
Sanity check
Virus scan
Machine-Center mapping
Officer & supervisor validation
Processing
Individual's data validations*
Functional validations
External system integration
ID issuance
Capture audit trails/analytics data
Post-processing
Notification
Print & post
Packet processing status
3 Resources - Usage of nouns and verbs
4 Resources – Usage of plurals in nouns
5 Resources – actions in the URL
6 Appropriate usage of the HTTP methods
7 HTTP Status codes
8 Identifying a resource
9 Filtering
10 Sorting
11 Pagination
12 Always use SSL
13 Versioning
14 Design first approach
15 Request format
16 Response format
References
{
/***** Following is the header information *****/
"id":"mosip.kernel.otpservice",
"version":"1.0",
"requesttime":"2007-12-03T10:15:30Z",
/***** Following is the metadata information *****/
"metadata" : {
},
/***** Following is the request payload *****/
"request" : {
// payload
}
}
{
/***** Following is the header information *****/
"id":"mosip.kernel.otpservice",
"version":"1.0",
"responsetime":"2007-12-03T10:15:30Z",
/***** Following is the metadata information *****/
"metadata" : {
"status" : "error"
},
/***** Following is the response payload *****/
"response" : {
// payload
}
/***** Errors wrapped in an array *****/
"errors":[
"errorCode": "PRG_PAM_APP_001",
"message": "Mobile or email not available"
},
{
"errorCode": "PRG_PAM_APP_001",
"message": "Service vendor is not responding"
}
]
}
Sync Handler allows registration client to sync Master data, List of User, Roles and Respective Mappings and Configurations (Registration Client specific and Global Configs).
Sync Handler also allows Registration Client to push data from Client local database to Master Database.
As part of Master data Sync, the service receives a Machine ID and Timestamp, looks for a mapped Center ID to that Machine ID and responds to the Registration Client with the Center specific Master data for the following tables.
Registration Center Type
List of Registration Center
Template File Format
Template Type
Templates
Reason Category
List of Reasons
Document Category
Document Type
Mapping of Applicant Type-Document Category-Document Type (refer table "Valid Documents")
Machine Type
Machine Specifications
List of Machines
Device Types
Device Specifications
List of Devices
Location Hierarchy
List of Languages
List of Genders
Biometric Authentication Type
Biometric Attribute
Center-Machine Mapping
Center-Device Mapping
Center-Machine-Device Mapping
Center-Machine-User Mapping
Center-User Mapping
Sync Job Definition
The Sync Handler service only sends incremental changes based on the Timestamp received by the service.
For configuration, sync handler receives a request to sync configurations and will respond back with Registration Client specific and Global Configurations.
For User, Roles and Respective User-Role mappings, Sync handler receives Center ID and Timestamp and will respond to the Registration Client with Center specific incremental changes.
Upon receiving a request to generate Machine ID, the system generates Machine ID as per default Machine ID generation logic as mentioned below:
Machine ID should only be numeric
Machine ID generated should be of length of 5 digits
Each new Machine ID should be incremented by 1 for each new request
Machine ID generation should start from 10000
The number should not contain the restricted numbers defined by the ADMINs.
Responds with the Machine ID to the source.
Raises an alert in case of exceptions.
Upon receiving a request to generate Registration Center ID, the system generates it as per default Registration Center ID generation logic.
Refer below for the process:
Registration Center ID is generated as per the defined logic mentioned below:
Registration Center ID should only be numeric
Registration Center ID generated should be of length of 5 digits
Each new Registration Center ID should be incremented by 1 for each new request
Registration Center ID generation should start from 10000
The number should not contain the restricted numbers defined by the ADMIN
In case of exceptions, system triggers relevant error messages
Responds with the Registration Center ID to the source
Raises an alert in case of exceptions.
Upon receiving a request to generate RID with Machine ID and Center ID as input, the system generates it as per default RID generation logic.
Refer below for the process:
RID should be generated as per the defined logic mentioned below:
RID should only be numeric
First 5 Digit should be Registration Center ID
Next 5 Digits should be Machine ID
Next 5 Digits should be Running sequence
Last 14 Digits should be Timestamp
Total: 29 Digits
Responds with the RID to the source
Raises an alert in case of exceptions and triggers the messages.
Upon receiving a request to generate MISP ID, the system generates it as per default MISP ID generation logic.
Refer below for the process:
MISP ID should be generated as per the defined logic mentioned below:
MISP ID should only be numeric
MISP ID generated should be of length of 3 digits (Configurable)
MISP ID generation should start from 100
Each new MISP ID should be incremented by one for each new request
The number should not contain the restricted numbers defined by the ADMIN
Responds with the MISP ID to the source
Raises an alert in case of exceptions and triggers the messages.
Upon receiving a request to generate PRID with input parameters, the system generates PRID as per default PRID generation logic.
Refer below for the process:
PRID generated should contain number of digits as configured by the ADMIN
PRID is generated as per the defined logic mentioned below:
The number should not contain any alphanumeric characters
The number should not contain any repeating numbers for 2 or more than 2 digits
The number should not contain any sequential number for 3 or more than 3 digits
The numbers should not be generated sequentially
The number should not have repeated block of numbers for 2 or more than 2 digits
The number should not contain the restricted numbers defined by the ADMIN
The last digit in the number should be reserved for a checksum
The number should not contain '0' or '1' as the first digit
Responds with the PRID to the source
Raises an alert in case of exceptions.
Upon receiving a request to generate VID, the system generates PRID as per default PRID generation logic.
Refer below for the process:
VID should be generated as per the defined logic mentioned below:
Responds with the VID to the source
Raises an alert in case of exceptions.
VID generation policy
VID generated should contain the number of digits as configured.
Validates if the VID is generated as per the defined logic mentioned below:
The number should not contain any alphanumeric characters
The number should not contain any repeating numbers for 2 or more than 2 digits
The number should not contain any sequential number for 3 or more than 3 digits
The numbers should not be generated sequentially
The number should not have repeated block of numbers for 2 or more than 2 digits
The number should not contain the restricted numbers defined by the ADMIN
The last digit in the number should be reserved for a checksum
The number should not contain '0' or '1' as the first digit.
Expired VID should not be sent in response.
Upon receiving a request to generate Token ID (with input parameters (TSP ID, UIN), the system generates token ID as per default Token ID generation logic
Refer below for the process:
Token ID should be generated based on the below logic using received UIN and Partner ID
Token ID = SHA256( SHA256(UIN + SALT) + Partner ID + SALT
Validate if all mandatory input parameters have been received as listed below for each specific request
UIN - Mandatory
Partner ID - Mandatory
Raise an exception if input parameter is missing. Refer messages section
Token ID length should be of 36 digits
Upon receiving a request to generate partner ID, the system generates it as per default partner ID generation logic.
Refer below for the process:
Partner ID is only be numeric
Partner ID generated is be of length of 4 digits
Partner ID length is be configurable
Each new Partner ID should be incremented by 1 for each new request
Partner ID generation is start from 1000
In case of exceptions, system triggers relevant error messages.
Upon receiving a request to generate License Key, the system generates it as per default License Key generation logic and responds with the License Key to the source
License Key is generated as per the defined logic mentioned below:
License Key Generation follows a random generation pattern
License Key is alphanumeric
License Key generated is of length of 8 digits
License Key is mapped to expiry (Expiry to be configured by admin).
In case of exceptions, system triggers relevant error messages
Upon receiving a request to validate the UIN, the system validates the UIN against the defined policy
Refer below for the process:
Validates if the UIN is of configured length.
Validates the UIN by verifying the checksum
Validates if the UIN received as per the UIN generation logic
Responds to the source with an appropriate message
Raises an alert in case of exceptions.
Upon receiving a request to validate the PRID, the system validates the PRID against the defined policy
Refer below for the process:
Validates if the received PRID contains number of digits as configured by the ADMIN
Validates the PRID received as per the PRID generation logic
Responds to the source with an appropriate message
Raises an alert in case of exceptions.
Upon receiving a request to validate the VID with input parameters (UIN), the system validates the VID against the defined VID policy
Refer below for the process:
Validates if the VID is of configured length.
Validates the VID by verifying the checksum
Validates if the VID received as per the VID generation logic
Responds to the source with an appropriate message and raises an alert in case of exceptions.
RID is generated in the following manner:
First 5 Digit: Registration Center ID
Next 5 Digits: Machine ID
Next 5 Digits: Running sequence
Last 14 Digits: Timestamp
Total: 29 Digits
RID Validation performs pattern validation on RID and provides three methods to validate RID.
Receive a RID, check whether RID is of configured length or not and respond with whether RID is valid or invalid
Receive a RID along with Registration Center ID and Machine ID. Check whether RID is of configured length or not and whether Registration Center ID and Machine ID are attached to the RID or not. Respond with whether RID is valid or invalid
Receive a RID along with Registration Center ID, Machine ID, Sequence Length and Timestamp Length. Check whether RID is proper or not as per the input received. Respond with whether RID is valid or invalid.
The system receives a request to check status of a Partner with an input parameter (Partner ID)
Checks the length of the Partner ID
Checks the status of the Partner ID
Responds to the source according to the conditions mentioned below:
If the length of Partner ID is not of the configured length, respond with message "INVALID"
If the Partner ID is Inactive, respond with message "INACTIVE"
If the Partner ID is of configured length and is Active, respond with "ACTIVE"
Throws an error if an input parameter is empty
In case of exceptions, system triggers relevant error messages.
The system receives a request to check status of the License Key with an input parameter (License Key)
Checks the length of the License Key
Fetches the status of the License Key
Throw an error if an input parameter is empty
Responds to the source according to the conditions mentioned below:
If the length of License Key is not 8 digits, respond with message "INVALID"
If the License Key is expired as per the expiry period configured, respond with message "EXPIRED"
If the status of License Key is "SUSPENDED", respond with message "SUSPENDED"
In case of exceptions, system triggers relevant error messages.
Data mapper
Data Access Manager
Sync Handler
ID Generator and Validator
ID Generator
Machine ID Generator
Registration Center ID Generator
RID Generator
MISP ID Generator
PRID Generator
VID Generator
Token ID Generator
Partner ID Generator
MISP License Key Generator
ID Validator
UIN Validator
PRID Validator
VID Validator
RID Validator
Partner ID Validator
License Key Status Validator
The Zero-Knowledge Administration principle is used so administrators can manage data without seeing the actual data. Data can be accessed only via APIs
The integrity of each database row is protected to prevent any malicious tampering like swapping identities, for instance.
Revocable Virtual IDs and Tokens are used to thwart any attempt on profiling the users.
Access controls are implemented on all APIs to ensure data privacy (who can see what).
All APIs support rate-limiting and are digitally signed.
All network channels assumed 'dirty'.
Every artefact (including JSON data sent over API) is digitally signed.
MOSIP uses the following algorithms:
RSA OAEP 2048 bit minimum for all PKI-based encryption.
AES GCM 256-bit minimum for all Symmetric key encryption.
SHA256 is the standard hashing algorithm.
X509 V3 as the certificate standard.
FIPS 140-2 Level 3 is the minimum Hardware Security Module (HSM) standard.
PKCS11 is used for HSM communication.
As a principle, MOSIP does not use any mechanism in-built in a database for encryption. All sensitive data to be stored in a DB is encrypted/decrypted outside the DB at the application layer.
All sensitive (configurable) data is encrypted using a symmetric key algorithm. MOSIP supports AES 256 algorithm by default.
Each cell is encrypted using its own symmetric key and the keys are selected randomly.
By default, we generate 10,000 symmetric keys for database encryption. This is a soft limit and that can be increased.
The symmetric keys are encrypted using a master key in HSM.
Every key has an expiry and the application follows the expiry to update the data with new keys.
Registration Client is used to collecting all the personal and biometric information for MOSIP. The client is designed to work on TPM-compatible machines. The client follows the following principles:
All machines are registered using the TPM identity keys. The public part of these keys is pre-whitelisted in the MOSIP database.
An SK from the SRK key is created to encrypt all the other keys used by MOSIP.
All local configurations are encrypted using the same mechanism.
A set of (defaulted to 10000) RSA keys is created for registration. These keys are generated in an HSM and the public part of these keys is embedded in the MOSIP registration client. These keys are used to encrypt the user's/residents' data.
The registration data in its unencrypted form is always stored in the volatile memory and never stored on permanent storage.
MOSIP uses AES and RSA keys. By default, the MOSIP is designed to have the expiry and key rotation as configurable parameters. The default values are set as follows:
AES 256-bit keys - 6 months from the date of creation.
RSA 2048-bit encryption keys - 1 year from the date of creation
RSA 2048-bit signature keys - 2 years from the date of creation.
MOSIP uses symmetric keys to protect its database.
Every key has an expiry date upon creation. (It's defined by the configuration, Default set to 6 Months)
There are two modes of operation for key management:
Inline
In this mode, the system would look at a configuration to see
When data is written back to the database a new active key is used.
When data is read where the encryption key is expired the system notifies the key management that the expired key is used and has to be re-encrypted with an active key.
Batch
In this mode, the system would search for all the tables for encrypted data with expired keys.
Re-encrypt them with the new active keys.
Registration Client is used to collecting all the personal and biometric information for MOSIP. The client is designed to work on TPM-compatible machines. The client follows the following principles:
All machines are registered using the TPM identity keys. The public part of these keys is pre-whitelisted in the MOSIP database.
An SK from the SRK key is created to encrypt all the other keys used by MOSIP.
All local configurations are encrypted using the same mechanism.
A set of (defaulted to 10000) RSA keys is created for registration. These keys are generated in an HSM and the public part of these keys is embedded in the MOSIP registration client. These keys are used to encrypt the user's/resident's data.
The registration data in its unencrypted form is always stored in the volatile memory and never stored in any permanent storage or filesystem.
RSA 2048-bit keys are used for the encryption of resident/user data from the registration client. The expiry policy for the same is set to 1 year.
The default expiry of these keys is set to 1 year.
These keys will be rotated using the API. Currently, the key rotation would happen manually with client upgrades.
The digital signature keys are domain-specific and are used to sign the artefacts generated by MOSIP for external consumption. It's expected that the countries would follow their legal standard on digital signatures. The default expiry is set to 2 years.
In MOSIP Authentication largely falls into the below categories:
Authentication via web channel (for Pre-Registration web app, Admin web app and Resident services portal)
Authentication via local system i.e., offline authentication (for Registration client)
In MOSIP Authorization falls into the below categories:
Authorization of APIs accessed via web channel (We are in migration to a KeyCloak server at this point in time. Soon we will publish the documents)
Authorization to access specific data (will be implemented in v3)
A country will have its own hierarchy of system users especially the Registration staff and system administration staff. So, instead of defining a fixed hierarchy, by default MOSIP will depend on an LDAP implementation to manage users, organizational hierarchy and roles for users in the hierarchy. MOSIP will use an open-source LDAP server as the LDAP implementation. Administrators can create a hierarchy and users using Apache Directory Studio.
Steps to Install and use PostgreSQL Version 10.2 on RHEL 7.5
Often simply Postgres, is an object-relational database management system (ORDBMS) with an emphasis on extensibility and standards compliance. It can handle workloads ranging from small single-machine applications to large Internet-facing applications (or for data warehousing) with many concurrent users Postgresql Prerequisites On a Linux or Mac system, you must have superuser privileges to perform a PostgreSQL installation. To perform an installation on a Windows system, you must have administrator privileges.
To changing default port 5432 to 9001 and connection + buffer size we need to edit the postgresql.conf file from below path PostgreSQL is running on default port 5432. you decide to change the default port, please ensure that your new port number does not conflict with any services running on that port.
Steps to change the default port
Open the file and modify the below changes
```
$ sudo vi /var/lib/pgsql/10/data/postgresql.conf
```
listen_addresses = '*' (changed to * instead of local host )
port = 9001 ( uncomment port=5432 and change the port number
Open the port 9001 from the VM
Use below command to open the port 9001 from RHEL 7.5 VM
MOSIP offers high configurability to customise and deploy for a country. Many components are available out of the box. However, for a specific deployment certain customisations and additions may be needed as follows:
ID Object
If the status of License Key is "BLOCKED", respond with message "BLOCKED"
If the status of License Key is "ACTIVE", respond with message "ACTIVE"
License Key should be mapped to expiry (Expiry to be configured by admin).
host
all
all
127.0.0.1/32
ident
host
all
all
::1/128
ident
local
replication
all
peer
host
replication
all
127.0.0.1/32
ident
host
replication
all
::1/128
ident
host
all
all
127.0.0.1/32
ident
host
all
all
0.0.0.0/0
md5
host
all
all
::1/128
ident
local
replication
all
peer
host
replication
all
127.0.0.1/32
ident
host
replication
all
::1/128
ident
local
all
all
local
all
all
peer
md5
$ sudo systemctl status postgresql-10
This mode is scheduled to run on a need basis or bi-monthly so there is no huge data crunch and the inline mode would have re-encrypted most of the data.
The Modular Open Source Identity Platform (MOSIP) effort started about 20 months ago as a response to the technology challenge identified by the ID community. MOSIP has launched the 1.1 version on Github and continues to improve the platform with fixes and enhancements. However, there are several additional important modules that need to be built to shape this open-source layer. The MOSIP team has curated a list of modules/ problems that would require the best minds in the technology world to take up and solve for.
To organize this effort to work with technology enthusiasts from around the world, the MOSIP team is proposing the Technology Contributors Coalition (TCC). The TCC is being set-up as a coalition of individuals and organizations who are keen on shaping the evolution of MOSIP. Organizations can encourage their resources to collaborate on specific projects by contributing code and documentation or second their resources to work full time with the MOSIP team.
TCC contributors will work closely with the MOSIP team on identified modules, features, or problems, or suggest new modules and enhancements to MOSIP. The key areas of contribution will include enhancements related to privacy, security, interoperability, service delivery, improved user experience etc. A suggested set of ideas for collaboration are appended below.
#1. Reporting Framework Mosip in its operation generates system data, seed data and transaction data along with audit logs. Reporting and analytics are required to monitor the operations of the system.
Use cases
Collation of data from numerous sources like master tables, transactional data, audit logs, system health monitors.
Creation of a live stream of data for real time analytics
Creation of a data lake to store data for consumption by presentation tools
#2. Registration App on a Tablet The registration services contain the required functionalities to capture and record demographic and biometric details of individuals. A native UI has been provided as a reference implementation for demo and customization. It is required to provide the same functionality on an iOS and Android tablets.
Use cases
Use the inbuilt camera to capture photograph
Work with peripherals for capture of other fingerprint and Iris
Use MDS specifications for interacting with the devices to capture biometrics securely
#3. Resident Portal Resident portal offers residents to avail self-service features for managing their identity data, controlling and viewing usage of their identity. A set of REST API provided by MOSIP is available for the portal to use. A portal is required with a human-centric design.
Use cases
Updating ID data
Managing ID usage (Lock / Unlock)
Generate virtual id
You can view the features for Resident Services .
#4. Resident Portal App The resident self-service app offers the same set of features offered in the portal as an app on the phone or tablet. Refer to Problem 3 for use cases.
#5. Log Manager Log manager provides following functionalities:
Create a logging system reference implementation with stacks such as elk, splunk, kafka etc.
Logging features should support
Supports creation of logs without loss of data with log levels
These logs come handy for analyzing the system behavior and debugging. More details can be obtained from our .
We need a visual dashboard that would display the logs using tools like Kibana.
#6. Consent Framework MOSIP is a custodian of user’s identity data. A user consent framework is needed that allows users to wield varying degrees of control of different types of their data and their uses.
Consent is required from the user for the following:
Verification of user identity by an external application
Verification of user data (Know Your Customer)
Sharing of user data (Know Your Customer)
Consent can be obtained a-priori or instantly for different nature of transactions. Consent can be provided in multiple ways like:
Authorizing a transaction with authentication (single or multi-factor) (Instant)
Signing the request with a digital certificate (apriori)
Providing an OTP (Instant)
No action is taken without user’s continued consent and knowledge.
A data clearinghouse setup can be set up to facilitate the exchange of information between the functional system based on user consent. This will help keep user information current and relevant and avoid sharing of data via third-party agents or an unsecured procurement chain.
#7. Fraud Analytics The objective of a fraud management system is to ensure frauds in various stages are identified and prevented. Some examples of tagging for possibility of frauds are below.
Fake supporting documents such as Proof of Identity, Address proof, age proof etc.
Registration in the name of an individual who is dead
Registration that happens outside the windows of working time of the registration centers
#8. System Health Monitoring Users need to monitor the health of various services running on the MOSIP server to manage them efficiently. The foundational ID Systems needs to run 24x7 for long period of time.
Common health monitoring use cases are,
Health of the services that includes services that are running and the ones that are down
Requests pending in the queues that have not been clearly for a long time
One or more services are not reachable since they are not running
Tools sets that may be used could be,
Heapster can be used to monitor Kubernetes clusters and collect metrics from it.
InfluxdB can be used to store these collected metrics in time-series database
Grafana or Prometheus to aggregate the collected information
#9. Homomorphic encryptions for offline validation An offline authentication mode is a powerful way to prove identity with very less traceability by a central system. We would like to avoid any card-based technology in performing such authentication as carrying and keeping its pin safe is specific to the culture of the country. The better model would be to print an ID card themselves (like QR code) who can then take it anywhere for validation without losing the privacy. One example use case is defined below.
Login to the MOSIP from a internet connected computer.
Perform a biometric/biographic authentication and receive the ekyc data.
Print the data (VID + demographic + photo) encrypted with homomorphic in QR form.
#10. Transparency of data integrity in custodian’s environment The initial adopters of MOSIP are developing nations with huge aspirations to go digital. While MOSIP plays a vital role in establishing a foundational digital id its essential that MOSIP brings transparency to the demographic and biometric data stored.
We want to ensure that every individual’s record is updated only after his consent.
A means of cryptography through which we could ensure that internal hackers cannot alter records and hide the evidence.
A mechanism for MOSIP to auto-publish a hash (or something similar) which could be used to validate that the data has not tampered.
#11. False Finger/Iris/Face detection While biometric has proven to be unique it also suffers from attacks related to false fingers/non-live photos. It’s important to build a mechanism over which we can detect such fraudulent activities. While the device on the field would bring in liveness validation it would not be enough just to depend on that alone.
All our images are JPEG lossless, so it would be good to have a mechanism to identify false biometrics on the server.
#12. Advanced demographic storage One of the important services in MOSIP is to provide authentication - An online verification. MOSIP plans to federate this service across multiple players. We expect the residents to choose a service provider to whom MOSIP can share data.
MOSIP would like to share this data in an encrypted model where the authentication provider has no access to the original data but still be non-reputable, and is able to provide an online verification service.
Is it possible to use Homomorphic encryption in this case?
Please see the on how to file bugs, contribute code, and more.
You can join the our to get more updates!
You may also be interested in joining our community room on Gitter via where you could get some great community support.
Biometric Specification
Biometrics images for various modalities are represented and exchanged as per the below specifications.
Admin portal allows managing registered devices. Device registration API is available. Device vendor to provide Device Management Server which takes care of registering devices and Key rotation
SMS Notification
Yes
Interface available. SMS Gateway/service to be provided by SI
Email Notification
Yes
Interface available. SMS Gateway/service to be provided by SI
Audit Trail
Yes
Technical Help Desk
No
Customer Relationship Management
No
Backup/Restore Management
No
Manual Adjudication
No
APIs available to retrieve data and approve/reject a packet when a Biometric Duplicate is found
Manual Verification
No
Analytics
No
Authentication OTP
Yes
Authentication Biometrics
Yes
Knowledge Management System
No
Payment Gateway
No
Card Production
No
Card Management
No
Implementation available for sending cards in queue to print and forward to postal system
Fraud Management
No
Supporting Document Retrieval
No
Registration processor may be customized for the same
Token Management at Registration Center
No
Registration of Pre-registered/Appointment
Yes
If MOSIP PreReg module is deployed
UIN Retrieval (Lost UIN)
Yes
Update of Demographic Information
Yes
Update of Biometric data
Yes
Grievance Reporting
No
Lock UIN against Auth
Yes
Transaction History Generator
No
Audit logs, DB records, and Resident Services APIs available
Integration hooks provided. SI to procure and integrate
Computation and storage of metrics on a periodic basis for trend analysis
Mechanism to archive or purge data based on time
Provide reports to support operations (some indicative reports are given below)
Report the number of new registrations carried out per day
Report the number of UIN update transactions
How many registrations happened per registration center on a given day
Report the number of UINs allocated age-wise and gender wise
How many registrations were approved and rejected end of day centerwise
Given a center, the list of registrations that were rejected along with the reasons for rejecting
Given a date or date range, list of registration packets that failed processing (for administrators)
Packet processing statistical report that includes
Number of new registrations, UIN updates, lost UIN, UIN updates via. Resident Services & Re-Prints done every day.
Number of packets stuck at processing state or failed for a specific date
View usage logs
Merge pre-registration features into this portal
CMS integration for country specific content to be presented
Login, session management features
Responsive UI that can work with mobiles and tablets
Collates logs from across the application
Store generated logs in configured location
Manages log size, rotation segregation
Support for logger configurations
Support addition log level to a particular logger dynamically
Indexing and searching of log to be supported
Time based purging of log to be supported for different types of log data
Seeding of authorized systems (Functional ID Linkage)
Sharing a generated pass-key (Instant)
Using a challenge-response mechanism (Instant)
Registering a child with invalid introducer (may be with using the operator’s identity)
Pre-registrations done from outside the country are tagged for fraud analysis.
Pre-registrations done from a single host many times may be tagged for fraud analysis.
A registration operator is taking way more time than the standard time may be tagged for further analysis.
A registration center has been decommissioned however there could be attempted registrations that eventually MOSIP denies, but the data would be useful for further analysis about the activities around the center.
A registration operator has been disabled, but there could be attempted registrations that are denied by MOSIP, but the data would be useful for further analysis.
Frequent registrations happening from one or more centers using manual adjudication process regularly could be a case of possible frauds.
The server may be running but has crashed multiple times over a given period of time rendering the server unhealthy.
The dependent servers/services such as ABIS, authentication servers, eKYC servers etc might be disconnected or not running and hence the server may not be able to fulfil requests completely.
The server may be running at suboptimal performance
Measure system metrics such as network utilization, disk utilization, CPU and memory utilization. The solution would require
Providing health monitoring APIs using which one could create a health monitoring dashboard
Providing alerts via SMS and emails.
Providing mechanisms to register to one or more alerts
All MOSIP services are embedded into various docker containers orchestrated by Kubernetes. Hence it is possible to measure the following
Kubernetes node utilization
Monitoring the running pods
Utilization of network, memory and CPU in individual pods
The data is digitally signed.
Take it to a bank to open an account
The person who carries the QR code print provides VID (one VID per QR) and demographic data.
Bank validates if the homomorphic data contains the given information and the photo matches the person standing in front.
If all is OK then the bank stores the entire QR Code and opens the account.
>= 500 native DPI. Higher densities are preferred.
RRefer to ISO 19794-6:2011 Specifications.
Factor
Registration Devices
Authentication Devices
Image Specification
ISO 19794-6:2011 Annex B
ISO 19794-6:2011 Annex B
Minimum Iris Diameter
Refer ISO 19794-5:2011 Specifications.
Factor
Registration Devices
Authentication Devices
Image Specification
ISO/IEC 19794-5:2011
ISO/IEC 19794-5:2011
Camera Specification
We recommend that countries look at ergonomics, accessibility, ease of usage, and common availability of devices while choosing devices for use in registration and authentication scenarios.
NFIQ v2.0 has been removed from the supported quality score for fingerprint authentication device
Introduction
Change History
Image formats
Fingerprint
* MOSIP adopters can change this if needed.
** Please refer .
Iris
* MOSIP adopters can change this if needed.
** Please refer .
Face Capture
* MOSIP adopters can change this if needed.
** Please refer .
Capture Time across modalities should be less than 4 Seconds (time taken for providing a final capture response to the calling application, when the biometrics are well placed on the sensors)
XML Container
UI Specification for Pre-registration
UI specification helps us identify how the data in an ID attribute (attributes of an ID object) is going to be retrieved from the UI. The UI screens in registration client application and pre-registration application are rendered using their respective UI specification JSON. We have different UI Specifications for Registration Client & Pre-registration which is derived from the ID Schema. Here we would be discussing about the properties used in the UI specification of Pre-registration.
Below are the properties in pre-registration UI specification that are used to store ID attributes in an ID object.
Name
Description
Example
>= 500 native DPI.
Minimum Active Platen Area or Capture area*
>=1.6 x 1.5 inches for 1 to 2 fingers
>=3.2 x 2.0 inches for 4 fingers
>=0.5 x 0.65 inches*
Greyscale Density
8 bits (256 grey levels)
8 bits (256 grey levels)
Image Format
JPEG 2000 Lossless
JPEG 2000 Lossy or WSQ
Compression Ratio
Lossless
Up to 15:1
Quality Score
NFIQ v2.0
NFIQ v1.0
Capture Mode
Auto Capture
Auto Capture
Preview
> 3 FPS M-JPEG frames with NFIQ 2.0 score superimposed
Not Applicable
ESD
>= 8kv
>= 8kv
EMC Compliance
FCC class A or equivalent
FCC class A or equivalent
Operating Temperature*
0 to 50 °C
0 to 50 °C
FTM**
SBI 1.0 - Use host based security (and above)
SBI 2.0 - FTM supported security
>=210 pixels
>=150 pixels
Grey Scale Density
8 bits (256 grey levels)
8 bits (256 grey levels)
Spatial Resolution
>=60% @ 2Lp/mm
>= 50% @ 1Lp/mm
Pixel Resolution
>10 pixels/mm
>10 pixels/mm
Capture Distance
>=10CM
>=10CM
Imaging Wavelength
Approximately 700-900 nm
Approximately 700-900 nm
Illumination
The eye should be illuminated using infrared or any other source that could produce high-quality gray scale image
The eye should be illuminated using infrared or any other source that could produce high-quality gray scale image
Image Format
IMAGE_TYPE_VGA (K2) OR IMAGE_TYPE_CROPPED (K3)
IMAGE_TYPE_CROPPED_AND_MASKED (K7)
Compression
JPEG 2000 Lossless
JPEG 2000 Lossy
Compression Ratio
Lossless
Up to 15:1 (>= 3.5 KB)
Aspect Ratio
1:1
1:1
Capture Mode
Auto Capture
Auto Capture
Scan Type
Progressive
Progressive
Preview
>= 3 FPS M-JPEG frames with quality score superimposed
Not Applicable
EMC compliance
FCC Class A or equivalent
FCC Class A or equivalent
Operating Temperature*
0 to 50 °C
0 to °50 C
FTM**
SBI 1.0 - Use host-based security (and above)
SBI 2.0 - FTM supported security
1080p with 90 degree FoV or above
720p or above
Skin Tone
All
All
Exception Image Specification
Full Frontal with FACE features, two palms next to the face, waist up photo.
60mm(width) X 40mm(height)
Not Applicable
Image quality
ICAO - Full frontal image, +/- 5 degrees rotation, 24 bit RGB, white background
35 mm(width) X 45mm(height)
ICAO is not mandated
Image format
JPEG 2000 Lossless
JPEG 2000 Lossy
Compression Ratio
Lossless
Up to 15:1
EMC compliance
FCC Class A or equivalent
FCC Class A or equivalent
Operation Temperature*
0 to 50 °C
0 to 50 °C
FTM**
SBI 1.0 - Use host based security (and above)
SBI 2.0 - FTM supported security
SBI specification documentation
SBI specification documentation
SBI specification documentation
id
Unique Ids for each attribute in ID Schema
fullname
description
Description for the ID attribute
Full Name of Resident
labelName
Label used for displaying the ID attribute in the UI
labelName.eng
Label value in English
Full Name
labelName.ara
Label value in Arabic
الاسم الكامل
labelName.fra
Label value in French
Nom complet
controlType
UI element used for displaying the attribute
textbox, dropdown, date, fileupload
inputRequired
Used to identify if UI input is needed or not
true or false
validators
List of validators for the attribute
validators.type
Type of validaton engine
regex
validators.validator
Pattern / methodName / scriptName / expression for the validation
validators.arguments
List of arguments needed for the validator
required
Used to decide if it is mandatory or not
true or false
The id property is the unique id provided to a fields to uniquely identify it. The fields can be alpha-numeric without any spaces between them.
This is a non-mandatory property used to describe the ID attribute.
This property defines label name to be used in UI. This property has sub attributes as the language code (eng, fra, ara) to store data in different languages based on the country's configuration.
This property defines what kind of UI component to be used to capture data in UI. Currently the values that can be used are:
textbox
dropdown
date
fileupload
This is a mandatory property which decides if the input is to be provided from the UI or not.
This property enables us to add a the list of validators for the ID attribute. Each validator will have the below fields,
Fields
Description
type
for validation engine type
validator
for pattern / methodName / scriptName / expression
arguments
Currently, regex is supported by MOSIP, the adopter can choose to add various types of validators.
This is a mandatory property which is needed to identify if the ID attribute is mandatory or not.
The admin portal integrates with the key cloak IAM to store users and provides login functionality. When an administrator accesses the homepage or any page on the admin portal through a browser, the portal detects if the administrator is already logged-in or not. If not, the system re-directs the administrator to the key cloak login user interface which requests the administrator for his/her username and password. After getting the credentials, key cloak verifies the administrator’s credentials and role. It also validates whether the administrator is not deactivated. After successful validation of the credentials, the system then re-directs the administrator to the page he/she initially landed on.
Logout
Manual logout
If an administrator wishes to logout of the admin portal, he/she can opt to select the logout option from the profile menu on the administrator UI. The system logs out the administrator.
Auto logout
If the user is inactive for 'X' minutes (where 'X' is configurable), the system logs out the user automatically. In such case, the system will not save any user’s data.
Account management
Using the portal, user will manage his/her profile. The portal users are central admin, central approver, zonal admin, zonal approver, registration center head, registration supervisor, and registration officer.
Resource management
Center management
Admin portal allows an administrator to manage registration centers, setup by the country for taking registrations of the residents. Center management includes functionalities like viewing, creating, editing, activating, deactivating and decommission of centers. An administrator should have the role of a zonal admin/global admin to do this. A zonal admin/global admin can manage only centers under his/her administrative zone.
The admin portal allows an admin to view the list of all registration centers available in the jurisdiction of his/her administrative zone. The system does not fetch the details of decommissioned registration centers but only active and inactive centers. Admin portal UI shows the list of registration centers in only the country configured primary language.
The administrator can filter the list of registration centers based on following parameters:
Center name
Center type
Status
Besides the list view, an administrator can also view the detail of a registration center by clinking on a center name in the list view. This detail view shows all the details of a registration center in all the country configured languages.
The registration center list view screen is built using a templatized approach.
An admin can create a center by providing necessary mandatory details. A center needs to be created in both configured primary and secondary language. Although the portal will allow creation of a center in only primary language but will not allow activation of that center until data for that center is not updated for all the languages.
A center is created with the following attributes:
Center name, center type, address, latitude, longitude, location, contact phone, contact person, working hours, no. of kiosk, center start time, center end time, lunch start time, lunch end time, time zone, holiday zone and administrative zone the center belongs to. A center can only be mapped to the administrative zone at the lowest zonal hierarchy. While defining centers, An admin can also define the working days of the week for a center and any exceptional holidays that might be applicable for a particular center.
While entering data through UI in multiple languages, the dropdown values and numeric values entered in primary language gets automatically captured in all language. But the text fields (e.g., center name) needs to be manually input in all the languages.
Once a center is created, an admin can edit a center later if required. The update can include adding the details in another required language that were missed during creation of the center or changing the details of a center itself.
All the attributes mentioned in the 'Create center' section can be updated for a center.
An admin can deactivate or decommission a center through the admin portal.
Deactivation refers to a temporary shut down while decommission refers to a permanent shut down of the center. Decommissioning a center also automatically deactivates the center. In cases, where a center has some resources mapped to it (e.g. machines, devices or users), the portal won't allow the admin to decommission such a center.
Difference between deactivated and decommissioned center is that a deactivated center can later be activated later through admin portal as required by the country. But a decommissioned center cannot be bought into commission again as decommission refers to a permanent shutdown. To reactivate such a center (if decommissioned by mistake), the admin must directly update the database through the back-end scripts.
Admin portal allows an administrator to manage machines the country will use for taking registration of the residents. The definition of machine is the device on which the registration client is installed. Machine management includes viewing, creating, editing, activating, deactivating and decommission of machines. An administrator should have the role of a zonal admin/global admin to do this. An admin can manage only machines under his/her administrative zone.
The Admin portal allows an admin to view the list of all machines available in the jurisdiction of his/her administrative zone. The system does not fetch the details of decommissioned machines but only active and inactive machines. Admin portal UI shows the list of machines in only the country configured primary language.
The admin can filter the list of machine based on following parameters:
Machine name
Mac address
Serial number
Besides the list view, an administrator can also view the detail of a machine by clinking on a machine name in the list view. This detail view shows all the details of a machine in all the country configured languages.
An admin can create a machine by providing necessary mandatory details. A machine needs to be created in both configured primary and secondary language. Although the portal will allow creation of the machine in only primary language but will not allow activation of that machine until data for that machine is not updated for all the languages.
A machine is created with the following attributes:
Machine ID, machine name, mac address, serial number, machine spec ID and administrative zone the machine belongs to.
While entering data through UI in multiple languages, the dropdown values and numeric values entered in primary language gets automatically captured in all language. But the text fields (e.g., machine name) needs to be manually input in all the languages. A machine can be mapped to the administrative zone which is at the any zonal hierarchy.
Once a machine is created, an admin can edit a machine later if required. The update can include adding the details in another required language that were missed during creation of the machine or changing the details of a machine itself. All the attributes mentioned in the 'Create machine' section can be updated for a machine.
An admin can deactivate or decommission a machine through the admin portal.
Deactivation refers to a temporary shut down while decommission refers to a permanent shut down of the machine. Decommissioning a machine also automatically deactivates the machine. In cases, where a machine is mapped to any center, the portal won't allow the admin to decommission such a machine.
Difference between deactivated and decommissioned machine is that a deactivated machine can later be activated through admin portal after a period as required by the country. But a decommissioned machine cannot be bought into commission again as decommission refers to a permanent shutdown. To reactivate such a machine (if decommissioned by mistake), the admin must directly update the database through the back-end scripts.
Admin portal allows an admin to map machines to a center. This mapping specifies as to which center the machine will be used in. A machine can only be mapped to a center which belongs under the machine's administrative zone.
A machine can later be un-mapped from the center in cases where a machine is needed to be moved to another center. In such cases, the machine will later need to be mapped to the new center. In case the machine is required to be mapped to a registration center outside the administrative zonal restriction, the administrative zone of the machine must be changed.
Admin Portal allows an Administrator to manage Devices the Country will use for taking Registration of the Residents. These includes Device for bio-metric capture (Fingerprint, Iris, Web camera etc.) Device management includes Viewing, Creating, Editing, Activating, Deactivating and Decommission of Devices. An Administrator should have the role of a Zonal Admin/Global Admin to do this. A Zonal Admin can manage only Devices under his/her administrative zone.
The Admin portal allows an Admin to view the list of all Devices available in the jurisdiction of his/her administrative zone. The system does not fetch the details of Decommissioned Devices but only Active and Inactive Devices. Admin portal UI shows the list of Devices in only the country configured Primary Language.
The Admin can filter the list of Registration Centers based on following parameters:
Device Name
Mac Address
Serial Number
Besides the list view, an Administrator can also view the detail of a Device by clinking on a Device Name in the List view. This Detail view shows all the details of a Device in all the country configured languages.
An Admin can create a Device by providing necessary mandatory details. A Device needs to be created in both configured Primary and Secondary languages. Although the Portal will allow creation of the Device in only primary language but will not allow activation of that Device until data for that Device is not updated for all the languages.
A Device is created with the following attributes:
Device ID, Device Name, Mac Address, Serial Number, Device Spec ID and Administrative Zone the Device belongs to. A Machine can be mapped to the Administrative Zone which is at the any Zonal hierarchy.
While entering data through UI in multiple languages, the dropdown values and numeric values entered in primary language gets automatically captured in all language. But the text fields (e.g., Device Name) needs to be manually input in all the languages.
Once a Device is created, an Admin can edit a Device later if required. The Update can include adding the details in another required language that were missed during creation of the Device or changing the details of a Device itself.
All the attributes mentioned in the 'Create Machine' section can be updated for a Machine.
An Admin can Deactivate or Decommission a Device through the Admin Portal.
Deactivation refers to a temporary shut down while Decommission refers to a permanent shut down of the Device. Decommissioning a Machine also automatically deactivates the Machine. In cases, where a Device is mapped to any Center, the portal won't allow the Admin to decommission such a Device.
Difference between Deactivated and Decommissioned Device is that a Deactivated Device can later be Activated through Admin Portal after a period as required by the country. But a Decommissioned Device cannot be bought into commission again as decommission refers to a permanent shutdown. To reactivate such a Device (if decommissioned by mistake), the Admin must directly update the database through the back-end scripts.
Admin portal allows an Admin to map each Device to a Center. This mapping specifies as to which Center the Device will be used in. A Device can only be mapped to a Center which belongs under the Device’s Administrative Zone.
A Device can later be un-mapped from the Center in cases where a Device is needed to be moved to another Center. In such cases, the Device will later need to be mapped to the new Center. In case the Device is required to be mapped to a Registration Center outside the Administrative Zonal Restriction, the Administrative Zone of the Device must be changed.
Refer to section on more details of CRUD APIs used in above mentioned features.
MOSIP uses Keycloak as an IAM (Identity access management tool) for managing Users. These users are internal users of MOSIP including Registration Officers, Registration Supervisors, Zonal Admins, Global Admins etc.
User Management includes Viewing, Creating, Editing, Activating, Deactivating and Blacklisting of Users.
Admin portal allows an Admin to map Users to a Center. This mapping specifies as to which Center the User will be used in. A User can only be mapped to a Center which belongs under the User’s Administrative Zone.
A User can later be un-mapped from the Center in cases where a User is needed to be moved to another Center. In such cases, the User will later need to be mapped to the new Center. In case the User is required to be mapped to a Registration Center outside the Administrative Zonal Restriction, the Administrative Zone of the User must be changed.
Administrative Zones are virtual boundaries which a country can define to better manage their resources which are used during registrations. These resources includes Centers, Users, Machines and Devices. These zones can be defined in a hierarchical fashion and a country can allocate resources to such zones based on their requirements.
Resources under each zone is managed by a Zonal Admin. This is done by assigning an Administrative zone to the Zonal Admin during user creation. These Zonal Admins can exist at any zonal hierarchy. (For e.g, a Zonal Admin can directly be mapped to the whole country as a Zone or can be mapped to a significantly smaller zone such as a city). Thus these resources when mapped to an Administrative Zone can only be managed by the Admin of that Zone.
Admin Portal allows an Administrator to manage Masterdata applicable for a Country. These data includes list of Genders, list of Holidays, Templates etc. This data is used by all the modules across MOSIP which includes Pre-Registration, Registration Client, Registration processor and ID-Authentication. An Administrator should have the role of a Global Admin to manage Masterdata.
The portal allows a Global Admin to view the list of Masterdata types. Through this list, the global admin can click on any of them and can view the data for that particular Masterdata table.
The portal allows the Global Admin to view the data of any Masterdata which are applicable to a country. The Administrator can access these list views by clicking on a type of Masterdata in the Masterdata Types Screen.
Each of these List views consumes the same UI template and allows following features:
List view shows data of a Masterdata Type only in the country configured Primary Language.
The Global Admin can access pagination features on each list screens. These includes selecting no. of rows to be displayed on the list view and options to jump to next or previous set of records.
The Global Admin can sort the data by any column on the list view
Since not all the attributes for a Masterdata record will be shown on the list view, the Global Admin can them all on the Masterdata detail view page. This view can be accessed by clicking on a record in the list view. The detail view will show all the details of a Masterdata record in all the languages configured by the country. The Global Admin can also activate/deactivate the record from detail view page.
Document types is the list of Documents a country will configure for the users to give during registrations.
The Global Admin can view list of all the available Document Types on the Admin UI portal. The portal shows both activated or deactivated Document Types. The Admin can filter the list of Document Types based on Document Name(Search box) and Status (Drop-down).
Using the portal, the Global Admin can create the document type providing the Document name and description if applicable. A Document type needs to be created in both configured Primary and Secondary language. Although the Portal will allow creation of a Document type in only primary language but will not allow activation of that Document type until data for that Type is not updated for all the languages. A deactivated document type will not show up on the Pre-Registration/Registration Client UI. While entering the data, the text fields (e.g., Document Type Name) needs to be manually input in all the languages. After successful creation, a Document type code will be generated.
Admin Portal also allows modification of any detail of a Document type. The modification includes either adding the details in another language that were missed during creation of the Document type or changing the details of a Document Type itself including name, description etc.
The portal allows Zonal Admin to activate or deactivate a document type. Deactivation of a document type can be done if the country feels the document type is not applicable anymore. Thus, deactivated documents does now show up on the Pre-Registration and Registration Client UI. The Activation/Deactivation functionality can be accessed from both the list view or the detail view page of Document Types
The Global Admin can view list of all the available Document Categories as created by the Country in Masterdata. The portal shows both activated or deactivated Document Categories. The Admin can filter the list of Document Categories based on Status (Drop-down).
Using the portal, the Global Admin can create the document category providing the Document Category name and description if applicable. A Document category needs to be created in both configured Primary and Secondary language. Although the Portal will allow creation of a Document category in only primary language but will not allow activation of that Document category until data for that Cateagory is not updated for all the languages. A deactivated document category will not show up on the Pre-Registration/Registration Client UI. While entering the data, the text fields (e.g., Document category Name) needs to be manually input in all the languages. After successful creation, a Document category code will be generated.
Admin Portal also allows modification of any detail of a Document category . The modification includes either adding the details in another language that were missed during creation of the Document category or changing the details of a Document category itself including name, description etc.
The portal allows an Global Admin to view Document Categories along with its mapped and un-mapped Document Types. From the view screen itself, the Global Admin can map or un-map the Documents from a Document Category.
The portal allows the Global Admin to map the available Document types to a Document category. This feature helps the country define as to which document falls under which category. Each Document can be mapped to multiple categories depending on the country's requirement.
The Global Admin can view list of all the Locations created by the country on the Admin UI portal. This list of locations defined shows up on the Pre-Registration and Registration UI while typing the address. The portal shows both activated or deactivated Locations Types. The Admin can filter the list of Locations based on Status (Drop-down) and each Location level (Search Box).
Using the portal, Global Admin can create/update the location data by providing location name and the parent hierarchy of that location. A location needs
A Location needs to be created in both configured Primary and Secondary language. Although the Portal will allow creation of a Location in only primary language but will not allow activation of that Location until data for that Location is not updated for all the languages. A deactivated Location will not show up on the Pre-Registration/Registration Client UI. While entering the data, the text fields (e.g., Document Type Name) needs to be manually input in all the languages. After successful creation, a Location code will be generated.
Admin Portal also allows modification of any detail of a Location. The modification includes either adding the details in another language that were missed during creation of the Location or changing the details of a Location itself including name, parent hierarchy etc.
The portal allows activation or deactivation of a Location. Deactivation of a Location can be done if the country feels the Location is not applicable anymore. Thus, deactivated locations does now show up on the Pre-Registration and Registration Client UI. The Portal won't allow deactivation of a Location if any child of that location is still active. The Admin will have to first deactivate all the child locations before deactivating a parent location. The Activation/Deactivation functionality can be accessed from both the list view or the detail view page of Location data.
The Global Admin can view list of all the available Blacklisted words on the Admin UI portal. The portal shows both activated or deactivated Blacklisted words. Blacklisted words in the only Masterdata which is language independent and will show the data in all the languages unlike the rest of the Masterdata tables which will show data only in primary language. The Admin can filter the list of Blacklisted Words based on Status (Drop-down), Word (Search Box) and Language (Drop-Down).
Using the portal, the Global Admin can create the Blacklisted Word providing the Word, Description (if applicable) and Language in which the blacklisted word in being added. While entering the data, the text fields (e.g., Word, Description) needs to be manually input in all the languages. Admin Portal also allows modification of any detail of a Blacklisted Word. The modification includes either changing the word altogether or changing the description itself.
The portal allows activation or deactivation of a Blacklisted Word. Deactivation of a Blacklisted Word can be done if the country feels the Blacklisted Word is not applicable anymore. The Activation/Deactivation functionality can be accessed from both the list view or the detail view page of Blacklisted Word.
Registration Center Type indicates the type of Centers a country can have. Some examples can be Regular, Mobile, temporary etc. The Global Admin can view list of all the available Registration Center Types on the Admin UI portal. A Registration Center while creation, can be assigned to a Center Type as defined by the country. The portal shows both activated or deactivated Center Types. The Admin can filter the list of Center Types based on Status (Drop-down).
Using the portal, the Global Admin can create the Registration Center Type providing the Registration Center Type name and description if applicable. A Registration Center Type needs to be created in both configured Primary and Secondary language. Although the Portal will allow creation of a Registration Center Type in only primary language but will not allow activation of that Registration Center Type until data for that Type is not updated for all the languages. While entering the data, the text fields (e.g., Registration Center Type Name) needs to be manually input in all the languages. After successful creation, a Registration Center Type code will be generated.
Admin Portal also allows modification of any detail of a Registration Center Type. The modification includes either adding the details in another language that were missed during creation of the Registration Center Type or changing the details of a Registration Center Type itself including name, description etc.
Machine Type indicates the type of Machines a country uses to take registrations. The Global Admin can view list of all the Machine Types on the Admin UI portal. A Machine while creation, can be assigned to a Machine Types as defined by the country. The portal shows both activated or deactivated Machine Types.
Using the portal, the Global Admin can create a Machine type providing the Machine type name and description if applicable.
A Machine type needs to be created in both configured Primary and Secondary language. Although the Portal will allow creation of a Machine type in only primary language but will not allow activation of that Machine type until data for that Type is not updated for all the languages. While entering the data, the text fields (e.g., Machine type Name) needs to be manually input in all the languages. After successful creation, a Machine type code will be generated.
Admin Portal also allows modification of any detail of a Machine Type. The modification includes either adding the details in another language that were missed during creation of the Machine Type or changing the details of a Machine Type itself including name, description etc.
Machine specification indicates the Brand, Make and Model of a Machine a country uses to take registrations. The Global Admin can view list of all the Machine Specifications on the Admin UI portal. A Machine while creation, can be assigned to a Machine Specification as required by the country. The portal shows both activated or deactivated Machine Specification. The Admin can filter the list of Machine Specifications based on Status (Drop-down), Name (Search Box), Brand (Search Box), Model (Search Box), and Machine type (Search Box).
Using the portal, the Global Admin can create the Machine Specification providing the Machine Specification name, brand, make and model. A Machine Specification needs to be created in both configured Primary and Secondary language. Although the Portal will allow creation of a Machine Specification in only primary language but will not allow activation of that Machine Specification until data for that Specification is not updated for all the languages. While entering the data, the text fields (e.g., Machine Specification Name) needs to be manually input in all the languages. After successful creation, a Machine Specification ID will be generated.
Admin Portal also allows modification of any detail of a Machine Specification. The modification includes either adding the details in another language that were missed during creation of the Machine Specification or changing the details of a Machine Specification itself including name, brand etc.
View Device Types
Device Type indicates the type of Devices a country uses to take registrations. This device types includes Fingerprint scanner, Iris Scanner, Web camera, Document scanner etc. The Global Admin can view list of all the Device Types on the Admin UI portal. A Device while creation, can be assigned to a Device Types as defined by the country.
The portal shows both activated or deactivated Device Types. The Admin can filter the list of Device types based on Status (Drop-down) and Name (Search Box).
Create/Update Device Types
Using the portal, the Global Admin can create a Device type providing the Device type name and description if applicable.
A Device type needs to be created in both configured Primary and Secondary language. Although the Portal will allow creation of a Device type in only primary language but will not allow activation of that Device type until data for that Type is not updated for all the languages. While entering the data, the text fields (e.g., Device type Name) needs to be manually input in all the languages. After successful creation, a Device type code will be generated.
Admin Portal also allows modification of any detail of a Device Type. The modification includes either adding the details in another language that were missed during creation of the Device Type or changing the details of a Device Type itself including name, description etc.
View Device Specifications
Device specification indicates the Brand, Make and Model of a Device a country uses to take registrations. The Global Admin can view list of all the Device Specifications on the Admin UI portal. A Device while creation, can be assigned to a Device Specification as required by the country. The portal shows both activated or deactivated Device Specification. The Admin can filter the list of Device Specifications based on Status (Drop-down), Name (Search Box) and Device type (Search Box).
Create/Update Device Specifications
Using the portal, the Global Admin can create the Device Specification providing the Device Specification name, brand, make and model. A Device Specification needs to be created in both configured Primary and Secondary language. Although the Portal will allow creation of a Device Specification in only primary language but will not allow activation of that Device Specification until data for that Specification is not updated for all the languages. While entering the data, the text fields (e.g., Device Specification Name) needs to be manually input in all the languages. After successful creation, a Device Specification ID will be generated.
Admin Portal also allows modification of any detail of a Device Specification. The modification includes either adding the details in another language that were missed during creation of the Device Specification or changing the details of a Device Specification itself including name, brand etc.
View Individual Types
Individual Type indicates the category in which a country might want to categorize residents in. Foreigner, Non-Foreigner, Immigrant are some examples of Individual Types. These can be defined by the country in Masterdata are required by them. The Global Admin can view list of all the defined Individual Types on the Admin UI portal. The portal shows both activated or deactivated Individual Types.
Create/Update Individual Types
Using the portal, the Global Admin can create the Individual Type providing the Individual Type name and description if applicable. A Individual Type needs to be created in both configured Primary and Secondary language. Although the Portal will allow creation of a Individual Type in only primary language but will not allow activation of that Individual Type until data for that Type is not updated for all the languages. A deactivated Individual Type will not show up on the Pre-Registration/Registration Client UI. While entering the data, the text fields (e.g., Individual Type Name) needs to be manually input in all the languages. After successful creation, a Individual Type code will be generated.
Admin Portal also allows modification of any detail of a Document category . The modification includes either adding the details in another language that were missed during creation of the Document category or changing the details of a Document category itself including name, description etc.
View List of Holidays
List of Holiday defines all the public holiday a applicable for a country. These holidays are on of the criteria for Pre-Registration to generate appointments. The holidays only define the public holidays and not the week-end days for the country. The Global Admin can view list of all the defined Holidays on the Admin UI portal. The portal shows both activated or deactivated Holidays. The Admin can filter the list of Holidays based on Status (Drop-down), Date Range (Search Box) and Name (Search Box).
Create/Update Holidays
Using the portal, the Global Admin can create a Holiday providing the Document Category name, date, location, and description if applicable. A Holiday needs to be created in both configured Primary and Secondary language. Although the Portal will allow creation of a Holiday in only primary language but will not allow activation of that Holiday until data for that Holiday is not updated for all the languages. A deactivated Holiday will not be considered for appointment generation in Pre-Registration While entering the data, the text fields (e.g., Holiday Name) needs to be manually input in all the languages. After successful creation, a Holiday ID will be generated.
Admin Portal also allows modification of any detail of a Holiday. The modification includes either adding the details in another language that were missed during creation of the Holiday or changing the details of a Holiday itself including name, description etc.
View List of Templates
List of Templates contains all the notification templates used by MOSIP to send notifications to the Users or Residents. This notification includes OTP notification, Acknowledgment Notifications etc. Even acknowledgement shown on the Pre-Registration UI is defined in the template Masterdata. Each template in the Masterdata has a description defined for it which indicates as to where the template is being used in MOSIP. The Global Admin can view list of all the defined Holidays on the Admin UI portal. The portal shows both Activated or Deactivated Templates. The Admin can filter the list of Templates based on Status (Drop-down), Name (Search Box), Module Name (Drop-down) and Module ID (Drop-down).
Create/Update Templates
Using the portal, the Global Admin can create a Template providing the Template name, Template Text, Template type and description if applicable. A Template needs to be created in both configured Primary and Secondary language. Although the Portal will allow creation of a Template in only primary language but will not allow activation of that Template until data for that Template is not updated for all the languages. A deactivated Template will not be used thorughout MOSIP. While entering the data, the text fields (e.g., Template Name) needs to be manually input in all the languages. After successful creation, a Template ID will be generated.
Admin Portal also allows modification of any detail of a Template. The modification includes either adding the details in another language that were missed during creation of the Template or changing the details of a Template itself including name, description etc.
View Titles
List of Titles contains all the salutations defined by a country in all the country defined languages. The Global Admin can view list of all the defined Holidays on the Admin UI portal. The portal shows both Activated or Deactivated Titles. The Admin can filter the list of Titles based on Status (Drop-down).
Create/Update a Title
Using the portal, the Global Admin can create the Title providing the Title name and description if applicable. A Title needs to be created in both configured Primary and Secondary language. Although the Portal will allow creation of a Title in only primary language but will not allow activation of that Title until data for that Title is not updated for all the languages. While entering the data, the text fields (e.g., Title Name) needs to be manually input in all the languages. After successful creation, a Title code will be generated.
Admin Portal also allows modification of any detail of a Title . The modification includes either adding the details in another language that were missed during creation of the Title or changing the details of a Title itself including name, description etc.
View Gender Types
List of Gender Types contains all the Gender types defined by a country. The Global Admin can view list of all the defined Genders on the Admin UI portal. The portal shows both Activated or Deactivated Gender types.
Create/Update Gender Types
Using the portal, the Global Admin can create a Gender Type providing the Gender Type nameand description if applicable. A Gender Type needs to be created in both configured Primary and Secondary language. Although the Portal will allow creation of a Gender Type in only primary language but will not allow activation of that Gender Type until data for that Gender Type is not updated for all the languages. A deactivated Gender Type will not show up on the Pre-Registration/Registration Client UI. While entering the data, the text fields (e.g., Gender Type Name) needs to be manually input in all the languages. After successful creation, a Gender Type code will be generated.
Admin Portal also allows modification of any detail of a Gender Type. The modification includes either adding the details in another language that were missed during creation of the Gender Type or changing the details of a Gender Type itself including name, description etc.
A Registration packet generated in Registration Client is sent to Registration Processor for further processing and UIN generation. Using the Portal, A Zonal Admin can view the status of a packet by giving the RID of the packet. The packet status will contain all the stages the packet has passed through along with the last stage the packet is in. In case the packet has not been processed or is marked for Re-Send/Re-Register, the admin will be able to view specific comments indicating the reason for that particular status.
All the bio-metric devices which will be used for Authentication and Registration needs to be registered with MOSIP. Unless these devices are not registered, they cannot be used for capturing resident Bio-metrics for registrations or authentication.
For managing these devices, MOSIP needs to store details of following four entities:
Device Provider
Foundational Trust Providers
MOSIP Complaint MDS services
Device Providers are the vendors supplying devices for Registration or Authentication. This device provides are needed to be registered before the devices of this providers are getting registered.
An MOSIP Administrator can register each Device Provider with MOSIP by storing the attributes Vendor Name, Vendor Address, Contact Number, Email, Status (Active/Inactive) and Certificate Alias. The status of a Device Provider is automatically marked as ‘Active’ during the creation. After successful registration, a unique Device Provider ID is generated by MOSIP for each device provider. In case a device provider is getting registered with an already existing name and address, Admin portal won’t allow the creation of such a Provider.
Admin portal will also allow an Admin to update details of the Device Provider including the Name, Address, Contact Details and Status. Changing the status from Active to Inactive will render that provider inactive and any biometric received from a device of such a provider will fail the validation checks and thus rejecting the Auth/Registration request. Any creation and modification in the details of a Device Providers is maintained in a history table to future references.
MOSIP will use two types of devices. L0 devices (encryption is done on the host machine device driver or the MOSIP device service) and L1 (capable of performing encryption in device’s trusted module). A Foundational Trust Provider provides this module which is then put in the L1 devices during manufacturing. These Foundational Trust Providers are identified before-hand and are registered with MOSIP.
An MOSIP Administrator can register each Foundational Trust Provider with MOSIP by storing the attributes Trust Providers Name, Trust Providers Address, Contact Number, Email, Status (Active/Inactive) and Certificate Alias. The status of a Foundational Trust Provider is automatically marked as ‘Active’ during the creation. After successful registration, a unique Foundational Trust Provider ID is generated by MOSIP for each Foundational Trust Provider. In case a Foundational Trust Provider is getting registered with an already existing name and address, Admin portal won’t allow the creation of such a Trust Provider.
Admin portal will also allow an Admin to update details of the Foundational Trust Provider including the Name, Address, Contact Details and Status. Any creation and modification in the details of a Foundational Trust Providers is maintained in a history table to future references.
Every Registration/Auth Device needs to use a MDS (MOSIP Device Service) to communicate with MOSIP. Each MDS needs to be registered before-hand with the MOSIP. A MOSIP Administrator can register each MDS with MOSIP by storing the attributes Software Version, Provider ID, Device Type Code, Device Sub-Type, Make, Model, Software Created Date, Software Expiry Date and Software’s Binary hash. The status of a MDS is automatically marked as ‘Active’ during the creation. After successful registration, a unique Service ID is generated by MOSIP for each MDS.
There will always be a unique service ID of an MDS against a unique combination of a Software Version, Provider ID, Device Type, Device Sub Type, Make and Model. Thus, no two MDS can exist with same above-mentioned combination. Admin portal will also allow an Admin to update details of an MDS. Any creation and modification in the details of a MDS is maintained in a history table to future references.
Devices are categorized in two types based on the usage. Registration Devices (used during registrations in Registration Client) and Auth Devices (used during authentication through Partners). Before being used, these devices are needed to be registered in MOSIP using the Register/De-Register API.
The Device is needed to be registered with the following attributes.
Device ID – Mandatory
Purpose – [Registration or Auth]
Device Sub Ids - (optional)
Digital ID will be a signed base64 encoded Json Object. It will be decoded and stored in the Registered Device Table once the signature is validated with the root certificate issued to each Device Provider (for L0 devices) or Foundational Trust Provider (for L1 devices).
Registration Device can only be registered if they exist in the list of white-listed devices. Once a device is registered, a unique device code is generated for each device. For Registration devices, the code comes from the white-list table.
Once the device is registered, there details should not be changed. However, an Admin can change the status of the device. The device can have three different statuses: Registered, Retired, and Revoked. Once retired, a device can be re-registered by updating the its status, although same is not the case of Revoked devices as they cannot be re-registered once revoked. Any creation and modification in the details of a Device is maintained in a history table to future references.
Device Provider Management also provides an API to validate device details during Authentication in IDA or during packet validation in Registration Processor.
The API receives Device Code, Digital ID, and MDS Service Version and validates the following conditions.
The Device exist and is ‘Registered’ and ‘Active’
The Device is not Revoked or Retired
The Device Provider exist and is 'Active’
For validation in IDA, the API checks the current status of the details, But for validation in Registration processor, API checks the status of details as on the packet generation date and time. For this, the API additionally receives packet generation timestamp.
Admin portal provides support for multiple languages which can be configured by a country. The portal can support two languages one of which will be primary and another a secondary language. Both can be configured as per the Country’s requirements. The portal will render all the functionalities (View, Create and Update) in two languages thus allowing the Admin to access these functionality in both the languages simultaneously. Although the Home page, Labels and certain functionalities like ‘Viewing Packet Status based on RID’ will only be rendered in the primary language.
If a Country wants to use only one language in MOSIP, both primary and secondary language must be configured as the same language. If configured, the portal will render the screens in only one configured language. Although to be noted, both the primary and secondary languages must be configured. If not, The portal won’t allow the Admin to login and will be shown a message saying “The system has encountered a technical error. Administrator to setup the necessary language configuration(s)".
Steps to Install Keycloak Standalone Server
Prerequisites
Install Java
Install java (java-8-openjdk) in all the machines in the cluster and setup the JAVA_HOME environment variable for the same.
sudo yum install java-1.8.0-openjdk-devel
Get your Java installation path.
update-alternatives --display java
Take the value of the current link and remove the trailing /bin/java. For example, on RHEL 7, the link is /usr/lib/jvm/java-1.8.0-openjdk-1.8.0.191.b12-1.el7_6.x86_64/jre/bin/java, So, JAVA_HOME should be /usr/lib/jvm/java-1.8.0-openjdk-1.8.0.191.b12-1.el7_6.x86_64/jre.
Edit ~/bashrc.sh:
Export JAVA_HOME={path-tojava} with your actual java installation path. For example on a Debian with open-jdk-8:
sudo wget "https://downloads.jboss.org/keycloak/6.0.1/keycloak-6.0.1.tar.gz"
sudo tar xzf keycloak-6.0.1.tar.gz
Install a database supported by keycloak
We have installed postgres as the database for keycloak; you can use any database supported by Keycloak.
Documentation for Keycloak Database Setup is available .
Install Postgres in your VM. Guide to install PostgreSQL is available .
Within the …/modules/ directory of your Keycloak distribution, you need to create a directory structure to hold your module definition. The convention is use the Java package name of the JDBC driver for the name of the directory structure. For PostgreSQL, create the directory org/postgresql/main. Copy your database driver JAR into this directory and create an empty module.xml file within it too.
Module Directory
After you have done this, open up the module.xml file and create the following XML:
Module XML
The module name should match the directory structure of your module. So, org/postgresql maps to org.postgresql. The resource-root path attribute should specify the JAR filename of the driver. The rest are just the normal dependencies that any JDBC driver JAR would have.
To enable SSL we need a certificate which here in example we will use Lets encrypt.
Follow the steps in this to create a certificate for your domain.
We will create a keystore in which we will store certificate chain and private key and give them an alias
Go to {{keycloak folder}}/standalone/configuration
Open Standalone.xml and make following changes
Add a driver for postgres(Or your database)
Add Keycload admin user from keycloak bin directory run
Create a new Realm (eg. mosip).
Create clients for every module (i.e. ida, pre-registration, registration-processor, registration-client, auth, resident, mosip-client).
Enable authorization and service account for every client and provide valid redirect uri. These clients will be used by all modules to get client tokens.
For this example we will be configuring LDAP as user federation
Go to "User Federation".
Create a new User Federation for LDAP.
Make Edit Mode Writable.
Sync Users and Roles from LDAP .
Create INDIVIDUAL, RESIDENT Role from Keycloak in Realm Roles
Assign Roles from LDAP and Keycloak to All Clients
Admin APIs
This documents provides details about the APIs used by Admin Module.
The Pre-Registration module enables a resident to: - Enter demographic data & upload supporting documents - Book an appointment for one or many users for registration by choosing a suitable registration center and time slot - Receive appointment notifications - Reschedule and cancel appointments - Resident data is sent to the designated registration center before appointment that can be used during the registration process.
This service manages to provide the following service to the Pre-registration application. - Demographic - This service details used by Pre-Registration portal to maintain the demographic data by providing his/her basic details. - Document - This service enables Pre-Registration portal to request for uploading the document for a particular pre-registration. - QrCodeGenerator - This service details used by Pre-Registration portal to generate QR Code. - Transliteration - This service details used by Pre-Registration portal to provide transliteration from primary to secondary language. - Notification - This service details used by Pre-Registration portal to trigger notification via SMS or email. - Login - This service details used by Pre-Registration portal to authenticate user by sending OTP to the user, validating with userid and OTP.
The following events are triggered as part of User Event Type in ID Pre-Registration Service
array to hold parameter or dependent field ids required for validation
Location hierarchy (all location levels)
Status
Map status
Machine type
Status
Map Status
Device Type
Device Spec ID
The List view also allows the Global Admin to directly activate or deactivate a Masterdata record from list view itself
The List view also supports filtering by multiple attributes. The attribute can either have a drop-down or a search box which an Admin can use to input values for filtering the values. The search box supports wildcard search as listed below
text*: implies "Starts with" search
*text: implies "Contains in" search
text: implies exact match search
Biometric Devices (Registered and White-listed)
Signed Digital ID
Firmware
Device Expiry - (optional)
Certification Level – L0 or L1
Timestamp - ISO format date time with time-zone
Foundational Trust provider ID - Required only if certification level received is L1
The MDS service against he software version is in the list and is marked ‘Active’
The MDS Software version matches against the Device Type, Device Sub Type, Make, Model and Provider ID of the device as received in input as part of Digital ID
The Device Code received matches against the Make, Model, Device Type, Device Sub Type, Serial Number, Provider Name and Provider ID of the device which received as part of Digital ID
View center
Create center
Update center
Activate/Deactivate/Decommission center
Machine management
View Machine
Create machine
Update machine
Activate/Deactivate/Decommission machine
Map/Un-map/Re-map Machine to a Center
Device Management
View Device
Create Device
Update Device
Activate/Deactivate/Decommission Device
Map/Un-map/Re-map Device to a Center
User Management
Map/Un-map User to a Registration Center
Administrative Zone Management
Master Data Management
View Master Data Types
View Master Data for Each Table
Manage Master Data
Manage Document Type (View, Create, Update, Activate, Deactivate)
View Document Types
Create/Update Document Types
Activate/Deactivate Document types
View Document Categories
Create/Update Document Categories
View mappings of Document Categories and Document Types
Map/Un-map Document Type to Document Category
View Location Data
Create/Update Location Data
Activate/Deactivate Location data
View Blacklisted Words
Create/Update Blacklisted Word
Activate/Deactivate Blacklisted Word
View Registration Center Types
Create/Update Registration Center Types
View Machine Types
Create/Update Machine Types
View Machine Specifications
Create/Update Machine Specifications
Packet Status Check (based on RID)
Device Provider Management
Device Providers (Create/Update)
Foundational Trust Providers (Create/Update)
MOSIP Complaint MDS services (Create/Update)
Devices (Register/De-Register)
Device Detail Validation
Multi-language Support
i18N
If RID is invalid
ADM-PKT-003
Center does not exist
If Center ID extracted from RID does not exist
ADM-PKT-004
RID is miss
If RID is missing in the Input
ADM-PKT-005
Error occurred while fetch Packet Status
If any system error occurs while fetching Packet Status
Adding a SSL certificate to Keycloak Here we will give the keystore we created to keycloak
<ssl>
<keystore path="your key store pass relative to the next property" relative-to="jboss.server.config.dir" keystore-password="yourpassword" alias="your alias"/>
</ssl>
Configure field based on your LDAP(There are many vendors for ldap you can connect to any ldap vendor based on configurations).
Go to Mappers and Create mappers for each field you want keycloak to take from LDAP.
mosip.keycloak.base-url=https://<keycloak.domain>
mosip.kernel.realm-id=<Mosip realm id> (EX mosip, should always be in lowercase)
mosip.kernel.open-id-url=${mosip.keycloak.base-url}/auth/realms/{realmId}/protocol/openid-connect/
mosip.kernel.base-url=${mosip.keycloak.base-url}/auth/realms/{realmId}
mosip.kernel.admin-url=${mosip.keycloak.base-url}/auth/admin/
mosip.kernel.roles-url=realms/mosip/roles
mosip.kernel.users-url=realms/mosip/users
mosip.kernel.role-user-mapping-url=/{userId}/role-mappings/realm
`#Domain should be updated
mosip.authmanager.base-url=https://<domain>/v1/authmanager
mosip.keycloak.authorization_endpoint=${mosip.keycloak.base-url}/auth/realms/mosip/protocol/openid-connect/auth
mosip.keycloak.token_endpoint=${mosip.keycloak.base-url}/auth/realms/mosip/protocol/openid-connect/token
mosip.admin.login_flow.name=authorization_code
mosip.admin.login_flow.response_type=code
mosip.admin.login_flow.scope=cls
mosip.admin.clientid=mosip-client
mosip.admin.clientsecret=<client secret of mosip client>
mosip.admin.redirecturi=${mosip.authmanager.base-url}/login-redirect/
mosip.admin_realm_id=<Mosip realm id> (EX mosip)
mosip.master.realm-id=master
`#Go to Mosip realm -> Go to Roles -> select INDIVIDUAL ROLE you will find hyperlink in tab will have a id after roles-> /realms/mosip/roles/[e3bb3344-6445-4f6f-9e33-d5ec0d231327]
mosip.admin.individual_role_id=<role if of individual>
mosip.admin.pre-reg_user_password=mosip
db_3_DS.keycloak.ipaddress=<keycloak db url>
db_3_DS.keycloak.port=<keycloak db port>
db_3_DS.keycloak.username=<keycloak db username>
db_3_DS.keycloak.password=<keycloak db password>
db_3_DS.keycloak.driverClassName=<keycloak db driver class name>
mosip.keycloak.admin.client.id=admin-cli
`#First user we create when we started keycloak
mosip.keycloak.admin.user.id=<admin user name>
`#First user we create when we started keycloak
mosip.keycloak.admin.secret.key=<admin user password>
mosip.kernel.auth.client.id=<Auth Client id>
mosip.kernel.auth.secret.key=<Auth Secret id>
mosip.kernel.ida.client.id=<Ida Client id>
mosip.kernel.ida.secret.key=<Ida Secret id>
`#Token generation app id
resident.clientId=<resident-client-id>
resident.secretKey=<resident-client-secret>
KERNELAUTHMANAGER=${mosip.base.url}/v1/authmanager/authenticate/clientidsecretkey
Create a service to start Keycloak
Enable SSL for Keycloak server
Configure standalone xml
Add keycloak admin user
Keycloak server start
Configure keycloak
Configure User Federation
Access token expiration action
If you find that a particular service will take more time to complete the process within stipulated time period, your token perhaps will get invalidated. Use refresh token mechanism to get latest token or if that is not implemented you can increase the access token lifespan at client level or realm level.
SSL enable at keycloak
SSL in keycloak is enabled by default but it can be toggled for all request, external request, and none.
Update of configuration for keycloak
<> is for variable properties with this sign need to be updated.
This event specifies that the retrieval of all Pre-Registration id, Full name, Status and Appointment details by user id was successful.
User ID
User ID
PRE_401
User
Retrieve
This event specifies that the Retrieval of document is successfull.
Event ID
Event Type
Event Name
Description
Reference ID
Reference ID Type
PRE_402
User
Update
Event ID
Event Type
Event Name
Description
Reference ID
Reference ID Type
PRE_403
User
Delete
Event ID
Event Type
Event Name
Description
Reference ID
Reference ID Type
PRE_404
User
Upload
Event ID
Event Type
Event Name
Description
Reference ID
Reference ID Type
PRE_406
User
Data Sync
Event ID
Event Type
Event Name
Description
Reference ID
Reference ID Type
PRE_408
User
Reverse Sync
Event ID
Event Type
Event Name
Description
Reference ID
Reference ID Type
PRE_409
User
Copy
Event ID
Event Type
Event Name
Description
Reference ID
Reference ID Type
PRE_410
User
Authentication
Event ID
Event Type
Event Name
Description
Reference ID
Reference ID Type
PRE_412
User
Consumed Status
Event ID
Event Type
Event Name
Description
Reference ID
Reference ID Type
PRE_413
User
Expired Status
The following events are triggered as part of System Event Type in ID Pre-Registration Service
Event ID
Event Type
Event Name
Description
Reference ID
Reference ID Type
PRE_405
System
Exception
Event ID
Event Type
Event Name
Description
Reference ID
Reference ID Type
PRE_407
System
Persist
Event ID
Event Type
Event Name
Description
Reference ID
Reference ID Type
PRE_411
System
Notification
Pre-Registration Service
User Event Type
Retrieval Event Information for User Event Type
Update Event Information for User Event Type
Delete Event Information for User Event Type
Upload Event Information for User Event Type
Data Sync Event Information for User Event Type
Reverse Sync Event Information for User Event Type
Copy Event Information for User Event Type
Authentication Event Information for User Event Type
Consumed Status Event Information for User Event Type
Expired Status Event Information for User Event Type
System Event Type
Exception Event Information for System Event Type
Persist Event Information for System Event Type
Notification Event Information for System Event Type
Naming Standards
Audience
Data Modelers
Database Administrators
Database Developers
Application Developers
A simple and consistent naming convention for database objects, when followed rigorously, can help database application developers greatly.
Common standards are followed
Singular names for the entities
Object name length to be less than 30 chars
Lowercase object names separated by an underscore (_)
The database names will follow the below naming convention mosip_(abbreviated value of the module name)
Ex: mosip_prereg
The schema name is named after the DB name, by default, without mosip_. If there is more than one schema in a DB, then a proper single-word name is assigned, either a full word or an abbreviated word. Ex: prereg
The table name can have one or two words that describe the contents of the table separated by an underscore (_).
Table name should always be in the singular.
An alias for each table is defined, this alias can be used in various other places like reference keys, indexes, constraints, etc.
Indexes are named as idx_(table-alias)_(column-abbreviation)
Primary Key: Each table should have a primary key, the key should be named “pk_table-alias_column-name”. If it is a composite key, then in place of the column name any meaningful name can be provided.
Unique Key: If a surrogate is used as PK then create a unique key, on fields that uniquely define a business key. The naming of the unique key should be “uk_table-alias_column-names”.
Foreign Key: For any references from a table with the other tables, creating a foreign key is mandatory. This helps maintain referential integrity. A foreign key can be named as fk__table-alias1_table-alias2
Standardize the attribute implementation-defined the following common datatypes used across the MOSIP system. The datatype sizes are defined to consider multi-language storage support, which may vary based on the implementation.
Attribute
Attribute Description
Type
Size
The following acronyms are used in the data model
Abbreviation
Description
Abbreviation
Description
User ID
User ID
This event specifies that the Pre-Registration data is sucessfully updated in the demographic table.
NO ID
No ID
This event specifies that the Document is successfully deleted from the document table.
Multiple ID
Multiple ID
PRE_403
User
Delete
This event specifies that the Pre-Registration data is successfully deleted from demographic table.
NO ID
No ID
This event specifies that the Document is uploaded & the respective Pre-Registration data is saved in the document table.
NO ID
NO ID
This event specifies that the Retrieval of all the Preregistration Id was successful.
PRE REG ID
PRID
PRE_406
User
Data Sync
This event specifies that the Retrieval of the Preregistration data was successful.
PRE REG ID
PRID
This event specifies that the Reverse Data sync & the consumed PreRegistration id's are successfully saved in the database.
NO ID
NO ID
This event specifies that the document copied from source PreId to destination PreId is successfully saved in the document table.
NO ID
NO ID
This event specifies that the Otp has been sent sucessfully.
User ID
User ID
PRE_410
User
Authentication
This event specifies that the user has logged in sucessfully.
User ID
User ID
PRE_410
User
Authentication
This event specifies that the user has logged out sucessfully.
User ID
User ID
This event specifies that the consumed status is updated & the consumed PreRegistration id's are successfully saved in the database.
PRID
Pre-Registration ID
This event specifies that the expired status is updated & the expired PreRegistration id's are successfully saved in the database.
PRID
Pre-Registration ID
This event specifies that the retrieval of all the Preregistration Id was unsuccessful.
NO ID
NO ID
PRE_405
System
Exception
This event specifies that the retrieval of the Preregistration data was unsuccessful.
NO ID
NO ID
PRE_405
System
Exception
This event specifies that the reverse data sync has failed.
NO ID
NO ID
PRE_405
System
Exception
This event specifies that the document upload failed & the respective Pre-Registration data save was unsuccessfull.
NO ID
NO ID
PRE_405
System
Exception
This event specifies that the document failed to copy from source Preregistration Id to destination Preregistration Id.
NO ID
NO ID
PRE_405
System
Exception
This event specifies that the retrieval of document has failed.
NO ID
NO ID
PRE_405
System
Exception
This event specifies that the document deletion has failed.
NO ID
NO ID
PRE_405
System
Exception
This event specifies that the Otp sending has failed.
NO ID
NO ID
PRE_405
System
Exception
This event specifies that the User has failed to log-in.
User ID
User ID
PRE_405
System
Exception
This event specifies that the User has failed to log-out.
User ID
User ID
PRE_405
System
Exception
This event specifies that the Expired status was not updated.
NO ID
NO ID
PRE_405
System
Exception
This event specifies that there was a failure while saving the Pre-Registration data.
NO ID
NO ID
PRE_405
System
Exception
This event specifies that there was a failure while updating the Pre-Registration data.
NO ID
NO ID
PRE_405
System
Exception
This event specifies that the retrieve of all the Pre-Registration data has failed.
NO ID
NO ID
PRE_405
System
Exception
This event specifies that the deletion of Pre-Registration data has failed.
NO ID
NO ID
PRE_405
System
Exception
This event specifies that there was a failure in updating the consumed status
NO ID
NO ID
PRE_405
System
Exception
This event specifies that it has failed to trigger the notification to the user
NO ID
NO ID
PRE_405
System
Exception
This event specifies that the Add availability for booking has failed
NO ID
NO ID
This event specifies that the availability for booking successfully saved in the database.
NO ID
NO ID
PRE_407
System
Persist
This event specifies that the Pre-Registration data is sucessfully saved in the demographic table.
NO ID
NO ID
This event specifies that the Pre-Registration data is sucessfully triggered as notification to the user.
NO ID
NO ID
Only defined abbreviations are used
No prefix or suffix to the table names
Each table is defined as an alias, this alias is used in constraints and index names
Unique Identification Number-Encrypted
character varying
500
reg_id
Registration ID
character varying
39
_code
Code
character varying
64
_descr
Description
character varying
256
_type
Type
character varying
128
_name
Name
character varying
128
_id
Identification Code / Number
character varying
36
_addr_line
address line
character varying
256
_loc_line
location line
character varying
128
country
country
character varying
64
pin
pin
character varying
16
_comment / _remarks
Comments / remarks captured as part of a transaction
The biometric devices that will be connected to MOSIP's registration machines to perform registrations need to be white-listed by the MOSIP administrator and registered by the device provider's management server.
White-listing is an activity performed by the MOSIP administrator. As part of this activity, device details are stored in the MOSIP's master data and are mapped to various centers in the MOSIP ecosystem. To white-list a device the following steps are followed:
The device should be created and mapped to a registration center
The device type is a master data which specifies the type of device. Ideally in case of biometrics devices, there would be only three types of devices, i.e. iris scanner, fingerprint slap scanner and a camera. This is an one-time activity that can be performed by the administrator for different types of devices.
The administrator should make sure that, the device type is available for a device, before creating any device specification. If the device type is not available then the administrator can create one.
** API Request Body **
API Response Body
Note:
If you have MOSIP set-up with two language then you need to create this record twice with two different language codes.
The role for authentication of the API should be Global_Admin.
This needs to be created only if the device type is not available.
The device specification is meta information about the device that the administrator want to use for registration. This contains basic details about the device like:
Unique name of the device specification
Brand name or make of the device
Model of the device
Device Type (from the device type created earlier)
Driver version for the device (optional)
The administrator should make sure that, the specification is available for white-listing a device. If the device specification is not available then the administrator can create one.
** API Request Body **
API Response Body
Note:
If you have MOSIP set-up with two language then you need to create this record twice with two different language codes.
The role for authentication of the API should be Global_Admin.
This needs to be created only if the device specification is not available.
After the device specification is available the administrator can white-list a device. Here, the administrator needs to capture the basic details about the device like,
Serial number of the device
IP Address of the device (optional)
MAC Address of the device (optional)
Validity of the device
Administrative zone of the device
Registration Center where the device will be used
** API Request Body **
API Response Body
Note:
If you have MOSIP set-up with two language then you need to create this record twice with two different language codes.
The role for authentication of the API should be Global_Admin.
Make sure the center and device are mapped to same administrative zone.
All the devices using which biometrics would be captured in MOSIP, need to be registered in MOSIP via. the management server before use. Before the management server makes a call to MOSIP for device registration various pre-requisites need to be performed,
Policy group for device providers should be available
Device provider should self-register in MOSIP as Partner using the Partner Management Portal
Device provider must register the device make & model for which device registration request will reach MOSIP
Request for device make & model should be approved by the Partner administrator
Device provider must register the device's secure biometric interface
Request for device's secure biometric interface should be approved by the Partner administrator
After the above mentioned steps, the device registration request can come from the device management server when the device is connected with the SBI.
A single policy group should be created for all the device vendors so that they can register into the MOSIP's partner management portal. Creation of policy group is an administrative activity which would be performed by the Policy administrator.
** API Request Body **
API Response Body
Note:
The role for authentication of the API should be POLICYMANAGER.
This needs to be created if the policy is not available for device providers.
The device provider needs to self register into the MOSIP system. During self registration we collect basic information from the partner, such as,
Partner ID
Organization Name
Contact Number
Postal Address
Email Address
Partner Type (for device providers its, Device_Provider which comes from the Master Data)
Policy Group ID (from the policy group created earlier)
** API Request Body **
API Response Body
Note:
The role for authentication of the API should be PARTNER.
This needs to be created if the partner is not available.
Once the device provider is approved, he/she needs to register his/her device's make and model information in the partner management portal. The make and model is basic device meta information that will be collected as part of device registration request. Here are the details that are captured as part of registering the device's make and model,
Device provider's organization name and ID
Brand Name or Make
Model
Device Type and Sub-Type (this is master data available in MOSIP for various types of devices)
** API Request Body **
API Response Body
Note:
The role for authentication of the API should be DEVICE_PROVIDER.
This needs to be created if the device make and model is not listed earlier.
The device's make and model details needs to be approved by the MOSIP's Partner administrator.
** API Request Body **
API Response Body
Note:
The role for authentication of the API should be PARTNER_ADMIN.
This needs to be done if the device make and model is pending approval.
Once the device's make and models are approved, the device provider needs to register his/her device's secure biometric interface in the partner management portal. The secure biometric interface is the software which would be interfacing with the devices and the registration client application. The below details would be collected when the device provider tries to register a SBI,
Device details (from the device's make and model)
Software creation time
Software binary hash
Software expiry time
Software version
** API Request Body **
API Response Body
Note:
The role for authentication of the API should be DEVICE_PROVIDER.
This needs to be created if the device SBI is not registered.
The device's Secure Biometric Interface details needs to be approved by the MOSIP's Partner administrator.
** API Request Body **
API Response Body
Note:
The role for authentication of the API should be PARTNER_ADMIN.
This needs to be done if the device SBI is pending approval.
The devices would be registered in MOSIP by the Device Provider's Management server. The management server can send a device registration request using the device registration API provided by MOSIP. Details about the API is available here.
** API Request Body **
API Response Body
Note:
This needs to be done if the device is not registered.
The Device Type & Device Sub Type Codes:
Sub Types for Device Type "Finger" are "Slap", "Single" or "Touchless"
Sub Types for Device Type "Iris" are "Single" or "Double"
Sub Types for Device Type "Face" are "Full face"
Device Sub IDs for Finger/Iris is
1 - for left slap/iris
2 - for right slap/iris
White-listing of Devices
POST https://{base_url}/v1/masterdata/devicetypes
{
"id": "string",
"metadata": {},
"request": {
"code": "Unique Code for Device Type",
"description": "Description of the Device Type",
"isActive": true,
"langCode": "eng",
"name": "Name of the Device Type"
},
"requesttime": "2018-12-10T06:12:52.994Z",
"version": "string"
}
POST https://{base_url}/v1/masterdata/devicespecifications
{
"id": "string",
"metadata": {},
"request": {
"brand": "Brand or Model Name",
"description": "Description of Device Specification",
"deviceTypeCode": "Device Type Code from Device Type",
"id": "Unique ID for Device Specification",
"isActive": true,
"langCode": "eng",
"minDriverversion": "Driver Version of the Device",
"model": "Model of the Device",
"name": "Name of the Specification"
},
"requesttime": "2018-12-10T06:12:52.994Z",
"version": "string"
}
POST https://{base_url}/v1/masterdata/devices
{
"id": "string",
"metadata": {},
"request": {
"deviceSpecId": "Specification ID from Device Specification",
"id": "Unique ID for Device",
"ipAddress": "IP Address of Device",
"isActive": true,
"langCode": "eng",
"macAddress": "MAC Address of Device",
"name": "Name of the Device",
"regCenterId": "Mapped Center for the Device",
"serialNum": "Serial Number of Device",
"validityDateTime": "Validity Time for Device in format - yyyy-MM-dd'T'HH:mm:ss.SSS'Z'",
"zoneCode": "Zone code for the device"
},
"requesttime": "2018-12-10T06:12:52.994Z",
"version": "string"
}
{
"errors": null,
"id": "string",
"metadata": {},
"response": {
"createdBy": "created by in DB",
"deviceSpecId": "Device Specification ID",
"id": "Unique ID for the device",
"ipAddress": "IP Address of the Device",
"isActive": true,
"isDeleted": true,
"langCode": "eng",
"macAddress": "MAC Address of the Device",
"name": "Name of the Device",
"regCenterId": "Mapped Center ID",
"serialNum": "Serial Number of the Device",
"updatedBy": "updated by in DB",
"validityDateTime": "Validity Time for Device in format - yyyy-MM-dd'T'HH:mm:ss.SSS'Z'",
"zoneCode": "Mapped Zone Code"
},
"responsetime": "2018-12-10T06:12:52.994Z",
"version": "string"
}
POST https://{base_url}/partnermanagement/v1/policies/policies/policyGroup
{
"id": "string",
"metadata": {},
"request": {
"desc": "description of policy group",
"name": "policy group name"
},
"requesttime": "2018-12-10T06:12:52.994Z",
"version": "string"
}
{
"errors": null,
"id": "string",
"response": {
"cr_by": "created by",
"cr_dtimes": "2020-10-23T07:30:27.674Z",
"desc": "description from request",
"id": "unique ID",
"is_Active": true,
"name": "Policy Group Name from request",
"up_by": "updated by",
"upd_dtimes": "2020-10-23T07:30:27.674Z"
},
"responsetime": "2020-10-23T07:30:27.674Z",
"version": "string"
}
POST https://{base_url}/partnermanagement/v1/partners/partners
{
"id": "string",
"metadata": {},
"request": {
"address": "Address of device provider",
"contactNumber": "Contact Number of Device Provider",
"emailId": "Email ID of Device Provider",
"organizationName": "Organization Name of Device Provider",
"partnerId": "Partner ID of the Device Provider",
"partnerType": "Partner Type comes from Master Data for Device Providers - Device_Provider",
"policyGroup": "Policy Group Name"
},
"requesttime": "2020-10-23T07:30:27.674Z",
"version": "string"
}
{
"errors": null,
"id": "string",
"metadata": {},
"response": {
"partnerId": "Partner ID set in Request",
"status": "Active"
},
"responsetime": "2020-10-23T07:30:27.674Z",
"version": "string"
}
POST https://{base_url}/partnermanagement/v1/partners/devicedetail
{
"id": "string",
"metadata": {},
"request": {
"deviceProviderId": "Partner ID for the Device Provider",
"deviceSubTypeCode": "Device Sub-Type Code comes from Device Type & Sub Type master Data",
"deviceTypeCode": "Device Sub-Type Code comes from Device Type & Sub Type master Data",
"id": "ID for the Device Details",
"isItForRegistrationDevice": true,
"make": "Make or Brand of the Device",
"model": "Model of the Device",
"partnerOrganizationName": "Organization Name of the Device Provider"
},
"requesttime": "2020-10-23T07:30:27.674Z",
"version": "string"
}
{
"errors": null,
"id": "ID of the Device Details",
"metadata": {},
"response": "string",
"responsetime": "2020-10-23T07:30:27.674Z",
"version": "string"
}
POST https://{base_url}/partnermanagement/v1/partners/securebiometricinterface
{
"id": "string",
"metadata": {},
"request": {
"deviceDetailId": "Device Details ID",
"isItForRegistrationDevice": true,
"swBinaryHash": "Hash of the SBI",
"swCreateDateTime": "Creation date & time in the format - yyyy-MM-dd'T'HH:mm:ss.SSS'Z'",
"swExpiryDateTime": "Expiry date & time in the format - yyyy-MM-dd'T'HH:mm:ss.SSS'Z'",
"swVersion": "Software version number"
},
"requesttime": "2020-10-23T07:30:27.674Z",
"version": "string"
}
{
"errors": null,
"id": "string",
"metadata": {},
"response": {
"id": "Unique ID for the SBI"
},
"responsetime": "2020-10-23T07:30:27.674Z",
"version": "string"
}
{
"errors": null,
"id": "ID of the SBI",
"metadata": {},
"response": "string",
"responsetime": "2020-10-23T07:30:27.674Z",
"version": "string"
}
POST https://{base_url}/partnermanagement/v1/partners/registereddevices
{
"id": "string",
"metadata": {},
"request": {
"deviceData": { //The Device Data block is a JWT Toke signed using the Device Provider's Key
"deviceId": "Unique ID coming from device",
"purpose": "REGISTRATION",
"deviceInfo": { //The Device Info block is a JWT Token signed using Device Key
"deviceSubId": "Sub-ID of Device",
"certification": "Certification level of Device - L0",
"digitalId": { //The Digital ID block is a JWT Token signed using Device Key
"serialNo": "Serial Number in the Device",
"deviceProvider": "Device Provider Name",
"deviceProviderId": "Device Provider ID",
"make": "Brand or Make Name",
"model": "Model",
"dateTime": "2020-10-09T08:48:31.158Z", // Digital ID creation time (should be with in 5 mins when request is sent)
"type": "Device Type",
"deviceSubType": "Device Sub Type"
},
"deviceExpiry": "2021-12-16T09:06:38.161Z",
"timestamp": "2020-10-09T08:48:31.158Z"
},
"foundationalTrustProviderId": ""
}
}
"requesttime": "2020-10-09T08:48:31.158Z",
"version": "string"
}
{
"errors": null,
"id": "string",
"metadata": {},
"response": { //The Response block is a JWT Token signed by MOSIP
"status": "Registered",
"digitalId":{ //The Digital ID block is a JWT Token signed using Device Key
"serialNo": "Serial Number in the Device",
"deviceProvider": "Device Provider Name",
"deviceProviderId": "Device Provider ID",
"make": "Brand or Make Name",
"model": "Model",
"dateTime": "2020-10-09T08:48:31.158Z",
"type": "Device Type",
"deviceSubType": "Device Sub Type"
},
"deviceCode": "unique device code for the device",
"env": "Developer",
"timestamp": "2020-10-06T07:01:30.374Z"
},
"responsetime": "2020-10-09T08:48:31.158Z",
"version": "string"
}
Adding Device Types
The device type can be created in MOSIP by three ways:
By using the device type API.
By using the device type screen in MOSIP administrator portal (Login > Master Data > Device Types).
API to Create a Device Type
Adding Device Specification
The device specification can be created in MOSIP by three ways:
By using the device specification API.
By using the device type screen in MOSIP administrator portal (Login > Master Data > Device Specs).
API to Create a Device Specification
Adding Device
The device can be created in MOSIP by three ways:
By using the device API.
By using the device screen in MOSIP administrator portal (Login > Devices).
API to Create a Device
Registering Devices in MOSIP
Adding a Policy Group
The policy group can be created using the policy group API.
API to Create a Policy Group
Registering Device Provider
The device provider can be registered in MOSIP using the partner self-registration API.
API to Create a Device Provider
Registering Device's Make and Model
The device provider can register the make and model details using the device make and model API.
API to Create a Device Make & Model
Approving Device's Make and Model Registration
The device's make and model details can be approved by the partner administrator using the device make and model approval API.
The device's secure biometric interface details can be approved by the partner administrator using the device's make and model approval API.
API to Approve a Device Make & Model
Registering the Device
API to Register Devices in MOSIP
MOSIP ID Object Definition
ID Object describes attributes that a country or entity will capture from an Individual. Since MOSIP is a generic identity platform the attributes of an ID cannot be predefined by MOSIP. One country may capture, say, 5 attributes and another 10. So to accommodate this flexibility MOSIP provides a feature to define ID Object. This will be the first step in using MOSIP. Once an ID Object is defined all applications built on top of MOSIP platform must conform to the same.
In order to define the ID object, MOSIP adopters need to analyze the attributes that they need in their ID object. We have provided a which might be helpful for adopter to analyze their ID attributes. The items that the adopter needs to analyze as part of tis exercise are:
ID attributes that would be collected to identify a resident uniquely. Example: Attributes such as, Name, Gender, DateOfBirth, Address, Biometrics etc.
Registration Functionality
The operators is the one who can login to the registration client application and perform various activities. The roles associated to an operator in MOSIP can be of a Supervisor or an Officer. Below are features accessed by a supervisor and an officer in the registration client.
When an operator tries to login to his/her registration client for the very first time they need to be online and would be re-directed automatically to the on-boarding page. During on-boarding the operator needs to provide his/her biometrics, which would be stored and mapped to the client machine locally post authentication.
Operator's biometrics are captured during on-boarding to support login using biometrics, local duplicate checks, and registration submission via. biometric authentication in registration client.
When an operator whats to login to the registration client for the first time, he/she needs to have the registration client in online mode. The first time login for any user in registration client is mandated to be using user name and and password based login. After the first login and successful on-boarding; the registration client would mandate the operator to login with the configured mode decided by the administrator.
Admin Service Audits
The admin portal provides various services for MOSIP administrators such as Login, Account management, Resource Management, Master data management and Packet status check based on RID.
The packet status service allows us to view the status of a packet by giving the RID of the packet. The packet status will contain all the stages the packet has passed through along with the last stage the packet is in. In case the packet has not been processed or is marked for Re-Send/Re-Register, the admin will be able to view specific comments indicating the reason for that particular status.
The following events are triggered as part of User Event Type in Packet Status Service module of Admin Services
Event ID
Event Type
Event Name
3 - for two thumbs/irises
0 - if we don't know any specific device sub id
By using the bulk upload screen in MOSIP administrator portal (Login > Bulk Upload > Master Data Upload).
By using the bulk upload screen in MOSIP administrator portal (Login > Bulk Upload > Master Data Upload).
By using the bulk upload screen in MOSIP administrator portal (Login > Bulk Upload > Master Data Upload).
Additional evidence attributes that would be collected as evidence. Example: Attributes such as proof documents (Identity, Address, Date of Birth, Relationship, etc) or Introducer.
Optional attributes that would be collected for processing purpose but might need to discarded later.
Validations for the above attributes. Example: Basic reg-ex validations for text fields, flow validations for capturing evidence data.
Various work flows for various types of applicants (say, a minor or a resident without any evidence, etc.)
Once an adopter has proper clarity on the above topics, it is very easy for them to construct an ID schema.
ID schema is a JSON schema which would be used for defining the structure, content, and (to some extent) semantics of an ID object. It lets us specify metadata (data about data) about what an ID object’s attributes mean and what values are valid for those attributes.
We use the ID schema JSON to validate the ID object when,
ID object is created in Pre-registration
ID object is created in Registration Client
Packet is opened in Registration Processor
ID data is stored in ID Repository
Below is a sample ID schema JSON.
ID JSON is an instance of the ID Schema (derived from ID Schema). It contains the basic details of an individual so that we can uniquely identify them in MOSIP.
Below is a sample ID JSON for private packet as per the schema defined above:
UI specification helps us identify how the data in an ID attribute (attributes of an ID object) is going to be retrieved from the UI. The UI screens in registration client application and pre-registration application are rendered using their respective UI specification JSON. We have different UI Specifications for Registration Client & Pre-registration which is derived from the ID Schema.
For details about the UI specification of registration client & pre-registration please visit the respective pages,
Relationship between ID Schema, ID Object & UI Specification
MOSIP supports single factor and multi factor login including password, OTP, iris, fingerprint, and face authentication for registration client. An administrative configuration setting determines the mode of login.
The registration client can authenticate an operator in offline mode using the locally stored biometrics (face/finger/iris) & password, but it has to be online to authentication an operator using OTP.
The registration client temporarily locks the operator’s account in case he/she provides an invalid password, fingerprint, iris, face for five times continuously to login. The temporarily account lock lasts for 30 minutes (which is configurable).
An Operator can logout of the registration client by just,
Clicking the logout button,
Closing the registration client, or
Being in-active on the registration client for configured amount of time after which he/she is automatically logged out.
Upon logout, any unsaved data will be lost. Data will not be automatically saved in the database and will not be retained in memory though transaction details which is used for auditing will be captured & stored (except for PII data).
In order to run the registration client application in online or offline mode it need some master data. When the client machine is switching from offline to online mode, the locally saved data can be synced with the server & changes from server can be synced backed to client. The data sync can happen through an automated process at a set frequency or an operator can manually initiate a sync.
When an operator performs data sync the configurations related to registration client also gets synced. Based on the configuration (turn on or turn off), the system allows the operator to capture applicable biometrics, authenticates, and completes the registration activities.
Registration Client syncs back some information back to the server whenever a sync is triggered:
Operator on-boarding details such as mapping of user, machine & center.
List of registration packets that are newly created.
The registration packets are also uploaded to the registration processor.
During the sync operation the registration client request for the registration server for the status of some of the packets that it has already synced in the server. Knowing the status of the packets helps the registration client to,
Delete the packets from it's local file system based on the countries policy.
Re-Upload the packet if it is missing in the server.
Inform the resident to re-register if packet processing fails in server.
An Operator can download the pre-registration data of his/her center for a date range (current date - end date) while being online (where the date range is configurable) and store it locally in the registration machine for offline use. Now when the system is offline and the pre-registration data is already downloaded; the operator can enter the pre-registration id to auto-populate the registration form with the demographic details of the resident.
Now if the registration machine is online the operator can enter the resident's pre-registration data in real time irrespective of the center selected by the resident while filling the pre-registration form.
The registration client has the provision to show if the registration machine has internet connectivity or not.
Upon receiving a request to create a registration packet at the end of data capture and authentication steps, registration client validates if the disk space available on the registration machine to store the registration packet is sufficient or not.
If disk space is insufficient, registration client displays an error message and data entered by registration officer is not saved. Then registration officer needs to clean up the registration machine to make sufficient space and try the registering the resident again.
When the registration client application is open, the application scans the registration packets at a configured frequency for viruses. If the registration client application is not open at the configured time, the scan will be queued up and will run when the client application is open.
An operator can initiate the process of registering an new applicant in the MOSIP ecosystem by filling the new registration form with the resident. Below are few of the processes needed to complete a new registration.
If the resident has a pre-registration id, the operator can auto-populate the demographic data and the documents by entering the pre-registration id.
If the resident doesn't have a pre-registration id, the operator can enter the resident’s demographic details (such as Name, Gender, DOB, Residential Address, etc.) & upload the documents (such as Proof of Address, Proof of Identity, Proof of Birth) based on the ID Object defined by the country.
After the demographic details are entered the registration client validates the entered demographic data as per the Id validation rules defined in the ID Object UI Specification and appropriate error messages are shown in case the validation fails.
The capture of biometrics is governed by the country, i.e. capture of each modality (fingerprint, iris or face) can be controlled by the country using the global configuration to turning on or off, capture of a particular biometrics.
When the operator clicks on the capture button and tries to capture the biometrics of the resident, the device needs to make the capture when the quality of the biometrics is more than the threshold configured by the country. The device will try to capture the biometrics until the quality threshold has crossed or the device capture timeout has crossed which is also configurable.
Post the timeout has occurred and the captured quality of biometrics is less than the threshold, registration client provide an option to the operator to retry capture of biometrics but for a particular number of times which is also configurable.
If the resident has a biometric exception (resident is missing a finger/iris or quality of finger/iris is very poor) the resident can mark that particular biometrics as exception but the resident has provide an exception photo after providing the biometrics.
The biometric devices connected to the registration machine to perform registration needs to registered devices and hence device validation is a very important process. The devices are validated using the master data that is received from the server during sync. Once the validation is successful and the device is connected to the registration machine a three way mapping of the center, machine & device is created and synced back to the server.
For every registration, the registration client provides an option for the operator to mark an individual's consent as Yes or No. The operator marks consent after confirming with the resident. Whether the consent is marked as Yes or No, it will not have any impact on issuance of UIN for that resident and the registration processor will not execute any validations in this regard during packet processing.
The registration flow for an infant is slightly different from that of registering an adult. The categorization of normal resident and infant is determined based on the age calculated by when the resident provides the date of birth. The age of infant is a configurable parameter (in the current configuration age of infant is set to 5 years).
For an infant registration client doesn't collect the biometrics (except for photo) but it collects the parent/guardian UIN or RID and biometrics for authentication in the server side. Apart from parent/guardian details the resident need to provide a Proof of Relationship document defined by the country.
New Registration Flow
When a resident visits the registration center to update his/her demographic or biometrics details, the operator captures the updated data as provided by the resident in the registration client.
Process Flow using which data gets captured by registration client for updating a resident's data:
UIN Update Flow
There might be a situation when a resident might have lost his UIN and visits the registration center for retrieving the same, the operator then captures the biometrics and demographic details of the individual and processes a request to retrieve the lost UIN. The system sends a notification to the individual upon successful creation of the UIN retrieval request.
Once the registration process (new registration, UIN update or lost UIN) is completed, the registration client generates an unique request id and a registration receipt which contains labels & data in configured language. This data also contains a QR code of the RID, photograph of the resident and ranking of each finger from 1 to 10 (1 being the finger with the best quality). This receipt is print friendly and can be used for printing using any printer.
Once a registration process is completed, a notification is sent to the resident using the email ID and mobile number that was provided as part of demographic data. This notification sent is driven by a template created as part of master data and the language selected (primary, secondary or both) & notification mode (SMS, Email or none) is driven by configurations.
Registration Client also provides an option to send SMS and email notifications to additional recipient\s (other than the individual’s primary email ID and mobile number).
Registration client perform authentication for registration officers and supervisors during various scenarios in registration client. In order to perform authentication using biometrics in such scenarios registration client need to integrate with a biometric SDK. The scenarios where biometric authentication is performed in registration client are:
When operator wants to login to registration client
When operator creates a packet
When an exception packet is created we need to perform supervisor authentication
When supervisor performs end of day verification
When supervisor performs resident about re-registration
There could be a scenario where an operator in-order to show a demonstration to the resident might capture his/her own biometrics, which could let to packet processing failure in the server side. Hence, in order to avoid such cases we perform de-duplication of biometrics of the resident against the operator's biometrics who have on-boarded to that registration machine.
An operator needs authenticate himself/herself when the registration process is completed. After successful authentication an encrypted packet is created in registration client. During this process if biometrics is used as the mode of authentication, the operator's biometrics is sent to server as part of the packet for verification in the server side.
If a packet is created for a resident who has marked his/her biometrics as exception, the registration client performs a second round of authentication for packet creation. During this authentication the supervisor needs to provide his/her credentials. If biometrics is provided during this authentication, it is sent as part of the packet to the server.
During pre-processing of the packet, if the registration processor finds an error in the packet such as decryption failure, then an individual will not be communicated automatically to re-register. In such cases, registration processor marks the status of the packet as "re-register" so that a supervisor informs the individual to "re-register" his/her application. After informing the resident the officer needs to authneticate himself/herself using his/her credentials.
We have a feature to capture geo location of a device before any registration is performed. This is driven by a configuration. If capture of geo location is turned on, the system performs the following steps:
Validates that an on-boarded GPS device is connected to the machine.
If an on-boarded GPS device is not found, then displays an error message.
If more than one on-boarded GPS device is connected, then proceeds with the first GPS device that the system finds as it scans the ports of the machine.
Requests the GPS device to capture a location.
Receives the latitude and longitude from the GPS device.
If signal is weak and GPS device is unable to capture location, then displays an error message.
Proceeds to perform following validations:
If location capture is required only at the beginning of day, the co-ordinates are stored and validations are performed when opting to start a new registration.
If location capture is required only at the beginning of day and location could not be captured at beginning of the day, then attempts to capture the location during the first registration of the day.
System captures and stores the transaction details for audit purpose (except PII data).
The Registration Client supports two languages, a primary language in which all pages of the application are rendered, and demographic details of an individual are also rendered in secondary language for convenience of the officer. The default primary and secondary languages are driven by an administrator configuration and can be setup by the admin as required. Transliteration from the primary to secondary language is supported for registration officer entered text fields.
In the below listed scenarios, system will render an error message on the Login page and inhibit Registration, and hence, the language configurations should be appropriately setup by the administrator.
If Primary Language is set to a specific value and Secondary Language is not set by Admin, or
If Secondary Language is set to a specific value and Primary Language is not set by Admin, or
If both Primary and Secondary Language are not set by Admin
This error message will not have an option to exit, hence not allow the user to proceed further. On page refresh, the system will render the error message again and hence, inhibit registrations. Therefore, it is important for the administrator to setup the configurations appropriately. In case configurations are setup correctly, but post Login, if a sync is initiated through the option in the homepage, and then if it is identified that either Primary/Secondary language/both are not defined, then the system will render the same error message on the homepage and not allow the user to proceed further.
Considering a scenario, wherein if Primary language and Secondary language is configured to be the same, EG: English then:
The system will render the demographic page (with both left and right side for Primary and Secondary language) in the same language
Values entered on the left side (Primary Language) will not be transliterated but auto-copied on the right side
Values on the right side will remain un-editable
As part of the packet, system will send/store data in one language only, if language code is identified to be the same – EG: ENG (English)
Therefore, it is important for the administrator to setup the configurations appropriately.
A Registration Officer can view static data translated to secondary language.
In MOSIP, the primary and secondary languages are configured by the admin.
Admin configures all the static data in both primary and secondary languages so that the registration officer can view all the pages of client application in primary (default) and second (translated) languages.
If the both languages are configured in one language, the system displays the text in default language only.
The Registration Client application supports two type of languages: Primary language (the language in which the registration officer enters data) and secondary language (transliteration language). The secondary language is country specific and is set by the administrator.
When the officer starts a new registration, update or lost UIN process and provides demographic data (Full Name, Address Line 1, Address Line 2, Address Line 3, and parent/guardian Name) of an individual in the primary language. The system transliterates the data and displays in the corresponding secondary language fields.
An Officer can invoke the virtual keyboard to edit transliterated data and proceeds with registration. The following rules are followed during transliteration.
Editing transliterated language does not change the data entered in the primary language.
The system also validates the maximum character length in the transliterated language and in primary language.
If secondary language is not configured, the system does not do any transliteration and will display empty space instead.
Numeric data are not transliterated. The same numeric data are displayed in the secondary language section of the page, which are not editable.
Master data selections are not transliterated. Instead, the master data as setup in the secondary language is displayed in the relevant section.
The system then enables the officer to view the registration confirmation page. The data, which are transliterated and edited earlier are also shown in the secondary language.
The system allows a registration officer to view a list of packets and may opt to upload one or multiple packets from a list of packets.
After the registration officer selects the packet(s), he/she can upload the selected packet(s) to server.
When the registration officer or supervisor navigates to the ‘Upload Packets’ page, the list of RIDs that are pending packets to upload will be displayed.
Pending packets are those packets, which are not sent to the server due to various reasons (e.g. Sanity Check and Validation failure in the Registration Processor) and have been marked for resending.
When the registration officer or supervisor selects the ‘Upload’ option, the pending packets will be uploaded to the server.
The result of each packet uploaded will be displayed as ‘Success’ or ‘Failure’.
Packets that are successfully sent or resent will not be sent again unless the server requests for them.
Packets for which upload fails will continue to be in pending state.
System captures and stores the transaction details for audit purpose (except PII data).
When EoD process is turned ON
Registration Client checks if the system is online as soon as the assigned approver (such as supervisor) approves or rejects a new registration or UIN update.
If client is online, the Registration Client sends Registration ID to server and then the packets are marked as “Ready to upload” and auto uploaded to server.
If client is offline or on low bandwidth, then when the client next comes online, the Registration ID’s are sent to server through scheduled or manual sync and the packets are then marked as “ready to upload”.
Once the packets are ready for upload, packets are uploaded in two ways:
The registration officer can initiate upload to server using upload function.
Export to external storage device for subsequent upload as required.
When EoD process is turned OFF
Registration Client checks if system is online as soon as the registration officer submits a new registration or UIN update.
If client is online, the Registration Client sends Registration Id to server and then the packets are marked as “Ready to upload” and auto uploaded to server.
Export Packets to External Device
System exports registration packet data from client machine to an external device as follows:
This feature allows the registration officer to select a destination folder to export the packets. By default all packets that are listed/eligible to be uploaded, are exported to the external device
The destination folder includes the laptop/desktop, an external hard drive or a remote location
External storage devices are not necessary to be MOSIP-registered devices
When the destination folder is selected, registration officer initiates export of packets
System exports the packets to the selected folder and performs the following steps:
Identifies the packets in ‘Ready to Upload’ state.
If EoD process is turned ON, packets that have been approved or rejected and packet ID sync is completed are considered ‘Ready to Upload’
All the Registration Officers and supervisors on-boarded to the client machine will be able to export all packets
Supports the partial export. If the system is able to export some packets to the folder and no other files due to lack of storage space or unavailability of the folder, the successfully exported packets will remain in the destination folder.
For partial or full failure, the system displays error message
Upload Packets from External Device to Server (To be Developed)
Once the server acknowledges that the packets have been received (which is uploaded from the external device to the server through a defined mechanism - Yet to be defined/developed), the packets in the client will be marked as ‘Uploaded’ upon the next sync with Server.
Packets that remain in ‘Ready to Upload’ status will be exported again when the next export is executed.
Packets in ‘Uploaded’ or any other status will not be exported again.
System captures and stores details of each transaction during registration process for audit purpose (except PII data). The audit data is stored in the audit database. When the client machine is working in an offline mode, the audit log is synced with the server as when the client machine is online.
Registration Client integrates with Trusted Platform Model (TPM) data integrity. For enhanced security and integrity purposes, data captured from individuals are saved securely in local system and then shared to server. The details saved locally will be encrypted. Database encryption is also mandatory.
MOSIP performs the following:
Signing the data (This process is called as Signature) using Private Key provided by the TPM
This process will ensure that the request to the server has been dispatched from a registered or trusted Registration Client machine
Validates the signature against the actual data using the Public Key or Public Part. The application does not connect or access the underlying TPM to validate the Signature. This validation ensures that the request is from a registered or trusted Registration Client machine
Encrypts and decrypts the data using RSA algorithm in TPM. System security and tampering of packets
The system uses a machine and centre specific public key to encrypt. Only the server which has the respective private key, machine id and centre id can decrypt the encrypted packet. The data stored in database and application binaries are encrypted using TPM public key and registration officers will not be able to access directly.
For initial installation of the client software on a particular machine, supervisor or registration officer will download an installable software (setup kit). Then unzip the setup kit and install it in the client machine.
When a registration officer or supervisor opts to download setup kit and selects the OS-specific setup kit to download, the system allows the registration officer to download the setup kit to the storage location chosen by the registration officer.
Registration officer then unzips the setup kit.
Extract the files and folders from the zip file to the chosen location.
Allows the registration officer to verify that the files and folder structure are as described in the design document.
System captures and stores the download transaction details for audit purpose (except PII data).
If a software update is available, then the system will provide an option to supervisor or registration officer to update either immediately or later. If the maximum number of days without software update has been exceeded, then the system will mandate a registration officer to update the software.
The system follows the following steps during the update process:
When the client is online, the system automatically checks for updates if available.
If an update is available, the system displays a message “Updates are available” and provides two options to the registration officer
Update now or
Update later.
If the registration officer opts to select “Update now” option, then the registration officer can download and installs software and launches the application.
The updates are downloaded as patch updates.
When installation is in progress, the registration officer cannot perform any action on the client.
Once installation is completed, the registration officer can start working on the client.
If update is not successful, the system provides error message and provides both the options (Update Now or Update Later) again.
If the registration officer opts to select “Update later” option, then the system checks if the freeze period has been reached.
If the freeze period has not been reached, the system allows the registration officer to continue with registration
If freeze period has been reached, the system does not allow the registration officer for registration without updating the software.
If updates are not available, the system launches the application.
If update is not successful, the client returns to its earlier version.
System captures and stores the transaction details for audit purpose (except PII data).
Pre-registration and registration data are automatically deleted from the client machine upon consumption and upon intimation from the server respectively.
Pre-registration data is deleted from the client machine immediately after consumption for a registration.
Registration packets that are identified as ‘processed’ are deleted by a periodic process.
Audit data is deleted after it is sent to the server.
All deletion is executed by a periodic process after retention of the data for a configured duration.
When the Registration Client receives a request through manual trigger or scheduled job to sync data, the system performs the following steps to read a packet status and delete the packets:
Sends the data sync request to server.
Receives response from server with packet statuses.
Server sends status of those registration packets that were created in the specific machine, and that status that has changed since the last sync.
Saves the statuses ‘Processing’, ‘Processed’ or ‘Resend’ as received for each packet. Statuses of other packets are not updated.
Immediately deletes the packets from the local machine whose status is received as ‘Processed’.
Displays an alert in case of sync failure.
The on-screen message is only indicated if the sync was a success or failure.
Detailed errors can be viewed in the transaction logs.
The system does not allow registration officer to perform any activities when the data sync is running.
If the Registration Client is not online or not open during a scheduled sync, the sync will be queued up and will be executed later.
When the Registration Client is next launched and is online, checks if the previous scheduled sync was executed. If not executed earlier, then immediately starts the sync.
System captures and stores the transaction details for audit purpose (except PII data).
When a set of audit data is uploaded to the server and the server has acknowledged receipt of the audit data, the system performs the following steps to delete transaction history (audit logs) post sync with server and the retention period:
Runs on a daily process to identify audit data that has been sent to the server and acknowledgement is received from the server.
The audit data acknowledgement received from the server >= x hours ago. X is configured at a country level.
Deletes the identified audit data from the client machine.
Executes at a time and frequency as configured.
The process takes place only when the Registration Client is in open and running situation. If the Registration Client is not open during a scheduled run, it is executed as soon as the client is next started up.
Does not delete audit data, if that is yet to be sent to the server.
System captures and stores the transaction details.
Machine is termed as machine retirement due to following reason:
If the machine has obsolete specification.
When the machine is moved from one center to another (re-mapped), then the machine will retire from that old center.
Before the machine is decommissioned, the following checks must be performed:
All packets created must either be uploaded to server or exported to external device.
All pending end of day approvals are completed and re-registrations pending action are cleared, refer below for more details
All data locally saved in the machine must be cleaned up.
Re-mapping of Machine:
If a Machine has been re-mapped to another center, then:
Officer will not be allowed to do any operation in Registration Client except,
Login/Logout
Approve packets as part of End of Day Approval process
Upload Packets
Inform Residents to Re-Register and mark action accordingly
Once Packet Approval and Informing Resident is Completed, then
Packets will be auto uploaded if anything is pending
Initial Sync Flag is Turned On
Once the Officer logs out and tries to login again, then
New Master data gets downloaded for the newly mapped Center
Operators in MOSIP
The list given above corresponds to the default configuration and can be changed by the MOSIP adoptor.
Operator on-boarding
On-boarding is successful for an operator if and only if,
The operator should be active.
The operator should not be blacklisted.
The operator & the machine should belong to the same center.
The operator's User ID should be mapped to his/her UIN.
The operator's biometric authentication should be successful during on-boarding.
The system should online during on-boarding.
Login & Logout
First time login
Any number of officers or supervisors can login to a registration client but,
They need to be mapped to the same center where the machine is registered.
They should have on-boarded to the registration client successfully.
Modes of login
While a operator attempts to login to registration client, the system will match the user name with the locally stored user names using a case-insensitive logic.
Temporarily lock the operator
Logout
Registration client provides an alerts to the operator, ‘x’ minutes before reaching the auto logout time limit. Registration client displays a countdown timer in the alert. The operator can choose to dismiss the alert and continue working. This will also reset the timer to zero.
Data Sync
Master data sync
Configuration sync
Client to server sync
Only the additions, deletions, and modifications made since the last sync are sent to the server.
Packet status sync
Pre-registration data download
Date Range of pre-registration data to be downloaded and storage location of pre-registration data in the registration machine is configurable.
Health check
Peripherals check
Disk space check
Virus scan/Security scan
Registration services
New registration
Enter demographic data and upload documents of a resident
Capture biometrics of a resident
Device validation
Capture consent from the resident for data storage and utilization
New registration for an infant
Update resident's details
The UIN update feature is configurable by a country. The Admin can turn ON or OFF, the UIN update feature using the configuration.
Find a lost UIN
Acknowledgement and Notifications
Printing the registration receipt
Sending email and SMS notifications
Use of biometric SDKs in registration client
Local biometric authentication for operators
For performing all the above mentioned authentication scenarios, registration client uses the operator's biometrics captured during on-boarding. The match threshold for authentication is a configurable parameter.
Local biometric de-duplication
Registration officer and supervisor approvals
Approval for packet creation
Approval of exception packet
Approval during "re-registation"
Geo-location
Language Support
Then the system will render the stated Error Message: “The system has encountered a technical error. Administrator to setup the necessary language configuration(s).”
Translation
Transliteration
Packet Upload
Registration Packet Upload
Upload the packet
Push those packets that are marked 'Resend' to the server
Enable a real time packet upload when system is online upon registration submission
Packet Exporter & Offline Upload from External Device
Analytics and Audit Logs
Data Security
Installation and Software Version Upgrade
A. Registration Officer or Supervisor can download and unzip the client application set up kit
B. Update the client software from the server
Clean up
Data retention policies
A. Read packet status and delete packets
B. Delete transaction history (audit logs) post sync with server and the retention period
Machine Retirement
Description
Reference ID
Reference ID Type
ADM-PKT-405
User
Authorization request
This event specifies that the specified user name is not authorized
No ID
No ID Type
ADM-PKT-406
User
Check RID validation
This event specifies that the specified registration ID is invalid
The following events are triggered as part of System Event Type in Packet Status Service module of Admin Services
Request Info for System Event Type
Event ID
Event Type
Event Name
Description
Reference ID
Reference ID Type
ADM-PKT-102
System
Request for packet status update API
Success response for System Event Type
Event ID
Event Type
Event Name
Description
Reference ID
Reference ID Type
ADM-PKT-200
System
Request for packet status update API
Failure response for System Event Type
Event ID
Event Type
Event Name
Description
Reference ID
Reference ID Type
ADM-PKT-404
System
Check authorization RID with zone
The bulk data service provides a feature for the mosip administrator to bulk insert, upload or delete - master data using csv’s. The bulk data upload operation can be performed based on various parameters.
The following events are triggered as part of System Event Type in Bulk Data Service module of Admin Services
Event ID
Event Type
Event Name
Description
Reference ID
Reference ID Type
ADM-BLK-101
System
Request for bulk data upload API
Event ID
Event Type
Event Name
Description
Reference ID
Reference ID Type
ADM-BLK-200
System
Request for bulk data upload API
Event ID
Event Type
Event Name
Description
Reference ID
Reference ID Type
ADM-BLK-401
System
Request for bulk data upload operation
Packet Status Service
User Events
Failure response for User Event Type
System Events
Bulk Data Service
System Events
Request Info for System Event Type
Success response for System Event Type
Failure response for System Event Type
Resident Service Audits
Resident services are the self-services which is used by the resident themselves via a portal. Functionalities such as lock/unlock authentication types, reprint UIN, view authentication history etc. are available. The services use OTP method of authentication.
System Events
The following events are triggered as part of System Event Type in Residence Service module
Request Info for System Event Type
Sl No.
Event ID
Event Type
Event Name
Description
Reference ID
Reference ID Type
Sl No.
Event ID
Event Type
Event Name
Description
Reference ID
Reference ID Type
Sl No.
Event ID
Event Type
Event Name
Description
Reference ID
Reference ID Type
No ID
No ID Type
ADM-PKT-407
User
Check whether center exists or not
This event specifies that the center id extracted from registration id does not exist
No ID
No ID Type
ADM-PKT-408
User
Check whether RID exists or not
This event specifies that the registration ID is missing in the input
No ID
No ID Type
This event calls the API to update the packet status for
RID
ADM-PKT-103
System
Check authorization RID with zone
This event triggers the authorization of registration ID with the zone
RID
ADM-PKT-104
System
Request to get packet status
This event calls the API to get the packet status for Registration ID
RID
ADM-PKT-105
System
Request to get packet status
This event specifies that the packet with registration id has reached Packet Receiver
RID
ADM-PKT-106
System
Request to get packet status
This event specifies that the packet with registration id is uploaded to the landing zone
RID
ADM-PKT-107
System
Request to get packet status
This event specifies that the packet with registration id is uploaded to the Packet Store
RID
ADM-PKT-108
System
Request to get packet status
This event specifies that the PDF for registration id is added to queue for printing
RID
ADM-PKT-109
System
Request to get packet status
This event specifies that the printing and post completed for the registration ID
RID
This event describes that the API call to packet status update for <Registration_id> is successful
RID
ADM-PKT-201
System
Check authorization RID with zone
This event specifies that the authorization of Registration ID with the zone is successful
RID
This event specifies that the authorization of registration ID with the zone is failed
RID
ADM-PKT-410
System
Check authentication
This event specifies that the authentication failed for auth manager
No ID
No ID Type
ADM-PKT-405
System
Check access
This event specifies that the access is denied from auth manager
No ID
No ID Type
ADM-PKT-401
System
Check authentication
This event specifies that the user tried to operate on a protected resource without providing the proper authorization
No ID
No ID Type
ADM-PKT-403
System
Check authentication
This event specifies that the user does not have the necessary permissions for the resource
No ID
No ID Type
ADM-PKT-405
System
Authorization request
This event specifies that the User <user_name> is not authorized
No ID
No ID Type
ADM-PKT-406
System
Check RID validation
This event specifies that the Registration ID is invalid
No ID
No ID Type
ADM-PKT-407
System
Check whether centre exists or not
This event specifies that the centre id extracted from registration ID does not exist
No ID
No ID Type
ADM-PKT-408
System
Check RID exists
This event specifies that the Registration id is missing in the input
No ID
No ID Type
ADM-PKT-409
System
Request to get packet status
This event specifies that the System error has occurred while fetching packet status for registration id
RID
ADM-PKT-402
System
Request to get packet response API
This event specifies that the JSON parse exception occurred while parsing packet response
No ID
No ID Type
This event calls the API to bulk upload data
No ID
No ID Type
ADM-BLK-102
System
Request for bulk data upload operation
This event requests the bulk data upload based on category <category_name>
No ID
No ID Type
ADM-BLK-103
System
Request for bulk data upload operation
This event requests bulk data upload based on
No ID
No ID Type
ADM-BLK-104
System
Request for bulk data upload operation
This event requests the bulk data upload based on category <category_name>
No ID
No ID Type
ADM-BLK-105
System
Request for bulk data upload operation
This event specifies that the bulk data upload job started with job id -
No ID
No ID Type
ADM-BLK-106
System
Request for bulk data insert operation based on category
This event returns the status of bulk data insert operation <file_name,operation,jobId and message> No ID No ID Type
ADM-BLK-107
System
Request for bulk data upload transaction
This event specifies the inserting of data into transaction table based on <operation,category,entity_name>
No ID
No ID Type
ADM-BLK-108
System
Request for bulk data upload transaction
This event specifies that the data is successfully inserted into transaction table with transaction id <transaction_id>
<transaction_id>
Transaction Id
ADM-BLK-109
System
Request for bulk data insert operation based on category
This event returns the status of the uploading packet <packetId,message>
No ID
No ID Type
ADM-BLK-110
System
Request to get transaction details based on transaction id
This event fetches the transaction details for transaction id <transaction_id>
<transaction_id>
Transaction Id
ADM-BLK-111
System
Request to get all the transaction details
This event fetches the transaction details for all the transactions
No ID
No ID Type
ADM-BLK-112
System
Request for bulk data upload operation
This event requests for bulk data packet upload of <file_name> file
No ID
No ID Type
This event specifies that the bulk data upload is successful
No ID
No ID Type
ADM-BLK-201
System
Request to get transaction details based on transaction id
This event specifies that the request to fetch the transaction details for transaction id <transaction_id> is successful
No ID
No ID Type
ADM-BLK-202
System
Request to get all the transaction details
This event specifies that the request to fetch the transaction details for all the transactions is successful
No ID
No ID Type
This event specifies that the bulk data upload failed – and returns <file_name,operation,jobId and errormessage>
No ID
No ID Type
ADM-BLK-402
System
Request for bulk data operation
This event specifies that an error occurred while operating bulk data for <file_name,operation and error message>
No ID
No ID Type
ADM-BLK-403
System
Validating CSV file request
This event specifies that the file name <file_name> is not a CSV file
No ID
No ID Type
ADM-BLK-404
System
Validating CSV file request
This event returns a validation message stating that it’s a invalid CSV file <file_name>
No ID
No ID Type
ADM-BLK-405
System
Validating CSV file request
This event specifies that all the rows have same number of element in CSV file <file_name>
No ID
No ID Type
ADM-BLK-406
System
Request for bulk data insert operation based on category
This event returns a validation message stating that it’s a
invalid category
No ID
No ID Type
ADM-BLK-407
System
Request for bulk data upload packets
This event specifies that the upload of packets failed for <packetId, message>
No ID
No ID Type
ADM-BLK-408
System
Request to get transaction details based on transaction id
This event specifies that it was unable to retrieve transaction details for transaction id <transaction_id>
No ID
No ID Type
ADM-BLK-409
System
Request to get all the transaction details
This event specifies that it was unable to retrieve transaction details for all transactions
No ID
No ID Type
ADM-BLK-410
System
Request for bulk data insert operation
This event returns a validation message stating that it’s a invalid argument
No ID
No ID Type
This event returns the RID status
No ID
No ID Type
3
RES-SER-102
System
Request EUIN
This event sends a request for EUIN for the specified transaction ID
<transaction_id>
Transaction ID
4
RES-SER-103
System
Request to print UIN
This event sends a request for print UIN for the specified transaction ID
<transaction_id>
Transaction ID
5
RES-SER-104
System
Request to lock auth
This event sends a request for locking the auth for the specified transaction ID
<transaction_id>
Transaction ID
6
RES-SER-105
System
Request to unlock auth
This event sends a request for unlocking the auth for the specified transaction ID
<transaction_id>
Transaction ID
7
RES-SER-106
System
Request for auth history
This event sends a request for retrieving the auth history for the specified transaction ID
<transaction_id>
Transaction ID
8
RES-SER-107
System
Request to update the uin
This event calls an API to update the UIN of the resident for the specified transaction ID
<transaction_id>
Transaction ID
9
RES-SER-108
System
Request for generating VID
This event Calls and API to generate a VID for the specified transaction ID
<transaction_id>
Transaction ID
10
RES-SER-109
System
Request for revoking VID
This event Calls and API to revoke a VID for the specified transaction ID
<transaction_id>
Transaction ID
11
RES-SER-110
System
Validating the input request
This event validates the type of input request
No ID
No ID Type
12
RES-SER-113
System
This event validates the OTP for the specified transaction ID
<transaction_id>
Transaction ID
13
RES-SER-116
System
Checking RID status
This event calls an API to get the RID status based on the individual ID
No ID
No ID Type
14
RES-SER-114
System
Request for print UIN
This event specifies that the RID is Obtained for specified transaction id while requesting for printing UIN
<transaction_id>
Transaction ID
15
RES-SER-115
System
Request for UIN Update
This event specifies that the RID is obtained for specified transaction id while requesting for update UIN
<transaction_id>
Transaction ID
16
RES-SER-116
System
Request to generate VID This event specifies that the VID is generated successfully for the specified transaction ID
<transaction_id>
Transaction ID
Checking RID status
This event specifies that the API call to check the RID status is successful
No ID
No ID Type
2
RES-SER-210
System
Request for EUIN
This event specifies that the request for EUIN for the specified transaction ID is successful
<transaction_id>
Transaction ID
3
RES-SER-201
System
Request to print the UIN
This event specifies that the API call to print UIN for the specified transaction ID is successful
<transaction_id>
Transaction ID
4
RES-SER-202
System
Request to lock the auth
This event specifies that the API call to lock the auth for the specified transaction ID is successful
<transaction_id>
Transaction ID
5
RES-SER-203
System
Request to unlock the auth
This event specifies that the API call to unlock the auth for the specified transaction ID is successful
<transaction_id>
Transaction ID
6
RES-SER-204
System
Request for auth history
This event specifies that the API call to retrieve the auth history for the specified transaction ID is successful
<transaction_id>
Transaction ID
7
RES-SER-205
System
Request updating the UIN
This event specifies that the API call to update the UIN for the specified transaction ID is successful
<transaction_id>
Transaction ID
8
RES-SER-206
System
Request for generating VID
This event specifies that the API call to generate a VID for the specified transaction ID is successful
<transaction_id>
Transaction ID
9
RES-SER-207
System
Request for revoking VID
This event specifies that the API call to revoke the VID for the specified transaction ID is successful
<transaction_id>
Transaction ID
10
RES-SER-208
System
This event specifies that the sending of notification for transaction ID is successful
<transaction_id>
Transaction ID
11
RES-SER-209
System
This event specifies that the validation of otp for the specified transaction ID is successful
<transaction_id>
Transaction ID
12
RES-SER-210
System
Request to revoke the VID
This event specifies that the VID is deactivated for the specified transaction ID
<transaction_id>
Transaction ID
This event specifies that a failure notification has been sent for the specified transaction ID
<transaction_id>
Transaction ID
2
RES-SER-405
System
Request to generate VID
This event specifies that the VID already exists for the specified transaction ID
<transaction_id>
Transaction ID
3
RES-SER-406
System
Request to generate VID
This event specifies that the VID generation failed for the specified transaction ID
<transaction_id>
Transaction ID
4
RES-SER-404
System
This event specifies that there was a json parsing exception while generating VID for the specified transaction ID
<transaction_id>
Transaction ID
5
RES-SER-407
System
Request to revoke VID
This event specifies that the VID revocation failed for the specified transaction ID
<transaction_id>
Transaction ID
6
RES-SER-408
System
Checking RID status
This event specifies that the RID was not found while verifying the RID status
No ID
No ID Type
7
RES-SER-409
System
Generating token
This event specifies that the token generation has failed
No ID
No ID Type
8
RES-SER-410
System
This event specifies that the input parameter was invalid No ID No ID Type
9
RES-SER-411
System
This event specifies that the API was not available for the specified transaction ID
<transaction_id>
Transaction ID
10
RES-SER-412
System
This event specifies that it was unable to access API resource for the transaction id
<transaction_id>
Transaction ID
11
RES-SER-413
System
Check RID
This event specifies that the RID is invalid
No ID
No ID Type
12
RES-SER-414
System
Validating request
This event specifies that the request does not exist
No ID
No ID Type
13
RES-SER-415
System
Get template
This event specifies that there was a template exception
No ID
No ID Type
14
RES-SER-416
System
Get template
This event specifies that there was a template subject exception
No ID
No ID Type
15
RES-SER-417
System
This event specifies that the notification was failed for the transaction ID
<transaction_id>
Transaction ID
16
RES-SER-418
System
This event specifies that it was a bad request
No ID
No ID Type
17
RES-SER-419
System
Checking RID status
This event specifies that there was a invalid API response while checking the RID status
No ID
No ID Type
18
RES-SER-420
System
This event specifies that there was a IO exception for the transaction ID
<transaction_id>
Transaction ID
19
RES-SER-421
System
Request for UIN update
This event specifies that there was a json parsing exception for the transaction ID
<transaction_id>
Transaction ID
20
RES-SER-422
System
This event specifies that the OTP validation failed for the transaction ID
<transaction_id>
Transaction ID
21
RES-SER-401
System
This event specifies that there was a base exception for the transaction ID specified
<transaction_id>
Transaction ID
22
RES-SER-402
System
This event specifies that the request failed for the transaction ID
<transaction_id>
Transaction ID
1
RES_SER_101
System
Checking RID Status
This event specifies that a request is raised to check the RID status.
No ID
No ID Type
2
RES-SER-111
System
1
RES-SER-200
1
RES-SER-403
Success response for System Event Type
Failure response for System Event Type
Checking RID status
System
System
The latitude and longitude will be stored in the packet when the packet is created.
If client is offline or on low bandwidth, then when the client next comes online, the Registration ID’s are sent to server through scheduled or manual sync and the packets are then marked as “ready to upload”.
Once the packets are ready for upload, packets are uploaded in two ways:
The registration officer can initiate upload to server using client’s upload function.
Export to external storage device for subsequent upload as required.
If EoD process is turned OFF, packets are considered ‘Ready to Upload’ as soon as the registration is submitted and packet ID sync is completed
Puts the packets in the destination folder
The client will be locked for registration, if x days (configuration setting) have passed since the last check for updates and mandates the registration officer to update the software.
Technology Stack
This page lists all the technologies used in building MOSIP. As far as possible free and open source software with clear long term support availability have been chosen. For a deployment certain choices can be replaced with other free or commercial options.
Domain
Tools/Technologies
Version
Licence Type
Commercial
Production
Cost
Registration Client Setup
This document contains the 'Registration Client' application initial setup, update and configuration process.
Registration Client application is a desktop based application, that can be used to captures the demographic and biometric details of a resident along with supporting information (like proof documents & information about parent/guardian/introducer) and packages the information in a secure way using RSA based algorithm. The information packet can be sent to the server in an online or offline mode for processing.
The registration client application leverages the TPM capabilities and secure the data and mark the senders identity in the request before sending to external system. The MOSIP server would validate the request and make sure that the request is received from the right source. Every individual machine's TPM public key should be registered at MOSIP server to accept and process the data send by them.
A Trusted Platform Module (TPM) is a specialized chip on a local machines that stores RSA encryption keys specific to the host system for hardware authentication. Each TPM chip contains an RSA key pair called the Endorsement Key (EK). The pair is maintained inside the chip and cannot be accessed by software. By leveraging this security feature every individual machine would be uniquely registered and identified by the MOSIP server component.
OpenJDK version "11.0.8" version to build the application.
Registration Client application is built with four different modules
registration-client - it contains only UI related code.
registration-libs - it contains the code to generate the initial run.bat.
registration-MDM-service - MOSIP Device Manager service to integrate with BIO device and render the required data in a standard format and that will be consumed by the 'registration-services' module.
CPU - Dual Core Processor - 2GHZ
Ram - 16 GB
Local Storage Disk Space - 500 GB
Before running the 'Registration Client' application, following prerequisites to be completed:
Before building the 'registration-services' module, all the external URLs should be configured in the 'spring.properties' and 'mosip-application.properties' files.
- [spring.properties] should be updated with right environment [env] and other details.
All Master data should be loaded at MOSIP Master database.
User's machine should have online connectivity to access the client_upgrade_server, where the application binaries are available.
If TPM enabled, a logged-in user to windows machine should have permission to get the public key from TPM device.
Through the sync process, the data would be updated into the local database from the server.
Installation of Open Source Anti Virus Software [ClamAV]:
Download the ClamAV (Version: 0.101.2) Anti Virus Software - .
Install the downloaded .exe file.
ClamAV Config Setup
Rename the clamd.conf.sample to clamd.conf from the installed directory of ClamAV.
Ex: C:\Program Files\ClamAV\conf_examples\clamd.conf.sample file
save as C:\Program Files\ClamAV\conf_examples\clamd.conf
Rename the freshclam.conf.sample to freshclam.conf from the installed directory of ClamAV.
Ex: C:\Program Files\ClamAV\conf_examples\ freshclam.conf.sample file
save as C:\Program Files\ClamAV\conf_examples\ freshclam.conf
Comment the line# 8(Example) in both the files
Download - Application Initial Setup file
User downloads registration client zip from https:///registration-client//reg-client.zip.
Once downloaded then unzip the file into a particular location. It contains the following folder structure.
bin: It contains the client UI and service binaries in an encrypted format.
When the user clicks on the 'run.bat' it does the following:
Communicate with client_upgrade_server through a secured connection and download the maven-metadata.xml file to identify the latest jar versions.
Compare the checksum of the local version of jar files with the data present in the Manifest.mf file.
Identify the list of binary files and Download the required jars.
Application Startup
Once after application launches, TPM is initialized with RSA endorsement keys when TPM mode enabled / fallback implementation is initialzed ('reg.key', 'reg.pub', and 'readme.txt' will be created in your user.home directory with under .mosipkeys folder).
On initial startup, DB and DB pwd is autogenerated. DB password is secured using TPM key and encrypted db.conf is saved under .mosipkeys folder inside user.home directory.
Use TPM public key / from readme.txt copy the public key and machine name (hostname) and use it in machine's update API.
The application refers to the 'maven-metadata.xml' to verifies any new version exists or not.
mosip.rollback.path - Make sure that the rollback path is provided in this variable, which is available in 'spring.properties' file; as part of the registration-services module.
During the startup of the application, the software check will be validating against the maven-metadata.xml file from client_upgrade_server. If any diffs found, the application prompts the user with 'Update Now' or 'Update Later' options to install immediately or later. Apart from this, there is another menu option available in the application to trigger the 'Update' process post login to the application. The update process would update both the application binaries and DB.
During the update process, the running application refer to the 'rollback' path and take the back up of 'lib, bin, MANIFEST.MF' files inside rollback folder with the new folder as 'Version_timstamp' format.
Download and Update the required binary libraries and DB script into the existing running folder and restart the application.
The database update can be rolled out through the binary update process. If any changes in the script then the respective script would be attached inside 'registration-service/resource/sql/version folder [like: 0.12.8]' and deliver the jar with the newer version. During the update process, the jar would be downloaded and script inside the jar would be executed. It would also contains the 'rollback' {registration-service/resource/sql/version folder_rollback [like: 0.12.8_rollback]} script if update process to be rollbacked due to any technical error.
The application provided with the facility of multiple configurations for a different set of parameters. Each attribute level configuration changes should be performed at 'Config' server and same should be sync to the local machine through kernel services. Here few of the configurations are listed out that provide the facility to enable and disable the biometric.
Refer the registration configuration maintained in .
Refer the global configuration maintained in environment.
To enable or disable the TPM functionality, modify the mentioned key in 'registrtaion-libs/props/mosip-application.properties' file.
mosip.reg.client.tpm.availability = { Y - to enable the TPM, N - to disable the TPM}
It integrates the Registration application with biometric devices (Iris/ Fingerprint/ Face).
Registration client verifies the below-configured URL to check whether the system is in online or not. The application uses this URL to perform the health check before communicating with the external services.
Property attributes and the respective sample values are provided below. Before building the registration-services, the required below properties needs to be changed.
mosip.reg.client.url={Reg client download url from client_upgrade_server }
mosip.reg.logpath=../logs
mosip.reg.packetstorepath={where the registration packet should be stored}.
In Registration client application, only user mapping to the local machine can be performed. Rest of the data setup should be performed at MOSIP Admin portal. Through sync process the data would be sync between local machine and server based on machine's public key and center id. There are other services that are available to send the created packet from local machine to remote system.
This section covers the list of drivers required to communicate with the external devices.
To integrate with Scanner, windows WIA libraries are used. So, the respective service should be running and also the scanner specific driver should also be installed.
The application has been currently tested with CANON LiDE 120.
Printer should be available to take the print out from application and the respective driver should be installed.
Registration Client UI Developer Document
This document guides the developer to find the traceability between UI and the respective controller components. The provided technical classes are available in the package of 'registration-client' module. In this module, the required controllers are bind with the FXML screens.
It doesn't detail about each methods level information since that is covered in Javadoc of each component and Design Documents.
UI Screen Vs Controller mapping:
Functionality:
Login with UserName and Password/ OTP/ BIO
The required buttons, text fields, Radio buttons, On-click events directly mapped to the Controllers of public methods.
The required buttons, text fields, Radio buttons, On-click events directly mapped ot the Controllers of public methods.
The required buttons, text fields, Radio buttons, On-click events directly mapped to the Controllers of the public methods
The required buttons, text fields, Radio buttons, On-click events directly mapped to the Controllers of the public methods
The required buttons, text fields, Radio buttons, On-click events directly mapped to the Controllers of the public methods
The required buttons, text fields, Radio buttons, On-click events directly mapped to the Controllers of the public methods
The required buttons, text fields, Radio buttons, On-click events directly mapped to the Controllers of the public methods
The required buttons, text fields, Radio buttons, On-click events directly mapped to the Controllers of the public methods
The required buttons, text fields, Radio buttons, On-click events directly mapped to the Controllers of the public methods
The required buttons, text fields, Radio buttons, On-click events directly mapped to the Controllers of the public methods
The required buttons, text fields, Radio buttons, On-click events directly mapped to the Controllers of the public methods
The required buttons, text fields, Radio buttons, On-click events directly mapped to the Controllers of the public methods
The required buttons, text fields, Radio buttons, On-click events directly mapped to the Controllers of the public methods
The required buttons, text fields, Radio buttons, On-click events directly mapped to the Controllers of the public methods
The required buttons, text fields, Radio buttons, On-click events directly mapped to the Controllers of the public methods
The required buttons, text fields, Radio buttons, On-click events directly mapped to the Controllers of the public methods
The required buttons, text fields, Radio buttons, On-click events directly mapped to the Controllers of the public methods
The required buttons, text fields, Radio buttons, On-click events directly mapped to the Controllers of the public methods.
The required buttons, text fields, Radio buttons, On-click events directly mapped to the Controllers of the public methods.
The required buttons, text fields, Radio buttons, On-click events directly mapped to the Controllers of the public methods.
The required buttons, text fields, Radio buttons, On-click events directly mapped to the Controllers of the public methods.
The required buttons, text fields, Radio buttons, On-click events directly mapped to the Controllers of the public methods.
The required buttons, text fields, Radio buttons, On-click events directly mapped to the Controllers of the public methods.
Technical Detail:
Login screen with User ID will be loaded initially and after successful valudation of the user id the respective authenitcaiton screen [if multi-factor more than one authenticaiton] will be loaded
FXML and Controller class
RegistrtaionLogin.fxml --> LoginController.java and Authentication.fxml --> AuthenticationController.java. For each controller always the initialization() method will be called from the controller to initialize the screen
Input parameter:
The required buttons,text fields, Radio buttons, On-click events directly mapped to the Controllers of public methods
Functionality:
Officer Information Header Screen
Technical Detail:
After successful login, the Home screen displayed with the officer's information as a header.
FXML and Controller class
Header.fxml --> HeaderController.java. For each controller always the initialization() method will be called from the controller to initialize the screen
Functionality:
Main / Home Screen
Technical Detail:
After successful login to the application, the application launches the home screen where the operator can do the new registration/UIN update/ Lost UIN / Pending Approval/ Update operator Bio-metrics operations
FXML and Controller class
RegistrationOfficerLayout.fxml, RegistrationOfficerPacketLayout.fxml --> PacketHandlerController.java. For each controller always the initalization() method will be called from the controller to initialize the screen
Functionality:
Registration Header Screen
Technical Detail:
On Click of any registration/UIN update or Lost UIN the screen header loaded with Registration Header screen, which indicates to the operator currently which data are we going to capture. It highlights with bold color.
FXML and Controller class
RegistrationHeader.fxml --> RegistrationHeaderController.java. For each controller always the initialization() method will be called from the controller to initialize the screen
Functionality:
Demographic Screen
Technical Detail:
This screen helps to capture the demographic information of the Resident like Name,Age/DOB , Address, Parent/Guardian Details,Email ID and Mobile Number
FXML and Controller class
Registration.fxml, DemographicDetail.fxml --> RegistrationController.java. For each controller always the initialization() method will be called from the controller to initialize the screen
Functionality:
Fingerprint Capture Screen
Technical Detail:
This screen helps to capture the fingerprint information of the Resident like left slap /Right Slap and two thumbs. Apart from this capture of single fingerprint for the authentication will also be called from here. The operations like Reset/Star Over and Scan methods are applicable to this screen
FXML and Controller class
FingerPrintCapture.fxml --> FingerPrintCaptureController.java. For each controller always the initialization() method will be called from the controller to initialize the screen
Functionality:
Iris Capture Screen
Technical Detail:
This screen helps to capture the Iris information of the Resident like left Eye /Right eye. Apart from this capture of single iris for the authentication will also be called from here. The operations like Reset/Star Over and Scan methods are applicable to this screen
FXML and Controller class
IrisCapture.fxml --> IrisCaptureController.java. For each controller always the initialization() method will be called from the controller to initialize the screen
Functionality:
Face Capture and Camera popup Screen
Technical Detail:
This screen helps to capture the Face information of the Resident using the ICFO standard. Apart from this capture of face for the authentication will also be called from here. The operations like capture/reset/close methods are applicable to this screen. The pop for the camera will be also part of this controller.
FXML and Controller class
FaceCapture.fxml --> FaceCaptureController.java and WebCamera.fxml --> WebCameraController.java. For each controller always the initialization() method will be called from the controller to initialize the screen
Functionality:
Resident capture information Preview Screen
Technical Detail:
This screen helps to preview the captured information of the Resident like Demographic/Bio-metric and Documents scanned. This screen helps to edit the particular section of which we captured.
FXML and Controller class
RegistrationPreview.fxml --> RegistrationPreviewController.java. For each controller always the initialization() method will be called from the controller to initialize the screen
Functionality:
Officer/Supervisor Authentication Screen
Technical Detail:
This screen helps to authenticate the officer/supervisor, after capture the all resident information. The authentication can happen base don the configuration like PWD/OTP/Bio-metric.
FXML and Controller class
OperatorAuthentication.fxml --> AuthenticationController.java. For each controller always the initialization() method will be called from the controller to initialize the screen
Functionality:
Acknowledgment Screen
Technical Detail:
This screen helps to provide the acknowledgment information of the information captured of the resident. This helps the operator to print the acknowledgment slip and give to the resident.
FXML and Controller class
AckReceipt.fxml --> AckReceiptController.java. For each controller always the initialization() method will be called from the controller to initialize the screen
Functionality:
Document Scan Screen & Scan Popup screen
Technical Detail:
This screen helps to scan the required documents which required based on the operations like New Registration/UIN update /Lost UIN. This scan/edit/remove operation of the documents mapped to this controller. For each scan button, the relevant scan pop window will be displayed. The operations capture will be part of the ScanPopupViewController.
FXML and Controller class
DocumentScan.fxml --> DocumentScanController.java and Scan.fxml --> ScanPopUpViewController.java. For each controller always the initialization() method will be called from the controller to initialize the screen
Functionality:
Bio-metric Exception Screen
Technical Detail:
This screen helps to mark the bio-metrics which are not available for the resident while capturing the biometric information. By this screen, we can select/deselect the fingers [10] and iris[2]. The operation select/deselect mapped to the controller.
FXML and Controller class
BiometricException.fxml --> BiometricExceptionController.java. For each controller always the initialization() method will be called from the controller to initialize the screen
Functionality:
Parent/Guardian Bio-metric Screen
Technical Detail:
This screen helps to capture the anyone of the parent bio-metric for the child registration/UIN update or Lost UIN. This screen provided with the dropdown by selecting the required bio-metric the same thing should be captured by the operator. The operation Reset/StarOver/Scan mapped to the controller.
FXML and Controller class
GuardianBiometrics.fxml --> GuardianBiometricsController.java. For each controller always the initialization() method will be called from the controller to initialize the screen
Functionality:
Officer/Supervisor Onboarding Screen
Technical Detail:
This screen helps to Onboard the officer/supervisor to the current machine to create the New Registration/UIN Update and Lost UIN for the residents.
FXML and Controller class
Onboard.fxml, UserOnboard.fxml --> UserOnboardParentController.java. For each controller always the initialization() method will be called from the controller to initialize the screen
Functionality:
Officer/Supervisor Fingerprint Capture Screen
Technical Detail:
This screen helps to capture the Officer/Supervisor fingerprint information of the Resident like left slap /Right Slap and two thumbs. Apart from this capture of single fingerprint for the authentication will also be called from here. The operations like Reset/Star Over and Scan methods are applicable to this screen
FXML and Controller class
UserOnboardFPCapture.fxml --> FingerPrintCaptureController.java. For each controller always the initialization() method will be called from the controller to initialize the screen
Functionality:
Officer/Supervisor Iris Capture Screen
Technical Detail:
This screen helps to capture the Officer/Supervisor Iris information of the Resident like left Eye /Right eye. Apart from this capture of single iris for the authentication will also be called from here. The operations like Reset/Star Over and Scan methods are applicable to this screen
FXML and Controller class
UserOnboardIrisCapture.fxml --> IrisCaptureController.java. For each controller always the initialization() method will be called from the controller to initialize the screen
Functionality:
Officer/Supervisor Face Capture and Camera popup Screen
Technical Detail:
This screen helps to capture the Officer/Supervisor Face information of the Resident using the ICFO standard. Apart from this capture of face for the authentication will also be called from here. The operations like capture/reset/close methods are applicable to this screen. The pop for the camera will be also part of this controller.
FXML and Controller class
UserOnboardWebCamera.fxml --> FaceCaptureController.java and WebCamera.fxml --> WebCameraController.java. For each controller always the initialization() method will be called from the controller to initialize the screen
Functionality:
Pending Approval Screen
Technical Detail:
This screen helps the supervisor to approve the registration done by the officer. This screen displays the list of the packets with respect to their acknowledgment slip. The operations approve/reject mapped to this controller.
FXML and Controller class
RegistrationPendingApproval.fxml --> RegistrationApprovalController.java. For each controller always the initialization() method will be called from the controller to initialize the screen
Functionality:
Pending Approval - Rejection list Screen
Technical Detail:
This screen helps the supervisor to reject the registrations done by the officer. This screen displays the list of the packets with respect to their acknowledgment slip. The operations reject mapped to this controller. On selecting the rejection the drop-down will be displayed with a list of reasons to reject the registrations.
FXML and Controller class
RejectionComment.fxml --> RejectionController.java. For each controller always the initialization() method will be called from the controller to initialize the screen
Functionality:
Send Notification[SMS/Email] Screen
Technical Detail:
This screen helps the officer to send the SMS/email to other members. After successful registration of the resident, if the person wants to send the message to more than one person they can send by using this screen.
FXML and Controller class
SendNotification.fxml --> SendNotificationController.java. For each controller always the initialization() method will be called from the controller to initialize the screen
Functionality:
UIN - Update Selection Screen
Technical Detail:
This screen helps the officer to select the required fields to be updated as part of the UIN update screen. W.r.t the selection of the relevant fields and screen will be displayed subsequently.
FXML and Controller class
UpdateUIN.fxml --> UpdateUINController.java. For each controller always the initialization() method will be called from the controller to initialize the screen
Functionality:
Re-Registration Screen
Technical Detail:
This screen helps the officer to inform/not inform the re-registration status, which comes from the server as response.
FXML and Controller class
ReRegistration.fxml --> ReRegistrationController.java. For each controller always the initialization() method will be called from the controller to initialize the screen
Functionality:
Sync Data Screen
Technical Detail:
This screen helps the officer to sync the all required operations manually. Which is available at the Main home screen.
FXML and Controller class
SyncDataProcess.fxml --> SyncDataProcessController.java. For each controller always the initialization() method will be called from the controller to initialize the screen
registration-services - it contains the Java API, which would be called from UI module to render the services to the User and capture the detail from User and store it in DB or send to external systems through services.
USB 2.0 ports or equivalent hub.
Physical machine with TPM 2.0 facility.
Windows OS [10 v]
User, machine, device & center mapping, and all other required table and data setup should exist in MOSIP Master database along with the profile and desired roles configuration in IAM server.
All the required dependent services should be installed, up and running before running the client application.
Download the Antivirus database from the following urls and placed it in the database folder(C:\Program Files\ClamAV\database)
To enable the bio auth validation during user 'On Boarding' process and validated against the IDA Auth service
2
mosip.secondary-language
fra / ara/ eng
French/ Arabic/ English
To run the MDM service in local machine's port
mosip.reg.healthcheck.url={Application uses this url to perform the health check before communicating with the external services. Default value: https://${environment}/v1/authmanager/actuator/health}
mosip.reg.rollback.path={where the application backup should be taken during software update} [Default: ../BackUp]
mosip.reg.cerpath=/cer//mosip_cer.cer
mosip.reg.xml.file.url={client_upgrade_server url with maven-metadata.xml file}
mosip.reg.app.key={contains the key to be used to decrypt the application binaries during run time}
mosip.reg.client.tpm.availability={ Y - to enable the TPM, N - to disable the TPM, default N}
2
User Salt Sync
User's password is validated using this salt. Without this sync user can't login to the app.
Kernel
3
Master Data Sync
Reg. client application related master data are sync from server using this sync. Without this sync, the app won't work.
Kernel
4
Application configuration Sync
Reg. client app related dynamic configuration parameters are sync from server. Without this sync, the app won't work.
Kernel
5
Policy Sync
Sync the key required for packet creation based on center and machine id. Packet can't be created without this sync.
Kernel
6
MOSIP public key Sync
To synchronize the MOSIP public key, which is used during response sign validation.
Kernel
7
Pre-registration Data Sync
To download the center specific pre-registration packet data based on date range.
Pre-Registration
8
Packet Sync
To upload the list of packet related information before uploading actual packet. Without this sync, the packet can't be uploaded to the server .
Registration-Processor
9
Packet Status reader
At regular interval read the status of the uploaded packet and update the same in local db.
Registration-Processor
10
Packet Upload
To upload the packet generated out of New/ Lost UIN / Update UIN process to MOSIP server.
Registration-Processor
11
Send OTP
To send OTP message to the user's mobile no. during authentication process.
Kernel
12
Auth Service - UserName and Password
To get the auth token based on user provided user name and password. This token would be attached in the request while making any service calls in the same user context.
Kernel
13
Auth Service - UserName and OTP
To get the auth token based on user provided user name and OTP.
Kernel
14
Auth Service - Client id and Secret Key
To get the auth token based on client id and secret key.
Kernel
15
Validate / Invalidate auth Token
To validate and invalidate the generated token.
Kernel
16
ID-Authentication API
To on board the user based on user's bio authentication. Without this service, user on-borading screen won't work if bio auth enabled.
ID-Authentication
Camera and the respective driver should be available to capture the applicant photo. Application tested with Logitech camera.
When there is an integrated camera associated with the machine, it needs to be disabled.
If GPS enabled through configuration then the respective device/ model specific driver should be installed to communicate through application.
To synchronize the user related information. Without this sync user can't login to the application.
Kernel
Application build
Prerequisites
System prerequisites
Application Prerequisites
Below are the mandatory master data mapping that should be available in master database.
The centers and zone's should be created for the country (in registration_center & zone tables respectively).
The user id's should be mapped to a center & a zone (in the user_details & zone_user table respectively) and corresponding user credentials should be created in KeyCloak.
The registration machines should be created and mapped to a center and zone (in the machine_master tables).
The devices to be used for registration activities should be whitelisted & mapped to a center and zone (in the device_master tables).
The corresponding history details should be also be populated for centers, zones, machines, devices & zone user tables, so that the validations in registration processor do not fail.
Anti Virus - ClamAV Setup and Configuration in local machine
Registration Client Installation
"mosip.hostname" property can also be defined in the aforementioned file spring.properties of the registration-services module.
This documentation is for setting up HDFS (v2.8.1) cluster with one namenode and one datanode
Setup HDFS version 2.8.1
Prerequisites
Create 2 VMs. They’ll be referred to throughout this guide as,
node-master.example.com
node-slave1.example.com
Install java (java-8-openjdk) to all the machines in the cluster and setup the JAVA_HOME environment variable for the same.
sudo yum install java-1.8.0-openjdk-devel
Get your Java installation path.
Note: Take the value of the current link and remove the trailing /bin/java.
For example on RHEL 7, the link is /usr/lib/jvm/java-1.8.0-openjdk-1.8.0.191.b12-1.el7_6.x86_64/jre/bin/java
So JAVA_HOME should be /usr/lib/jvm/java-1.8.0-openjdk-1.8.0.191.b12-1.el7_6.x86_64/jre.
Export JAVA_HOME={path-tojava} with your actual java installation path.
For example on a Debian with open-jdk-8: export JAVA_HOME=/usr/lib/jvm/java-1.8.0-openjdk-1.8.0.191.b12-1.el7_6.x86_64/jre
Note: In the further steps when u login to the hadoop account set the java path in ~/hadoop/etc/hadoop/hadoop-env.sh also.
Get the IP of master and slave nodes using:
Adjust /etc/hosts on all nodes according to your configuration.
Note:
While adding same machine ip to /etc/hosts, use private ip that machine instead of public IP. For other machine in the cluster use public IP. * Edit the Master node VM /etc/hosts file use private IP of Master node and public IP of the Slave node. * Edit the Slave node VM /etc/hosts file use private IP of Slave node and Public IP of Master node. * Example: 10.0.22.11 node-master.example.com 10.0.3.12 node-slave1.example.com
Create a hadoop user in every machine in the cluster to followup the documentation or replace the hadoop user in the documentation with your own user.
Log in to the system as the root user.
Create a hadoop user account using the useradd command.
Set a password for the new hadoop user using the passwd command.
You have successfully configured a hadoop user with sudo access. You can now log in to this hadoop account and use sudo to run commands as if you were logged in to the account of the root user.
The master node will use an ssh-connection to connect to other nodes with key-pair authentication, to manage the cluster.
Login to node-master as the hadoop user, and generate an ssh-key:
id_rsa.pub will contains the generated public key
Copy the public key to all the other nodes.
or
Update the $HOME/.ssh/id_rsa.pub
Note: if ssh fails, try setting up again the authorized_keys to the machine.
Login to node-master as the hadoop user, download the Hadoop tarball from Hadoop project page, and unzip it: cd wget https://archive.apache.org/dist/hadoop/core/hadoop-2.8.1/hadoop-2.8.1.tar.gz tar -xzf hadoop-2.8.1.tar.gz mv hadoop-2.8.1 hadoop
Add Hadoop binaries to your PATH. Edit /home/hadoop/.bashrc or /home/hadoop/.bash_profile and add the following line: export HADOOP_HOME=$HOME/hadoop export HADOOP_CONF_DIR=$HOME/hadoop/etc/hadoop export HADOOP_MAPRED_HOME=$HOME/hadoop export HADOOP_COMMON_HOME=$HOME/hadoop export HADOOP_HDFS_HOME=$HOME/hadoop export YARN_HOME=$HOME/hadoop export PATH=$PATH:$HOME/hadoop/bin export JAVA_HOME=/usr/lib/jvm/java-1.8.0-openjdk-1.8.0.191.b12-0.el7_5.x86_64/jre Run following command to apply environment variable changes, using source command: source /home/hadoop/.bashrc or source /home/hadoop/.bash_profile
Configuration will be done on node-master and replicated to other slave nodes.
Edit ~/hadoop/etc/hadoop/masters to be: node-master.example.com
Edit ~/hadoop/etc/hadoop/slaves to be: This slaves file will specifies the datanode to be setup in which machine node-slave1.example.com
Copy the hadoop binaries to slave nodes:
or copy each configured files to other nodes
Connect to node1 via ssh. A password isn’t required, thanks to the ssh keys copied above:
Unzip the binaries, rename the directory, and exit node-slave1.example.com to get back on the node-master.example.com:
HDFS needs to be formatted like any classical file system. On node-master, run the following command: hdfs namenode -format Your Hadoop installation is now configured and ready to run.
Start the HDFS by running the following script from node-master: start-dfs.sh, stop-dfs.sh script files will be present in hadoop_Installation_Dir/sbin/start.dfs.sg
It’ll start NameNode and SecondaryNameNode on node-master.example.com, and DataNode on node-slave1.example.com, according to the configuration in the slaves config file.
Check that every process is running with the jps command on each node. You should get on node-master.example.com (PID will be different):
and on node-slave1.example.com:
Hdfs has been Configured Successfully
Note: If datanode and namenode has not started, look into hdfs logs to debug: $HOME/hadoop/logs/
To create users for hdfs (regprocessor, prereg, idrepo), run this command:
Note: Configure the user in module specific properties file (ex- pre-registration-qa.properties) as mosip.kernel.fsadapter.hdfs.user-name=prereg**
Create a directory and give permission for each user
Note: If different port has been configured , enable those port.
Following configuration is required to run HDFS in secure mode. Read more about kerberos here:
Install Java Cryptography Extension (JCE) Unlimited Strength Jurisdiction Policy File on all cluster and Hadoop user machines. Follow this
Kerberos server(KDC) and the client needs to be installed. Install the client on both master and slave nodes. KDC server will be installed on the master node.
To install packages for a Kerberos server:
To install packages for a Kerberos client:
Edit the /etc/krb5.conf: Configuration snippets may be placed in this directory (includedir /etc/krb5.conf.d/) as well,
Note: Place this krb5.conf file in /kernel/kernel-fsadapter-hdfs/src/main/resourcesmosip.kernel.fsadapter.hdfs.krb-file=classpath:krb5.conf Or if kept outside resource then give absolute path mosip.kernel.fsadapter.hdfs.krb-file=file:/opt/kdc/krb5.conf
Edit /var/kerberos/krb5kdc/kdc.conf
Create the database using the kdb5_util utility.
Edit the /var/kerberos/krb5kdc/kadm5.acl
To set up the KDC server to auto-start on boot. ``` RHEL/CentOS/Oracle Linux 6
Verify that the KDC is issuing tickets. First, run kinit to obtain a ticket and store it in a credential cache file.
Next, use klist to view the list of credentials in the cache.
Use kdestroy to destroy the cache and the credentials it contains.
For more information, check here:
If you have root access to the KDC machine, use kadmin.local, else use kadmin. To start kadmin.local (on the KDC machine), run this command: sudo kadmin.local
Do the following steps for masternode.
In the kadmin.local or kadmin shell, create the hadoop principal. This principal is used for the NameNode, Secondary NameNode, and DataNodes.
Create the HTTP principal.
Create principal for all user of hdfs (regprocessor, prereg, idrepo)
Create the hdfs keytab file that will contain the hdfs principal and HTTP principal. This keytab file is used for the NameNode, Secondary NameNode, and DataNodes. kadmin: xst -norandkey -k hadoop.keytab hadoop/admin HTTP/admin Use klist to display the keytab file entries; a correctly-created hdfs keytab file should look something like this: $ klist -k -e -t hadoop.keytab Keytab name: FILE:hadoop.keytab KVNO Timestamp Principal ---- ------------------- ------------------------------------------------------ 1 02/11/2019 08:53:51 hadoop/admin@NODE-MASTER.EXAMPLE.COM (aes256-cts-hmac-sha1-96) 1 02/11/2019 08:53:51 hadoop/admin@NODE-MASTER.EXAMPLE.COM (aes128-cts-hmac-sha1-96) 1 02/11/2019 08:53:51 hadoop/admin@NODE-MASTER.EXAMPLE.COM (des3-cbc-sha1) 1 02/11/2019 08:53:51 hadoop/admin@NODE-MASTER.EXAMPLE.COM (arcfour-hmac) 1 02/11/2019 08:53:51 hadoop/admin@NODE-MASTER.EXAMPLE.COM (camellia256-cts-cmac) 1 02/11/2019 08:53:51 hadoop/admin@NODE-MASTER.EXAMPLE.COM (camellia128-cts-cmac) 1 02/11/2019 08:53:51 hadoop/admin@NODE-MASTER.EXAMPLE.COM (des-hmac-sha1) 1 02/11/2019 08:53:51 hadoop/admin@NODE-MASTER.EXAMPLE.COM (des-cbc-md5) 1 02/11/2019 08:53:51 HTTP/admin@NODE-MASTER.EXAMPLE.COM (aes256-cts-hmac-sha1-96) 1 02/11/2019 08:53:51 HTTP/admin@NODE-MASTER.EXAMPLE.COM (aes128-cts-hmac-sha1-96) 1 02/11/2019 08:53:51 HTTP/admin@NODE-MASTER.EXAMPLE.COM (des3-cbc-sha1) 1 02/11/2019 08:53:51 HTTP/admin@NODE-MASTER.EXAMPLE.COM (arcfour-hmac) 1 02/11/2019 08:53:51 HTTP/admin@NODE-MASTER.EXAMPLE.COM (camellia256-cts-cmac) 1 02/11/2019 08:53:51 HTTP/admin@NODE-MASTER.EXAMPLE.COM (camellia128-cts-cmac) 1 02/11/2019 08:53:51 HTTP/admin@NODE-MASTER.EXAMPLE.COM (des-hmac-sha1) 1 02/11/2019 08:53:51 HTTP/admin@NODE-MASTER.EXAMPLE.COM (des-cbc-md5)
Creating keytab [mosip.keytab] file for application to authenticate with HDFS cluster
To view the principals in keytab
On every node in the cluster, copy or move the keytab file to a directory that Hadoop can access, such as /home/hadoop/hadoop/etc/hadoop/hadoop.keytab.
Place this mosip.keytab file in /kernel/kernel-fsadapter-hdfs/src/main/resources and update the application properties for mosip.kernel.fsadapter.hdfs.keytab-file=classpath:mosip.keytab mosip.kernel.fsadapter.hdfs.authentication-enabled=true mosip.kernel.fsadapter.hdfs.kdc-domain=NODE-MASTER.EXAMPLE.COM mosip.kernel.fsadapter.hdfs.name-node-url=hdfs://host-ip:port
Note: Configure the user in module specific properties file (example: pre-registration-qa.properties as mosip.kernel.fsadapter.hdfs.user-name=prereg).
To enable security in hdfs, you must stop all Hadoop daemons in your cluster and then change some configuration properties. sh hadoop/sbin/stop-dfs.sh
To enable Hadoop security, add the following properties to the ~/hadoop/etc/hadoop/core-site.xml file on every machine in the cluster:
Add the following properties to the ~/hadoop/etc/hadoop/hdfs-site.xml file on every machine in the cluster.
The first step of deploying HTTPS is to generate the key and the certificate for each machine in the cluster. You can use Java’s keytool utility to accomplish this task: Ensure that firstname/lastname OR common name (CN) matches exactly with the fully qualified domain name (e.g. node-master.example.com) of the server. keytool -genkey -alias localhost -keyalg RSA -keysize 2048 -keystore keystore.jks
We use openssl to generate a new CA certificate: openssl req -new -x509 -keyout ca-key.cer -out ca-cert.cer -days 365 The next step is to add the generated CA to the clients’ truststore so that the clients can trust this CA: keytool -keystore truststore.jks -alias CARoot -import -file ca-cert.cer
The next step is to sign all certificates generated with the CA. First, you need to export the certificate from the keystore: keytool -keystore keystore.jks -alias localhost -certreq -file cert-file.cer Then sign it with the CA: openssl x509 -req -CA ca-cert.cer -CAkey ca-key.cer -in cert-file.cer -out cert-signed.cer -days 365 -CAcreateserial -passin pass:12345678 Finally, you need to import both the certificate of the CA and the signed certificate into the keystore keytool -keystore keystore.jks -alias CARoot -import -file ca-cert.cer keytool -keystore keystore.jks -alias localhost -import -file cert-signed.cer
Change the ssl-server.xml and ssl-client.xml on all nodes to tell HDFS about the keystore and the truststore
Edit ~/hadoop/etc/hadoop/ssl-server.xml
Edit ~/hadoop/etc/hadoop/ssl-client.xml
After restarting the HDFS daemons (NameNode, DataNode and JournalNode), you should have successfully deployed HTTPS in your HDFS cluster.
For you face error during kerberos, check this:
Partner Management Audits
Partner Management provides services for various types of partners associated with the MOSIP system. Currently, in MOSIP we have identified some types of partners, but the adopters can choose to add many more partners.
Partners in MOSIP are created in a self-service mode. The partner visit the MOSIP partner management portal and requests for collaborating with MOSIP by providing basic details such as organization name & email id, purpose of registration (how they want to collaborate with MOSIP as a device provider, authentication partner, print partner, etc), basic credentials and performing an OTP based verification.
The following events are triggered as part of User Event Type in Partner Management Service module
Event ID
Event Type
Event Name
Add the haddop user to the wheel group using the usermod command.
Test that the updated configuration allows the user you created to run commands using sudo.
Use the su to switch to the new user account that you created.
su hadoop
Use the groups to verify that the user is in the wheel group.
groups
Use the sudo command to run the whoami command. As this is the first time you have run a command using sudo from hadoop user account the banner message will be displayed. You will be also be prompted to enter the password for the hadoop account.
The last line of the output is the user name returned by the whoami command. If sudo is configured correctly this value will be root.
file contents of slave node to Master node
$HOME/.ssh/authorized_keys file
and also Update
$HOME/.ssh/id_rsa.pub
file contents of Master node to Slave node
$HOME/.ssh/authorized_keys manually
.
Copy the Hadoop configuration files to the slave nodes:
for node in node-slave1.example.com; do
scp ~/hadoop/etc/hadoop/* $node:/home/hadoop/hadoop/etc/hadoop/;
done
Create the first principal using kadmin.local at the KDC terminal:
mkdir -p /home/hadoop/data/nameNode [where on the filesystem the DFS name node should store the name table(fsimage)]
mkdir -p /home/hadoop/data/dataNode [where data node should store its blocks.]
cd /home/hadoop/
scp hadoop-*.tar.gz node-slave1.example.com:/home/hadoop
ssh node-slave1.example.com
tar -xzf hadoop-2.8.1.tar.gz
mv hadoop-2.8.1 hadoop
exit
```
klist -k -e -t mosip.keytab
```
and so on add all the users to keytab. if you want create the separate keytab file for each application and distribute them
<configuration>
<property>
<name>ssl.server.truststore.location</name>
<value>/home/hadoop/truststore.jks</value>
<description>Truststore to be used by NN and DN. Must be specified.
</description>
</property>
<property>
<name>ssl.server.truststore.password</name>
<value>12345678</value>
<description>Optional. Default value is "".
</description>
</property>
<property>
<name>ssl.server.truststore.type</name>
<value>jks</value>
<description>Optional. The keystore file format, default value is "jks".
</description>
</property>
<property>
<name>ssl.server.truststore.reload.interval</name>
<value>10000</value>
<description>Truststore reload check interval, in milliseconds.
Default value is 10000 (10 seconds).
</description>
</property>
<property>
<name>ssl.server.keystore.location</name>
<value>/home/hadoop/keystore.jks</value>
<description>Keystore to be used by NN and DN. Must be specified.
</description>
</property>
<property>
<name>ssl.server.keystore.password</name>
<value>12345678</value>
<description>Must be specified.
</description>
</property>
<property>
<name>ssl.server.keystore.keypassword</name>
<value>12345678</value>
<description>Must be specified.
</description>
</property>
<property>
<name>ssl.server.keystore.type</name>
<value>jks</value>
<description>Optional. The keystore file format, default value is "jks".
</description>
</property>
<property>
<name>ssl.server.exclude.cipher.list</name>
<value>TLS_ECDHE_RSA_WITH_RC4_128_SHA,SSL_DHE_RSA_EXPORT_WITH_DES40_CBC_SHA,
SSL_RSA_WITH_DES_CBC_SHA,SSL_DHE_RSA_WITH_DES_CBC_SHA,
SSL_RSA_EXPORT_WITH_RC4_40_MD5,SSL_RSA_EXPORT_WITH_DES40_CBC_SHA,
SSL_RSA_WITH_RC4_128_MD5</value>
<description>Optional. The weak security cipher suites that you want excluded
from SSL communication.</description>
</property>
</configuration>
<configuration>
<property>
<name>ssl.client.truststore.location</name>
<value>/home/hadoop/truststore.jks</value>
<description>Truststore to be used by clients like distcp. Must be
specified.
</description>
</property>
<property>
<name>ssl.client.truststore.password</name>
<value>12345678</value>
<description>Optional. Default value is "".
</description>
</property>
<property>
<name>ssl.client.truststore.type</name>
<value>jks</value>
<description>Optional. The keystore file format, default value is "jks".
</description>
</property>
<property>
<name>ssl.client.truststore.reload.interval</name>
<value>10000</value>
<description>Truststore reload check interval, in milliseconds.
Default value is 10000 (10 seconds).
</description>
</property>
<property>
<name>ssl.client.keystore.location</name>
<value>/home/hadoop/keystore.jks</value>
<description>Keystore to be used by clients like distcp. Must be
specified.
</description>
</property>
<property>
<name>ssl.client.keystore.password</name>
<value>12345678</value>
<description>Optional. Default value is "".
</description>
</property>
<property>
<name>ssl.client.keystore.keypassword</name>
<value>12345678</value>
<description>Optional. Default value is "".
</description>
</property>
<property>
<name>ssl.client.keystore.type</name>
<value>jks</value>
<description>Optional. The keystore file format, default value is "jks".
</description>
</property>
</configuration>
Edit ~/bashrc.sh:
Creating Hadoop User
Distribute Authentication Key-pairs for the Hadoop User
Verify ssh from Master node to slave node and vice versa.
Download and Unpack Hadoop Binaries
Set Environment variables in each machine in the cluster
Configure the Master Node
Set NameNode
Set path for HDFS
Configure Master
Configure Slaves
Create duplicate config files on each node
Format HDFS
Start HDFS
Create HDFS users
Enabling configured port through firewall in each machine in cluster
Securing HDFS
Install Kerberos
Before Installing Kerberos Install the JCE Policy File
Kerberos
Configuring the Master KDC Server
Create and Deploy the Kerberos Principals and Keytab files
This event triggers an API call to create Partner in mosip database
No ID
No ID Type
PMS_PRT_112
User
Register Partner
This event triggers an API call to create Partner Key in mosip database
Event ID
Event Type
Event Name
Description
Reference ID
Reference ID Type
PMS_PRT_200
User
Register Partner
The following events are triggered as part of System Event Type in Partner Management Service module.
Event ID
Event Type
Event Name
Description
Reference ID
Reference ID Type
PMS_PRT_122
System
Create Partner
Event ID
Event Type
Event Name
Description
Reference ID
Reference ID Type
PMS_PRT_222
System
Create Partner
Event ID
Event Type
Event Name
Description
Reference ID
Reference ID Type
PMS_PRT_401
System
Create Partner Request
The Partner Management service also involves policy management for Partners. Each partner can access various services only based on a defined policy.In order to create a policy we must have a policy group first. The policy admin needs to first create a policy group using the partner management portal.
The following events are triggered as part of System Event Type in Policy Management Service.
Event ID
Event Type
Event Name
Description
Reference ID
Reference ID Type
PMS_PRT_115
System
Create Policy Group
Event ID
Event Type
Event Name
Description
Reference ID
Reference ID Type
PMS_PRT_215
System
Create Policy Group
Event ID | Event Type | Event Name | Description | Reference ID | Reference ID Type -------|----------|------------|------------|-------------|--------------|------------------- PMS_PRT_475 | System | Create Policy Group | This event describes that the API call to create policy group has failed. | No ID | No ID Type PMS_PRT_416 | System | Create Policy Group | This event specifies that the API call to fetch the policy group details has failed. | Policy Group ID | Policy Group ID PMS_PRT_456 | System | Update Policy Group | This event describes that the API call to update policy group has failed. | Policy Group ID | Policy Group ID PMS_PRT_437 | System | Create Policy | This event describes that the API call to create a policy for a policy group has failed. | No ID | No ID Type PMS_PRT_487 | System | Create Policy | This event specifies that the API call to fetch the policy details has failed. | Policy ID | Policy ID PMS_PRT_483 | System | Update Policy | This event describes that the API call to update a policy for a policy group has failed. | Policy ID | Policy ID
MISP (MOSIP Infrastructure Service Provider) who provides infrastructure to send authentication request through a secure channel.
The following events are triggered as part of User Event Type in MISP management module
Event ID
Event Type
Event Name
Description
Reference ID
Reference ID Type
PMS_MSP_101
User
Register MISP
Event ID
Event Type
Event Name
Description
Reference ID
Reference ID Type
PMS_MSP_200
User
Register MISP
The following events are triggered as part of System Event Type in MISP management module
Event ID
Event Type
Event Name
Description
Reference ID
Reference ID Type
PMS_MSP_102
System
Register MISP
Event ID
Event Type
Event Name
Description
Reference ID
Reference ID Type
PMS_MSP_201
System
Processing MISP status request
Event ID
Event Type
Event Name
Description
Reference ID
Reference ID Type
PMS_MSP_401
System
Create MISP request
Partner Management Service
User Event Type
Request Information for User Event Type
Success Response for User Event Type
System Event Type
Request Information for System Event Type
Success Response for System Event Type
Failure Response for System Event Type
Policy Management Service
System Event Type
Request Information for System Event Type
Success Response for System Event Type
Failure Response for System Event Type
MISP Management Service
User Event Type
Request Information for User Event Type
Success response for User Event Type
System Event Type
Request Info for System Event Type
Success response for System Event Type
Failure response for System Event Type
Services in MOSIP
This document defines the public and private services of MOSIP.
Public Services: MOSIP services available to the general public and can be accessed by UI or user token.
Private Services: MOSIP services available for service to service call and should be accessed by service token or restricted user.
MOSIP Service
Private Service
Public Service
Partner ID
Partner ID
This event describes that the API call to create Partner in Mosip DB is successful
No ID
No ID Type
PMS_PRT_212
User
Create Partner Key
This event describes that the creation of Partner Key for - (Partner ID) in Mosip DB is Successful
Partner ID
Partner ID
This event triggers an API call to create Partner API key in mosip database.
No ID
No ID Type
PMS_PRT_111
System
Create Partner
This event triggers an API call to create Partner Biometrics in mosip database.
No ID
No ID Type
PMS_PRT_121
System
Create Partner Policy Map
This event triggers an API call to create Partner Policy mapping in mosip database.
No ID
No ID Type
PMS_PRT_144
System
Create Partner Policy Map
This event triggers an API call to create or update Partner contact details in mosip database.
No ID
No ID Type
PMS_PRT_149
System
Get Partner
This event triggers an API call to fetch the Partner details.
No ID
No ID Type
PMS_PRT_159
System
Get Partner
This event triggers an API call to fetch the Partner API key details.
No ID
No ID Type
PMS_PRT_169
System
Get Partner
This event triggers an API call to fetch the Partner certificate.
No ID
No ID Type
This event describes that the Partner API key with id - (Partner ID) is approved successfully.
No ID
No ID Type
PMS_PRT_211
System
Create Partner
This event describes that the Partner Biometrics are created successfully.
No ID
No ID Type
PMS_PRT_221
System
Create Partner Policy Mapping
This event describes that the Partner Policy mapping is created successfully.
No ID
No ID Type
PMS_PRT_244
System
Create Partner Policy Mapping
This event describes that the API call to Create or update partner contact details is successful.
No ID
No ID Type
PMS_PRT_249
System
Get Partner
This event describes that the API call to fetch partner details is successful.
No ID
No ID Type
PMS_PRT_259
System
Get Partner
This event describes that the API call to fetch partner API keys is successful.
No ID
No ID Type
PMS_PRT_269
System
Get Partner
This event describes that the API call to fetch partner Certificate is successful.
No ID
No ID Type
This event validates for Invalid email id while creating the partner.
No ID
No ID Type
PMS_PRT_416
System
Update Partner Request
This event validates the email ID for a (partner ID).
Partner ID
Partner ID
PMS_PRT_402
System
Update Partner Request
This event validates if the Partner is already registered for a (partner ID).
Partner ID
Partner ID
PMS_PRT_417
System
Create Partner Request
This event validates the create partner request for already registered partner with organization name.
No ID
No ID Type
PMS_PRT_419
System
Create Partner Request
This event describes that the policy group does not exist.
No ID
No ID Type
PMS_PRT_421
System
Create Partner API Key request
This event specifies that the partner does not exist.
No ID
No ID Type
PMS_PRT_423
System
Add Biometric Extractors Request
This event specifies that the partner policy mapping does not exist.
No ID
No ID Type
PMS_PRT_425
System
Partner not allowed
This event specifies that the partner is not allowed to register.
No ID
No ID Type
PMS_PRT_429
System
Email not allowed
This event specifies that the partner email ID is not allowed.
No ID
No ID Type
PMS_PRT_431
System
Create Partner
This event specifies that the API call to upload the partner certificate failed.
No ID
No ID Type
PMS_PRT_452
System
Create Partner
This event specifies that the API call to upload the partner certificate failed.
No ID
No ID Type
This event triggers an API call to create a policy group in MOSIP database.
No ID
No ID Type
PMS_PRT_116
System
Create Policy Group
This event triggers an API call to fetch the policy group details.
No ID
No ID Type
PMS_PRT_156
System
Update Policy Group
This event triggers an API call to update a policy group in MOSIP database
No ID
No ID Type
PMS_PRT_137
System
Create Policy
This event triggers an API call to create the policy for a policy group in MOSIP database.
No ID
No ID Type
PMS_PRT_187
System
Create Policy
This event triggers an API call to fetch the policy details.
No ID
No ID Type
PMS_PRT_183
System
Update Policy
This event triggers an API call to update a particular policy inside a policy group in MOSIP database.
No ID
No ID Type
This event describes that the API call to create policy group is successful.
No ID
No ID Type
PMS_PRT_216
System
Create Policy Group
This event specifies that the API call to fetch the policy group details is successful.
Policy Group ID
Policy Group ID
PMS_PRT_256
System
Update Policy Group
This event describes that the API call to update policy group is successful.
Policy Group ID
Policy Group ID
PMS_PRT_237
System
Create Policy
This event describes that the API call to create a policy for a policy group is successful.
No ID
No ID Type
PMS_PRT_287
System
Create Policy
This event specifies that the API call to fetch the policy details is successful.
Policy ID
Policy ID
PMS_PRT_283
System
Update Policy
This event describes that the API call to update a policy for a policy group is successful.
Policy ID
Policy ID
This event triggers an API call to create MISP in MOSIP database
No ID
No ID Type
This event describes that the API call to create MISP in MOSIP database is successful
No ID
No ID Type
PMS_MSP_212
User
Register MISP
This event describes that the creation of MISP id - <misp_id> in MOSIP database is Successful
<misp_id>
MISP ID
This event specifies that the kernel MISP ID generator is called to Generate the MISP ID.
No ID
No ID Type
PMS_MSP_103
System
Register MISP
This event specifies that the MISP details created successfully
No ID
No ID Type
PMS_MSP_104
System
Processing of MISP status request
This event calls the API to update MISP status with ID - <misp_id>
<misp_id>
MISP ID
PMS_MSP_104
System
Processing of MISP status request
This event validates the MISP ID - <misp_id>
<misp_id>
MISP ID
PMS_MSP_105
System
Processing of MISP status request
This event specifies that the MISP license key is not generated for rejected misp with id - <misp_id>
<misp_id>
MISP ID
PMS_MSP_106
System
Processing of MISP status request
This event updates the MISP license status for ID - <misp_id>
<misp_id>
MISP ID
PMS_MSP_107
System
Update MISP request
This event calls the API to update MISP request
No ID
No ID Type
PMS_MSP_108
System
Update MISP request
This event returns the updated MISP status
No ID
No ID Type
PMS_MSP_109
System
Validate license key
This event calls the API to validate MISP license key
No ID
No ID Type
PMS_MSP_110
System
Validate license key
This event fetches the license key details for MISP ID - <misp_id>
<misp_id>
MISP ID
PMS_MSP_111
System
Validate license key
This event specifies the license key for MISP is <misp_id>
<misp_id>
MISP ID
PMS_MSP_112
System
Update MISP status request
This event calls the API to update MISP status
No ID
No ID Type
PMS_MSP_113
System
Update MISP status request
This event specifies the MISP status is <misp_id>
<misp_id>
MISP ID
PMS_MSP_114
System
Update MISP license key request
No ID
No ID Type
This event describes that the API call to update MISP status with id - <misp_id> is successful
<misp_id>
MISP ID
PMS_MSP_202
System
Processing MISP status request
This event specifies that the MISP status is updated for id - <misp_id>
<misp_id>
MISP ID
PMS_MSP_211
System
Update MISP status
This event specifies that the MISP status is updated for id - <misp_id>
<misp_id>
MISP ID
PMS_MSP_203
System
Update MISP request
This event describes that the API call to update MISP request is successful
No ID
No ID Type
PMS_MSP_204
System
Validate MISP license key
This event describes that the API call to validate MISP license key is successful
No ID
No ID Type
PMS_MSP_205
System
Update MISP status request
This event describes that the API call to update MISP status is successful
No ID
No ID Type
This event validates for invalid email id while creating MISP request
No ID
No ID Type
PMS_MSP_416
System
Update MISP request
This event validates for invalid email id while updating MISP request
<misp_id>
MISP ID
PMS_MSP_402
System
Update MISP request
This event validates the MISP update request for already registered MISP with organization name
No ID
No ID Type
PMS_MSP_417
System
Create MISP request
This event validates the MISP create request for already registered MISP with organization name
No ID
No ID Type
PMS_MSP_403
System
Processing MISP status request
This event validates that the MISP status must either be approved or rejected for id - <misp_id>
<misp_id>
MISP ID
PMS_MSP_404
System
Processing MISP status request
This event specifies an MISP exception while processing an MISP status request
No ID
No ID Type
PMS_MSP_405
System
Processing MISP status request
This event specifies that the MISP is de-activated and hence cannot approve the de-activated MISP with id - <misp_id>
<misp_id>
MISP ID
PMS_MSP_406
System
Validate license key
This event specifies that no details were found while performing license key validations
No ID
No ID Type
PMS_MSP_418
System
Update MISP license key request
This event specifies that the MISP status must either be active or de-active for id - <misp_id> to update the MISP license key
<misp_id>
MISP ID
PMS_MSP_407
System
Update MISP status request
This event specifies that the MISP status must either be active or de-active for id - <misp_id> for updating MISP status request
<misp_id>
MISP ID
sudo whoami
We trust you have received the usual lecture from the local System
Administrator. It usually boils down to these three things:
#1) Respect the privacy of others.
#2) Think before you type.
#3) With great power comes great responsibility.
[sudo] password for hadoop:
root
Admin /Bulk Upload
Admin /Login
Admin /AuditManager
Admin /PacketUpdateStatus
Commons /PacketReader-Writer
Kernel /AuditManager
Kernel /AuthManager
Kernel /Login
Kernel /Refresh
Kernel /Jasperreport
Kernel /ClientCrypto
Kernel /CryptoManager
Kernel /KeyManager
Kernel /LicenceKey
Kernel /PartnerCertManager
Kernel /Signature
Kernel /TokenIDGenerator
Kernel /ZKCryptoManager
Kernel /ApplicantType
Kernel /ApplicantValidDocument
Kernel /Application
Kernel /BiometricAttribute
Kernel /BiometricType
Kernel /BlacklistedWords
Kernel /Device
Kernel /DeviceHistory
Kernel /DeviceProvider
Kernel /DeviceProviderManagement
Kernel /DeviceRegister
Kernel /DeviceSpecification
Kernel /DeviceType
Kernel /DocumentCategory
Kernel /DocumentType
Kernel /DynamicField
Kernel /ExceptionalHoliday
Kernel /FoundationalTrustProvider
Kernel /GenderType
Kernel /Holiday
Kernel /IdType
Kernel /IndividualType
Kernel /Language
Kernel /Location
Kernel /LocationHierarchy
Kernel /Machine
Kernel /MachineHistory
Kernel /MachineSpecification
Kernel /MachineType
Kernel /Module
Kernel /MOSIPDeviceService
Kernel /PacketRejectionReason
Kernel /RegisteredDevice
Kernel /RegistrationCenter
Kernel /RegistrationCenterDevice
Kernel /RegistrationCenterHistory
Kernel /RegistrationCenterType
Kernel /RegistrationCenterUserMachineHistory
Kernel /Schema
Kernel /Template
Kernel /TemplateFileFormat
Kernel /TemplateType
Kernel /Title
Kernel /UserDetailsHistory
Kernel /ValidDocument
Kernel /WorkingDay
Kernel /Zone
Kernel /EmailNotification
Kernel /SmsNotification
Kernel /OtpGenerator
Kernel /OtpValidator
Kernel /RidGenerator
Kernel /SyncData
ID Authentication /AuditTest
ID Authentication /Test
ID Authentication /CredentialIssueanceCallback
ID Authentication /Cryptomanager
ID Authentication /InternalAuth
ID Authentication /InternalAuthTxn
ID Authentication /InternalOTP
ID Authentication /InternalUpdateAuthType
ID Authentication /Keymanager
ID Authentication /Signature
ID Authentication /WebSub
ID Authentication /KycAuth
ID Authentication /OTP
ID Authentication /Auth
ID Authentication /StaticPin
ID Authentication /VID
ID Repository /BiometricExtractor
ID Repository /CredentialRequestGenerator
ID Repository /CredentialStore
ID Repository /ID Repository
ID Repository /Vid
Partner Management Service /Misp
Partner Management Service /PartnerManagement
Partner Management Service /DeviceDetail
Partner Management Service /FTPChipDetail
Partner Management Service /RegisteredDevice
Partner Management Service /SecureBiometricInterface
Partner Management Service /PartnerService
Partner Management Service /PolicyManagement
Pre Registration /Demographic
Pre Registration /Document
Pre Registration /GenerateQRcode
Pre Registration /Login
Pre Registration /Notification
Pre Registration /Transliteration
Pre Registration /Booking
Pre Registration /Captcha
Pre Registration /DataSync
Registration Processor /BioDedupe
Registration Processor /RegistrationStatus
Registration Processor /RegistrationSync
Registration Processor /PrintApi
Registration Processor /RegistrationTransaction
Registration Processor /External
Registration Processor /QCUsers
Registration Processor /QualityChecker
Resident Services /Resident
Resident Services /ResidentVid
Tester Documentation
The MOSIP architecture mainly consists of the following functional blocks/modules
Pre-Registration - Web application designed in Angular JS A resident can provide his demographic details in this web application and book an appointment for his future registration at a registration center
Registration Client - A Desktop thick client application developed in JavaFX. A resident is registered through the Registration Client software to generate get a unique identification number. The software captures demographic and biometrics information of the residents. It is connected to scanner devices (finger print, iris), camera and printer to capture resident biometrics information
Registration Processor - A back-end server application developed using SEDA framework It processes the client packets and generates UIN based on de-dupuplication information from ABIS (Automated Biometrics Identification System)
IDA (ID Authentication) - A back-end authentication server developed using spring family. It authenticates the resident based on registered set of biometric and demographic information
Test automation is the key to the success of comprehensive test coverage and test data. However in the context of MOSIP testing, where there are external devices and integration with third party software, test automation cannot be exhaustive and comprehensive test coverage can be achieved by testing driven by manual intervention, along with test automation.
In this document we will also talk about utilities for test data generation, tools for test automation and test strategy in general.
Each of the modules has the following building blocks which are the testable entities, at the module level
System Integration Testing - This involves testing functional work-flows across the modules, starting from Pre-Reg and ending in IDA
Test Automation - tools, approach, test code configuration management process, regular usage
Module
Testable Entities
Levels of Testing
Pre-Registration
UI
REST APIs
UI Functional Testing
Individual API testing
API level integration testing
Registration Client
Data utility tools - approach, usage
Each module is tested, both manually and through automation software for effective test coverage.
A progressively evolving test approach is being adopted in both cases.
Manual Testing starts with module level functional coverage followed by --> integration across modules --> End to end workflow testing
Automation Testing starts with the fundamental building blocks like APIs, and grows up the stack.
Individual API verification is followed by --> API Integration testing --> integration across modules --> End to end workflow testing
A critical interface module of MOSIP, Kernel is the core package on which MOSIP services are built upon and is a platform, which provides higher-level services and functions that shall be reused by other modules of MOSIP.
Kernel provides a foundation to build and run the services by providing several significant necessary technical functions. Kernel makes it easy to build the higher-level services (domain services, batch services and core services) by taking care of fundamental features so that individual services are concerned with specific business functions. Kernel provides an active framework that ensures structure and rules within which the higher-level services operate.
Kernel automation works with Restful and Java API’s.
The test execution module of the Kernel module involving API’s is as depicted below
Knowledge on Java 8
Basic knowledge on Rest assured tool
Knowledge on Maven
Knowledge on TestNg framework
Knowledge on GitHub
Good analytical and debugging skill
Create a workspace in the local system
Open git bash in the workspace
Enter the command :- git clone https://github.com/mosip/mosip-functional-tests.git
MOSIP project shall be cloned
Import the “automationtests” project into the eclipse.
None
From the automationtests project, the test suites and cases can be located in the folder [src/main/resources]
Every API tests structure (model, api name and test case) are stored in a folder/sub-folder approach. Let us take an example of “Email Notification service” and explain how to add a new test
Every test case will have 2 json files named [request.json and response.json] in its sub-folder as shown below
In the request.json file, we need to mention the input that needs to be send to the API and response.json file contains the expected result for that particular input.
Based on the test cases, we need to add the test case folders with request and response files.
The readTestCases method from TestCaseReader class will read the folder names and give the test case names and readRequestResponseJson method from TestCaseReader class will read the request and response files from the tests.
To run the automation suite of Kernel you will need an xml file named [testngKernel.xml], which will be available under [src/main/resources].
Add what are the test need to run in that xml file.
Add the path of the xml file in pom.xml file under maven surefire plugin.
Right click project
Select “Run as configuration”
Under configuration select Maven build and create new maven build
Required Environment- In which environment the suite needs to run. (Ex: qa, dev, int)
Select or Click the button “RUN”
Once the execution is completed, Test report will be generated in target/surefire-reports folder with the name MOSIP_ModuleLevelAutoRun_TestNGReport.html
Open the report in Internet Explorer
The report will give the module name, total number of test case execution with pass, skipped and fail count
Report will provide the build version and also execution time
Report will show API name and corresponding test case names with execution time
For failed test cases, it will show the cause of failure
This is the web channel of MOSIP, which facilitates capturing individual information, relevant documents and booking an appointment with a registration center. This helps to reduce registration time and optimize the process. The current web application is highly modular by design and with multi language support. This UI can be customized or modified as per the country's requirements. A country can also build a new web/mobile application on top of the back end services that MOSIP provides.
The test execution work-flow for the module Pre-Registration involving Rest API’s is as depicted below:
Knowledge on Java 8
Knowledge on Rest services
Knowledge on maven
Good analytical and debugging skill
Navigate to git repository.
Copy URI
Open Git Bash
Clone repository(git clone “URI”)
None
From the code repository of the module, the test suites and cases can be located in the folder [src/main/resources]
Every API tests structure (test suite and test case) are stored in a folder/sub-folder approach. Let us take an example of “Create_PreRegistration” and Here you can see Create_PreRegistration is the suite name and inside that we have list of test cases.
To add new test case we need to create a folder inside test suite folder. You can give folder name same as test case name
Every test case name we need to add Create_PreRegistrationRequest.json file
In the Create_PreRegistartionRequest.json file, we need to mention all folder name(Test Case Name). When we run any class, then it will pick request body from folder and it will pick expected response. We will take request body, as input and it will give response (Actual Response). For Validation, we are doing JSON to JSON comparison.
In Pre-Registration module, we have created on class called PreRegistrationLibrary, which is present in io.mosip.util package. In this class, we have created all reusable method, which is used, in Pre-Registration module.
To run the automation suite of Pre-Registration module you will need an xml file named [Pre-Registration_TestNG.xml], which will be available under [src/main/resources]. In this xml file we need to add class name which we want to run.
Procedure to execute the [Reg-automation-service_TestNG.xml] xml File:
Right click the xml file Pre-Registration_TestNG.xml
In Goal Pass environment name,Base URI and type of test case you want to run(smoke or regression)
Here,
Denv.user indicates environment name.
Denv.endpoint indicates base URI
Denv.testLevel indicates types of test case we want to run
Select or Click the button “RUN”
Test Suites execution will commence.
Test report will be stored in [surefire-report] folder under the base directory/project
Right click on class, which you want to run.
Click on run as
Click on testing
Select class
In VM argument pass -Denv.user=qa -Denv.endpoint="eg:https://testenvname.mosip.io" -Denv.testLevel=smokeAndRegression
Once run is complete, then refresh project and go to target/surefire folder.
Open MOSIP_ModuleLevelAutoRun_TestNGReport.html report.
To analyze failure test case check exception message.
An important client interface module of MOSIP, which captures the Biometric and Demographic information of the Individual resident. This module also stores supporting information such as proof documents and information about the guardian or introducer as per the configuration set by the Admin. The packet creation is finished in this module in a secure way using sophisticated encryption algorithm and later send to the server for online mode of processing. The registration client test suites comprises of tests related to UI and Java API’s.
The test execution module of the Registration client module involving Java API’s is as depicted below
Knowledge on Java 8
Basic knowledge on Spring services and should know annotations
Knowledge on maven
Good analytical and debugging skill
Instruction to checkout code from GitHub using Eclipse.
Open eclipse
Go to quick access and search “clone git”
Figure 1
Figure 2
A pop up will appear in that enter the URI, Host and Repository path as same as below. Pass your GitHub username and password and click on next.
Search the branch name, select it, and then click next. Our latest branch name as link.
Browse the directory to pull the code.
Now the code will be in eclipse git repository. Import the required project to the workspace. For registration client automation, we want to import kernel and registration projects.
None
From the code repository of the module, the test suites and cases can be located in the folder [src/test/resources]
Every API tests structure (test suite and test case) are stored in a folder/sub-folder approach. Let us take an example of “Email Notification service” and explain how to add a new test
Every test case will have a configuration property file named [condition.properties] in its sub-folder as shown below
In this condition.properties file, we need to mention the parameter type that needs to be sent to the API. [valid] indicates the value passed is a correct/right data and [invalid] indicates the data being sent is an incorrect/wrong data.(we can also check the parameter behavior for the empty and space also, for that we can pass the value as space and empty respectively in condition.properties) This information has to be entered for every field/parameter that the API consists.
Based on values set inside the condition.properties file test cases will fetch the data from yaml file and then call a data generator code internally which shall add meaningful right or incorrect values as test data into these variables. More information on the Yaml file can be found under appendix
To run the automation suite of Registration Client module you will need an xml file named [Reg-automation-service_TestNG.xml], which will be available under [src/test/resources].
Procedure to execute the [Reg-automation-service_TestNG.xml] xml File:
Right click the xml file Reg-automation-service_TestNG.xml
Select “Run as configuration”
Under configuration select [TestNG] and pass the VM argument as
-Dspring.profiles.active=required environment (which could be either of QA or INT or DEV)
-Dmosip.dbpath=DB path
DB path – this is the local DB path where all the sync happens and other data’s get updated while running the code. The empty DB name is available in /registration/registration-libs/src/main/resources/db/reg . We are copying this empty DB in our project and passing as vm argument while running the code.
-Dmosip.registration.db.key=DB key path
Sample representation of the VM argument is as below:
-Dspring.profiles.active=qa
-Dmosip.dbpath=reg
-Dmosip.registration.db.key=D:\keys.properties
Select or Click the button “RUN” Test Suites execution will commence.
Test report will be stored in [test-output] folder under the base directory/project
1. Java API
Java application programming interface (API) is a list of all classes that are part of the Java development kit (JDK). An application-programming interface (API), in the context of Java, is a collection of prewritten packages, classes, and interfaces with their respective methods, fields and constructors.
Yaml file is the master data set for testing the API, Sample Mater Data set is as below:
3. How to increase the data coverage inside Yaml file?
To increase the data coverage we can add as many as test data’s into the Yaml file
4. Any dependencies of values in the Database
None
Registration Processor processes the data (demographic and biometric) of an Individual for quality and uniqueness and then issues a Unique Identification Number (UIN). The source of data are primarily from
MOSIP Registration Client
Existing ID system(s) of a country
The workflow of testing or running the test suite of the available API’s And Stages is as depicted below
Knowledge on Core Java
Basic knowledge on Rest assured library
Knowledge on Maven
Knowledge on TestNg framework
Knowledge on Keyword, Data Driven and Hybrid methodology
Import the automationtests project into the eclipse.
Case 1: For API Level Testing
From the automationtests project, the testdata can be located in the folder [src/main/resources]
Every API tests structure (model, api name and test case) are stored in a folder/sub-folder approach. Let us take an example of “Sync Api Service” and explain how to add a new test
Case 2: For Stage Level Testing
From the automationtests project, the testdata can be located in the folder [src/main/resources]
Every stage can be tested by feeding negative packets to the system and expecting them to fail for the particular stage. Let us take the example of “OSI Validation Stage”
A sample property file looks like as follows:
The reg proc automation suite will tweak the values in a valid packet and will generate packets for the above attributes sequentially.
There is one more file “StageBits.properties” which has a stage string. The string is used to construct the status string for a packet. For eg if stage string is “111110000” it means that packet should go through first five stage and should fail for last 4 stages.
To run the automation suite of Reg-Proc, build the project and get the uber jar generated under target.
Run the jar using the command line “java -Denv.user= -Denv.endpoint= -Denv.testLevel= -jar ”
Report will be generated under “< workspace >/testing-report.
Report can be opened in any Web browser (i.e. Internet Explorer)
The report will consist of module name, total number of test case executed with status as either pass, skipped and fail and their count.
Report will also display API name and corresponding test case names with execution time along with build version and execution time.
For detailed analysis, refer logs or default testing-report and for failed test cases, the related cause of failure will be highlighted.
MOSIP ID Authentication provides an API based authentication mechanism for entities to validate Individuals. ID Authentication is the primary mode for entities to validate an Individual before providing any service.
An example of how this service will work is as depicted below
The workflow of testing or running the test suite of the available API’s is as depicted below
Knowledge on Core Java
Basic knowledge on Rest assured library
Knowledge on Maven
Knowledge on TestNg framework
Knowledge on Keyword, Data Driven and Hybrid methodology
Import the automationtests project into the eclipse.
From the automationtests project, the testdata can be located in the folder [src/main/resources]
Every API tests structure (model, api name and test case) are stored in a folder/sub-folder approach. Let us take an example of “Demo-Address Authentication service” and explain how to add a new test
Pre-requisites: open runConfiguration.properties file
Add the following two lines which represents your test case; one for the folder location and another on the test data as below, the array [X], where “X” represents the number of times this tests shall be repeated with different test data
An example: DemographicAuthentication.testDataPath[6]=ida/TestData/Demo/Name/
If you want to remove a test, kindly comment the relevant line in this file before the execution of TestNG runner class
Configuration Setup for creating the request Json file:
Please use the TestData keyword defined under in appendix for creating your request.json file. The provided keywords are sufficient for testing the ID Authentication module, however If you ever need you can add an additional attribute to the end of this list
Sample structure of the request.JSON file, which is being created at run time using the attributes defined in the TestData, which reads from the Yaml data file:
To run the automation suite of ID-Authentication, build the project and get the uber jar generated under target.
Run the jar using the command line “java -Denv.user= -Denv.endpoint= -Denv.testLevel= -jar ”
Report can be opened in any Web browser (i.e. Internet Explorer)
The report will consist of module name, total number of test case executed with status as either pass, skipped and fail and their count.
Report will also display API name and corresponding test case names with execution time along with build version and execution time.
For detailed analysis, refer logs or default testing-report and for failed test cases, the related cause of failure will be highlighted.
Yaml Test Data Format:
The sample structure should be like below:
TestData Keyword repository:
Keywords
KeywordName/Purpose
Example
$TIMESTAMPZ$
To generate current timestamp with UTC format
2019-06-20T16:18:08.008Z
$TIMESTAMP$
End to end system level Test Rig covers the functionality across the modules starting with Pre-Registration and ending in Registration Processor or IDA.
The below diagram depicts the overall design of the end to end suite.
Knowledge on Core Java
Basic knowledge on Rest assured library
Knowledge on Maven
Knowledge on TestNg framework
Knowledge on Keyword, Data Driven and Hybrid methodology
Pre Registration which will generate list of Pre-IDs
Registration Client which will generate list of packets.
Registration Processor which will generate UIN for the packets.
IDA to perform authentication.
E2E to consume the above projects
A basic code structure looks as follows:
4.6.4.1 A Code Structure For E2E run
The E2E code has the following prerequisite
Under src/test/resources we should have an input.json which contains a data to generate the list of preIDs.
All the module level suites should be up and running.
A sample pom for e2e looks like the following:
The pre Reg Automation has the following pre Requisite :
It should have an input.json file which will conation info about the adults and children against whom the preIDs are being generated.
The Reg Client Automation has the following pre Requisite:
The pre Reg Automation Should have run.
A json file with a list of preIds must have been generated.
The reg Proc Automation has the following pre Requisite:
The reg Client and pre Reg automation should have run.
A list of packets must have been generated.
The IDA automation has the following pre Requisite :
The regProc,reg Client,Pre Reg automation should have run.
A list of uin should be present as a property file under src/main/resources which is generated by regProc.
To run the automation suite simply select the “EndToEndRun.java” class under the package “io.mosip.e2e.runner”.
Report will be generated under “/testing-report.
Report can be opened in any Web browser (i.e. Internet Explorer)
The report will consist of total number of test case executed with status as either pass, skipped and fail and their count.
Report will also display applicant type and corresponding test case names with execution time along with build version and execution time.
For detailed analysis, refer logs or default testing-report and for failed test cases, the related cause of failure will be highlighted.
The rig is designed to run for only 5 packets.
The rig should run on a particular version of each module.
1. Introduction
1.1 Overview
1.2 Scope
1.2.1 Test Coverage
1.2.2 Data Coverage
2. Test Approach
4. Test Automation User Guides
4.1 Kernel Test Automation Suite - User Guide
4.1.1 About the Kernel Module
4.1.2 Pre-requisites for understanding Java API automation
4.1.3 Procedure to check out the test code from the repository
4.1.4 Pre-configuration information prior to test run
4.1.5 Procedure to Add new test cases into the API test suite
4.1.6 Procedure to execute or Run the tests on a new environment
4.1.7 Running a test suite
Here regression means all tests other than smoke tests.
4.1.8 Analyze the test reports
4.2 Pre-Registration Test Automation Suite - User Guide
4.2.1 About the Pre-Registration Module
4.2.2 Pre-requisites for understanding Java API automation
4.2.3 Procedure to checkout-out the test code from the repository
4.2.4 Pre-configuration information prior to test run
4.2.5 Procedure to Add new test cases into the API test suite
E.g. To book an appointment first we need to create an application, upload document, and then book appointment. Here for each operation we have created one method.
4.2.6 Procedure to execute or Run the tests on a new environment
4.2.7 Running a test suite
4.2.8 Running a single test case
4.2.9 Analyze the test reports
4.3 Registration Client Test Automation Suite - User Guide
4.3.1 About the Registration Client Module
4.3.2 Pre-requisites for understanding Java API automation
4.3.3 Procedure to check out the test code from the repository
4.3.4 Pre-configuration information prior to test run
4.3.5 Procedure to Add new test cases into the API test suite
4.3.6 Procedure to execute or Run the tests on a new environment
4.3.7 Running a test suite
4.3.8 Appendix
4.4 Registration Processor Test Automation Suite - User Guide
4.4.1 About The Registration Processor Module
4.4.2 Pre-requisites for understanding Rest API automation
4.4.3 Procedure to checkout-out the test code from the repository
4.4.4 Procedure to Add new test cases into the API test suite
4.4.5 Procedure to execute or Run the tests on a new environment
4.4.6 Analyze the test reports
4.5 ID Authentication (IDA) Test Automation Suite - User Guide
4.5.1 About the ID-Authentication
4.5.2 Pre-requisites for understanding Rest API automation
4.5.3 Procedure to checkout-out the test code from the repository
4.5.4 Procedure to Add new test cases into the API test suite
4.5.5 Procedure to execute or Run the tests on a new environment
4.5.6 Analyze the test reports
4.5.7 Annexure
4.6 E2E Test Automation Suite - User Guide
4.6.1 About The End To End Test Rig
4.6.2 Pre Requisite To Understand The Flow Of E2E Test Rig
4.6.3 Procedure to checkout-out the test code from the repository
4.6.4 Basic Code Structure Of The E2E Rig
4.6.5 Procedure to execute or Run the tests on a new environment
4.6.6 Analyze the test reports
4.6.7 Limitations for the test rig
Test Level- Type of tests like (Ex: smoke, regression, smokeAndRegression)
Java APIs
UI Functional Testing (with simulators and with devices)
Individual API testing
API level integration testing
Registration Processor
Java APIs
SEDA vert.x stages
Individual API testing
Integration work-flow testing including the APIs and vert.x for processing various packet types
IDA
REST APIs
Individual API testing
Integration work-flow testing
Kernel
REST APIs
Individual API testing
Integration work-flow testing
To generate current timestamp with timezone format
2019-06-20T16:18:08.008+05:30
$TIMESTAMP$HOUR+24
$TIMESTAMP$HOUR-24
$TIMESTAMP$MINUTE+23
$TIMESTAMP$MINUTW-56
$TIMESTAMP$SECOND+145
$TIMESTAMP$SECOND-123
To generate future or current timestamp
$RANDOM:N:10$
To generate random digit for the given number
$RANDOM:N:10$
$RANDOM:N:3$
$RANDOM:N:14$
$UIN$
To get random UIN number from uin.property file
$UIN$:WITH:Deactivated#
To get uin number from uin.property file where value contains Deactivated
$VID$
To get random VID from vid.property file where type as perpetual and status as ACTIVE
$VID:WITH:Temporary$
$VID:WITH:REVOKE$
To get random VID from vid.property file where value contains Temporary or Revoke
$VID:WHERE:UIN:WITH:VALID$
To get the VID from vid.property where uin.property value contains specified keyword after “WITH:”
$TestData: indvId_Vid_valid$
$TestData: bio_finger_LeftIndex_subType$
$TestData:bio_face_deviceCode$
To get the random value form the list in the authenticationTestData.yml file.
To get biometric value for the UIN using cbeff File. It is combination of above listed keyword.
Where $idrepo -> keyword mandatory at start.
$input.bio-auth-request : AuthReq.individualId$ -> get the value from the previously mentioned field
individualBiometricsValue -> Mapping name in UINMapping/mapping.property
//BIR/BDBInfo[Type = 'Finger'][Subtype = 'Left IndexFinger']//following::BDB -> cbeff xpath, where in this location biovalue will be saved for Left IndexFinger
$input.demo-auth-request: AuthReq.individualId$ -> get the value from the previously mentioned field
valueaddressLine1 -> Mapping name in UINMapping/mapping.property
TestData: primary_lang_code -> keyword to get language code from the authenticationTestData.yml
Registration Client Audits
The registration client is a thick Java-based client where the resident's demographic and biometric details are captured along with the supporting documents in online or offline mode. The captured information is packaged in a secure tamper-proof way and send to the server for processing.
Login and Authentication Service
The Login and Authentication Service ia about the process of logging into the Registration Client by Operator or Supervisor using various authentication modes such as user id, password, OTP and biometrics.
User Event Type
The following events are triggered as part of User Event Type in Login and Authentication Service
Event ID
Event Type
Event Name
Description
Reference ID
Reference ID Type
The navigation links in home screen keeps the user oriented and makes its esier for them to move around to desired sections of the application.
The following events are triggered as part of User Event Type under Home Screen Navigation
Event ID
Event Type
Event Name
Description
Reference ID
Reference ID Type
The following events are triggered as part of System Event Type under Home Screen Navigation
Event ID
Event Type
Event Name
Description
Reference ID
Reference ID Type
An operator can initiate the process of registering an new applicant in the MOSIP ecosystem by filling the new registration form with the resident.
The following events are triggered as part of New Registration
Event ID
Event Type
Event Name
Description
Reference ID
Reference ID Type
Event ID
Event Type
Event Name
Description
Reference ID
Reference ID Type
Event ID
Event Type
Event Name
Description
Reference ID
Reference ID Type
As a part of EOD activities the supervisor can review the registration acknowledgement, retrieve the packets, approve or reject the packets and finally upload the packets to the server.
The following events are triggered as part of end of day activities
Event ID
Event Type
Event Name
Description
Reference ID
Reference ID Type
The following events are triggered as part of end of day activities
Event ID
Event Type
Event Name
Description
Reference ID
Reference ID Type
The Synchronization service gives information about the various sync activities that take place between the server and the registration client, such as Pre-Reg Sync, packet count,Geo sync etc.
The following events are triggered as part of synchronization activities
Event ID
Event Type
Event Name
Description
Reference ID
Reference ID Type
The scheduler service periodically check all the open sessions to determine which ones have been idle for a time greater than the idle timeout set.
The following events are triggered as part of scheduler service
Event ID
Event Type
Event Name
Description
Reference ID
Reference ID Type
Thw Mosip Device Manager Service which runs on a particular port automatically scans all the devices (Eg. Biometric Device) and stores the information in device registry.The service gives the information about the device availabilty.
The following events are triggered as part of Mosip Device Manager service
Event ID
Event Type
Event Name
Description
Reference ID
Reference ID Type
Event ID
Event Type
Event Name
Description
Reference ID
Reference ID Type
UI Specification for Registration Client
UI specification helps us identify how the data in an ID attribute (attributes of an ID object) is going to be retrieved from the UI. The UI screens in registration client application and pre-registration application are rendered using their respective UI specification JSON. We have different UI Specifications for Registration Client & Pre-registration which is derived from the ID Schema. Here we would be discussing about the properties used in the UI specification of Registration Client.
Here is one of the attributes in the Registration Client UI Specification.
Below are the properties in registration client UI specification that are used to store ID attributes in an ID object.
Name
Description
Example
User ID
REG-AUTH-003
User
Get the OTP
This event describes the process of getting the OTP in order to log in into the Registration Client by Operator or Supervisor.
User ID
User ID
REG-AUTH-004
User
Login with OTP
This event describes the process of logging into the Registration Client by Operator or Supervisor using his/her OTP.
User ID
User ID
REG-AUTH-005
User
Resend OTP
This event describes the process of resending the OTP to the Operator or Supervisor in case they have not received the OTP.
User ID
User ID
REG-AUTH-006
User
Login with Finger Print
This event describes the process of logging into the Registration Client by Operator or Supervisor using his/her Finger Print.
User ID
User ID
REG-AUTH-007
User
Login with Iris
This event describes the process of logging into the Registration Client by Operator or Supervisor using his/her Iris.
User ID
User ID
REG-AUTH-008
User
Login with Face
This event describes the process of logging into the Registration Client by Operator or Supervisor using his/her Face.
User ID
User ID
REG-AUTH-009
User
User Logout
This event describes the process of logout from the Registration Client by Operator or Supervisor.
User ID
User ID
REG-AUTH-010
User
Fetch Login Modes
This event describes the process of fetching the login modes for the Registration Client by Operator or Supervisor.
User ID
User ID
REG-AUTH-013
User
Fetch User Details
This event describes the process of fetching the user details of the Registration Client.
User ID
User ID
REG-AUTH-015
User
Fetch Center Details
This event describes the process of fetching the center details for the Registration Client.
User ID
User ID
REG-AUTH-017
User
Fetch Screens to be authorized
This event describes the process of fetching the screens to be authorized for the Registration Client.
User ID
User ID
Registration ID
Registration ID
REG-EVT-001
User
Lost UIN
This event specifies the navigation link action for Lost UIN.
Registration ID
Registration ID
REG-EVT-003
User
Update UIN
This event specifies the navigation link action for Updating the UIN.
Registration ID
Registration ID
REG-EVT-004
User
Approve Registration
This event specifies the navigation link action for approving the registration.
User ID
User ID
REG-EVT-005
User
Upload Packets
This event specifies the navigation link action for uploading the packets.
User ID
User ID
REG-EVT-006
User
Re-Registration of
This event specifies the navigation link action for Re-Registration.
User ID
User ID
REG-NAV-003
User
Data Synchronization
This event specifies the navigation link action for Data Synchronization in Registration Client.
User ID
User ID
REG-NAV-004
User
Downloading of Pre-Registration Data
This event specifies the navigation link action for downloading of Pre-Registration data to Registration Client.
User ID
User ID
REG-NAV-006
User
Onboarding of User
This event specifies the navigation link action for user onboarding in Registration Client.
User ID
User ID
User ID
User ID
Registration ID
Registration ID
REG-EVT-008
User
Fetch Pre-Registration Data
This event describes that the data for selected Pre-Registration ID is being fetched.
Registration ID
Registration ID
REG-EVT-084
User
Save Demographic Details
This event describes that the demographic details are being saved to Data Transfer Object.
Registration ID
Registration ID
REG-EVT-009
User
Next Screen Navigation
This event specifies the navigation link action for next screen after capturing the demographic details.
Registration ID
Registration ID
REG-EVT-089
User
Scan Documents
This event triggers the action for scanning of documents.
Registration ID
Registration ID
REG-EVT-090
User
View Documents
This event triggers the action for viewing of documents.
Registration ID
Registration ID
REG-EVT-091
User
Delete Documents
This event triggers the action for deleting the documents.
Registration ID
Registration ID
REG-EVT-010
User
Scan Proof of Address Dcoument
This event triggers the action for scanning the Proof of Address document.
Registration ID
Registration ID
REG-EVT-011
User
View Proof of Address Dcoument
This event triggers the action for viewing the Proof of Address document.
Registration ID
Registration ID
REG-EVT-012
User
Delete Proof of Address Dcoument
This event triggers the action for deleting the Proof of Address document.
Registration ID
Registration ID
REG-EVT-013
User
Scan Proof of Identity Dcoument
This event triggers the action for scanning the Proof of Identity document.
Registration ID
Registration ID
REG-EVT-014
User
View Proof of Identity Dcoument
This event triggers the action for viewing the Proof of Identity document.
Registration ID
Registration ID
REG-EVT-015
User
Delete Proof of Identity Dcoument
This event triggers the action for deleting the Proof of Identity document.
Registration ID
Registration ID
REG-EVT-016
User
Scan Proof of Residence Dcoument
This event triggers the action for scanning the Proof of Residence document.
Registration ID
Registration ID
REG-EVT-017
User
View Proof of Residence Dcoument
This event triggers the action for viewing the Proof of Residence document.
Registration ID
Registration ID
REG-EVT-018
User
Delete Proof of Residence Dcoument
This event triggers the action for deleting the Proof of Residence document.
Registration ID
Registration ID
REG-EVT-019
User
Scan Proof of Birth Dcoument
This event triggers the action for scanning the Proof of Birth document.
Registration ID
Registration ID
REG-EVT-020
User
View Proof of Birth Dcoument
This event triggers the action for viewing the Proof of Birth document.
Registration ID
Registration ID
REG-EVT-021
User
Delete Proof of Birth Dcoument
This event triggers the action for deleting the Proof of Birth document.
Registration ID
Registration ID
REG-EVT-022
User
Scan Proof of Exception Dcoument
This event triggers the action for scanning the Proof of Exception document.
Registration ID
Registration ID
REG-EVT-023
User
View Proof of Exception Dcoument
This event triggers the action for viewing the Proof of Exception document.
Registration ID
Registration ID
REG-EVT-024
User
Delete Proof of Exception Dcoument
This event triggers the action for deleting the Proof of Exception document.
Registration ID
Registration ID
REG-EVT-025
User
Next Screen Navigation
This event specifies the navigation link action for next screen after uploading the documents.
Registration ID
Registration ID
REG-EVT-026
User
Back Screen Navigation
This event specifies the navigation link action for back screen after uploading the documents.
Registration ID
Registration ID
REG-EVT-027
User
Marking Biometric Exception
This event describes the action for marking of biometric exception for the user.
Registration ID
Registration ID
REG-EVT-065
User
Removing Biometric Exception
This event describes the action for removing of biometric exception for the user.
Registration ID
Registration ID
REG-EVT-030
User
Scanning of Left Fingerprint Slap
This event describes the action for Scanning of Left Fingerprint Slap.
Registration ID
Registration ID
REG-EVT-031
User
Scanning of Right Fingerprint Slap
This event describes the action for Scanning of Right Fingerprint Slap.
Registration ID
Registration ID
REG-EVT-032
User
Scanning Thumb Print
This event describes the action for Scanning of Thumb prints.
Registration ID
Registration ID
REG-EVT-034
User
Scanning of Iris
This event describes the action for Scanning of both the Iris.
Registration ID
Registration ID
REG-EVT-039
User
Face Capture
This event describes the action for capturing of individuals face.
Registration ID
Registration ID
REG-EVT-040
User
Exception in Face Capture
This event describes the action for capturing an exception image instead of individuals face capture.
Registration ID
Registration ID
REG-EVT-041
User
Next Screen Navigation
This event specifies the navigation link action for next screen after capturing the biometric details.
Registration ID
Registration ID
REG-EVT-042
User
Back Screen Navigation
This event specifies the navigation link action for back screen after face photo capture.
Registration ID
Registration ID
REG-EVT-043
User
Preview and Edit Demographic details
This event describes the action to preview and edit the demographic details.
Registration ID
Registration ID
REG-EVT-044
User
Preview and Edit Document details
This event describes the action to preview and edit the document details.
Registration ID
Registration ID
REG-EVT-045
User
Preview and Edit Biometric details
This event describes the action to preview and edit the biometric details.
Registration ID
Registration ID
REG-EVT-046
User
Next Screen Navigation
This event specifies the navigation link action for next screen after Registration Preview.
Registration ID
Registration ID
REG-EVT-047
User
Back Screen Navigation
This event specifies the navigation link action for back screen after Registration Preview.
Registration ID
Registration ID
REG-EVT-048
User
Operator Authentication
This event describes the action for operator authentication with password on click of submit.
Registration ID
Registration ID
REG-EVT-049
User
Operator Authentication
This event describes the action of getting the OTP for operator authentication.
Registration ID
Registration ID
REG-EVT-050
User
Operator Authentication
This event describes the action for operator authentication with OTP on submitting the OTP.
Registration ID
Registration ID
REG-EVT-051
User
Operator Authentication
This event describes the action for operator authentication with resend OTP.
Registration ID
Registration ID
REG-EVT-052
User
Operator Authentication
This event describes the action for operator authentication with finger print on capture and submit.
Registration ID
Registration ID
REG-EVT-053
User
Operator Authentication
This event describes the action for operator authentication with iris on capture and submit.
Registration ID
Registration ID
REG-EVT-054
User
Operator Authentication
This event describes the action for operator authentication with face on capture and submit.
Registration ID
Registration ID
REG-EVT-057
User
Supervisor Authentication
This event describes the action for supervisor authentication with password on click of submit.
Registration ID
Registration ID
REG-EVT-058
User
Supervisor Authentication
This event describes the action of getting the OTP for supervisor authentication.
Registration ID
Registration ID
REG-EVT-059
User
Supervisor Authentication
This event describes the action for supervisor authentication with OTP on submitting the OTP.
Registration ID
Registration ID
REG-EVT-060
User
Supervisor Authentication
This event describes the action for supervisor authentication with resend OTP.
Registration ID
Registration ID
REG-EVT-061
User
Supervisor Authentication
This event describes the action for supervisor authentication with finger print on capture and submit.
Registration ID
Registration ID
REG-EVT-062
User
Supervisor Authentication
This event describes the action for supervisor authentication with iris on capture and submit.
Registration ID
Registration ID
REG-EVT-063
User
Supervisor Authentication
This event describes the action for supervisor authentication with face on capture and submit.
Registration ID
Registration ID
REG-EVT-064
User
Supervisor Authentication Preview
This event specifies the option of preview for supervisor authentication before submit.
Registration ID
Registration ID
Registration ID
Registration ID
Registration ID
Registration ID
User ID
User ID
REG-EVT-071
User
Approve Packet
This event describes that the packet approval was successful.
User ID
User ID
REG-EVT-072
User
Reject Packet
This event describes that the packet rejection was successful.
User ID
User ID
REG-PKT-002
User
Packet Updation
This event describes that Packets which are in created state are updated.
User ID
User ID
REG-SYNC-006
User
Sync Packet Status
This event describes that the registration packet status is synced from server to the client.
User ID
User ID
REG-EXPT-PKT-001
User
Export Packet
This event describes that the registration packets are exported to the external device.
User ID
User ID
REG-EVT-068
User
Upload Packet
This event describes that the registration packet was uploaded successfully to the server.
User ID
User ID
User ID
User ID
Application ID
Application ID
REG-SYNC-012
User
Sync Validation
This event describes that the Validation of the sync status ended successfully.
Application ID
Application ID
REG-SYNC-013
User
Sync Count Validation
This event the validation of yet to export packets frequency with the configured limit count.
Application ID
Application ID
REG-SYNC-014
User
Sync Geographic Validation
This event describes that the Validation of the geographic information ended successfully.
Application ID
Application ID
REG-PKT-003
User
Pending Packet Count Validation
This event describes that the action for validating the count of pending packets.
Application ID
Application ID
REG-PKT-004
User
Pending Packet Duration Validation
This event describes that the action for validating the duration of pending packets.
Application ID
Application ID
REG-SYNC-007
User
Sync Pre-Registration Packet
This event describes that the pre-registration data is synced from server to the registration client.
Application ID
Application ID
REG-AUTH-020
User
Center Machine Remap Service
This event describes that the machine is remapped to another center.
Application ID
Application ID
Application ID
Application ID
REG-SCH-002
System
Refresh Timeout
This event describes the time task remainder alert.
Application ID
Application ID
REG-SCH-003
System
Session Timeout
This event describes the time task session has expired.
Application ID
Application ID
Application ID.
Application ID
REG-EVT-086
User
Biometric Capture Status
This event specifies that the biometric capture was successful.
Application ID
Application ID
Application ID
Application ID
REG-EVT-085
User
Biometric Capture Status
This event specifies that the biometric capture was unsuccessful.
Application ID
Application ID
REG-AUTH-001
User
Login with User ID
This event describes the process of logging into the Registration Client by Operator or Supervisor using his/her User ID.
User ID
User ID
REG-AUTH-002
User
Login with Password
This event describes the process of logging into the Registration Client by Operator or Supervisor using his/her Password.
REG-EVT-002
User
New Registration
REG-NAV-007
System
Home Screen
REG-EVT-007
User
Capturing of Demographic Details
REG-EVT-066
User
Packet Creation
REG-EVT-074
User
Packet Creation
REG-PKT-001
User
Retrieve Packet
REG-UPL-PKT-001
System
Upload Packet
REG-SYNC-011
User
Fetch Info Sync Service
REG-SCH-001
System
Scheduler Utility
REG-EVT-088
User
Device Information
REG-EVT-087
User
Device Information
Navigation Events in Home Screen
User Event Type
System Event Type
New Registration Flow
User Event Type
Success Response for User Event Type
Failure Response for User Event Type
End of Day Activities
User Event Type
System Event Type
Synchronization Activities
User Event Type
Scheduler Service
System Event Type
Mosip Device Manager Service
User Event Type
Success Response for User Event Type
Failure Response for User Event Type
User ID
This event specifies the navigation link action for New Registration.
This event specifies the navigation link action to redirect to Home Screen.
This event describes that the capturing of demographic details has started.
This event describes that the packet was created successfully.
This event describes that there was an internal error during packet creation
This event describes that Packets which are in created state for approval are retrived.
This event describes that the packet was uploaded to the server through sync.
This event describes that the SyncJobInfo containing the sync control list and yet to export packet count are fetched successfully
This event describes that the scheduler started sucessfully.
This event specifies that the device is found/available
This event specifies that the device is not found/unavailable
id
Unique ID for each attribute in ID Object
fullName
description
Description for the ID attribute
ID Schema Version
label
Label used for displaying the ID attribute in the UI
The id property is the unique id provided to a fields to uniquely identify it. The fields can be alpha-numeric without any spaces between them.
This is a non-mandatory property used to describe the ID attribute.
This property defines label name to be used in UI. The label has sub attributes as primary and secondary to store data in primary language and secondary language based on the country's configuration.
This property defines the field value type for the attribute. MOSIP supports primitive as well as user defined types.
Currently MOSIP supports the below data types, any MOSIP adopter can choose to define their own data types.
string
number
integer
simpleType
documentType
biometricType
Below are the definitions of the user defined data types currently being used in MOSIP.
This property is applicable for only number fields to add UI level validation for minimum value.
Similar to minimum, this property is applicable to only number fields to add UI level validation for maximum value. It is applicable only if the value is greater than zero.
This property defines what kind of UI component to be used to capture data in UI. Currently the values that can be used are:
textbox
dropdown
dob
fileupload
This property identifies if the ID attribute is country specific (specified as dynamic) or is already defined in the platform (specified as default).
This property is used to add a simple validation in the UI level.
Currently, the allowed values here are
lowercased - To validate if the data entered by the user is in lower case
uppercased - To validate if the data entered by the user is in upper case
MOSIP adopter can choose to add more values for different types of validations.
This property defines where the ID attributes will be placed in packet structure. Currently, the new packet structure has three parts; private, evidence and optional. For more details on packet structure please go through our documentation on Registration Packet.
Values
Description
none
The ID attribute will be stored in all the packets.
pvt
It is for private information which will be used for authentication & will be stored in private packet.
evidence
This is a mandatory property which decides if the input is to be provided from the UI or not. Items which are marked as true will be validated using the ID object validator.
This property enables us to add a the list of validators for the ID attribute. Each validator will have the below fields,
Fields
Description
type
for validation engine type
validator
for pattern / methodName / scriptName / expression
arguments
Currently, regex is supported by MOSIP, the adopter can choose to add various types of validators.
This property contains the list of biometric attributes that can be captured by the ID attributes which have type "biometricType".
leftEye
rightEye
rightIndex
rightLittle
rightRing
rightMiddle
leftIndex
leftLittle
leftRing
leftMiddle
leftThumb
rightThumb
face
For various ID attribute there are different rules to capture biometrics,
individualBiometrics - all the biometrics needs to be captured here if the resident is not an child
individualAuthBiometrics - only one biometric is needed for authentication
parentOrGuardianBiometrics - only one biometric is needed for authentication
This property contains a list of rules which decides if the attribute is mandatory or not. It has additional fields, engine and expr which are used to specify the rule engine and the expression.
Example for individualAuthBiometrics:
This expression states that, individual biometric authentication capture is madatory when,
the resident is not child
the resident has come for update
the resident is not updating his/her biometrics
the guardian of the resident is not providing his/her biometrics
Which means, the applicant is an adult applicant who has come to the registration center to update only his/her demographics details, so we must capture his/her biometrics for authentication.
This property helps the system to uniquely identify a attribute if we are not able to identify it using the type.
Example: In individualBiometrics, individualAuthBiometrics and parentOrGuardianBiometrics the types are same i.e. biometricType; hence to uniquely identify them we created sub types such as applicant, applicant-auth and introducer respectively.
This property is used to identify the contact attributes. Here we have categorized the contact types into three categories, i.e. email, phone and postal (all the postal address related items).
This property is used to group the ID attributes so that we can select them in the update screen.
Examples:
We have grouped all the address items as "Location", so that the resident needs to just select the group to update, i.e. the Location and in update screen he/she would be able to update all the location attributes.
ID attributes related to Parent or Guardian are grouped together as "GuardianDetails".
This is a mandatory property which is needed to identify if the ID attribute is mandatory or not.
The above attributes which are available in the current MOSIP platform, adopters can choose to add new attributes or remove attributes based on their requirement.
Create the basic ID Object definition & ID Schema as per your requirement.
If any of your attributes needs pre-defined master data (example: Blood Group)
The adopters can use our Dynamic Fields API to create dynamic master data
Then the adopter can add this field in the UI specification and mark the field type as dynamic
Once all the attributes are added, the adopter can create the UI Specification for registration client using the .
Once the UI Specification is created it needs to be published. Once published, the ID schema version is updated & an ID Schema is generated from the registration client UI specification for verification.
The adopters now can verify the structure of the ID schema derived against the one that they had defined earlier & make modifications as required.
Then the needs to be created and should be updated in the file "pre-registration-demographic.json".
Once the file is placed the property "mosip.idschema.version" in pre-registration properties file should be updated to the latest ID schema version.
All the services needs to be re-started to use the new UI.
Used to identify if it is a default field or a dynamic field
default, dynamic
format
To validate the format should be in upper or lower case
lowercase, uppercase, none
fieldCategory
Used to decide in which sub-packet the data will be placed
kyc, pvt, evidence, optional, none
inputRequired
Used to identify if UI input is needed or not
true or false
validators
List of validators for the ID attribute
validators.type
Type of validation engine
regex
validators.validator
Pattern / methodName / scriptName / expression for the validation
validators.arguments
List of arguments needed for the validator
bioAttributes
List of biometric attributes
requiredOn
List of rules using which system can decide to make the attribute mandatory
requiredOn.engine
Rule engine used
requiredOn.expr
Expression for the rule
subType
Used to identify it is which type of field
location
contactType
Used to identify if the ID attributes belong to one of the contact types
email, phone or postal
group
Used to group together the list of id attributes for update operation
required
Used to decide if the ID attribute is mandatory or not
true or false
This data is treated as proof and can be later removed by the adopter. This data will be stored in evidence packet.
optional
This data is also treated as proof data for the registration and can be removed later by the adopter based on policy. This data will be stored in optional packet.
array to hold parameter or dependent field ids required for validation
The Sandbox is a safe environment isolated from your PC's underlying environment. You may use the sandbox to execute files without having to worry about malicious files or unstable programs impacting data on the system.
System Requirement
This section describes handy information that is useful to know when operating the Sandbox Installer which is tested under mentioned configuration.
Component
Number of VMs
Configuration
Persistence
*vCPU: Virtual CPU
** Console has all the persistent data stored under /srv/nfs. Recommended storage here is SSD or any other high IOPS disk for better performance
The Multi-VM Sandbox Installer is a fully automated deplorer that incorporates all MOSIP modules into a virtual machine cluster that can be either cloud or on premise.
The sandbox can be used for development and testing, while the Ansible scripts run MOSIP on a multi-virtual machine (VM) setup.
Caution - The sandbox is not intended for use by serious pilots or for production purposes. Also, do not run the sandbox with any confidential data.
In Minibox, note that for any form of load or multiple pod replication scenarios, this may not be sufficient. It is possible, however, to enable the feature to bring up MOSIP modules with lesser VMs as below:
Component
Number Of VMs
Configuration
Persistence
Terraform is a tool to securely and efficiently develop, edit, and update infrastructure. Using Terraform scripts available in _terraform/._the initial installation stage is achieved. AWS scripts are being used and maintained at present.
It is strongly recommended that the scripts be analyzed in depth before running them.
Before, MOSIP modules installation process that runs on a preset time or when a predefined condition, need to have VMs set up on all Machines. The user must ensure if the CentOS 7.8 OS is installed on all the machines:
Create user 'mosipuser' on console machine with password-less sudo su
The hostname must match hostnames in hosts.ini on all machines. Set the same with
Enable Internet access on all machines
To ensure proper installation, install these pre-requisites manually:
Git
Git Clone
Ansible
On the Installation Options, click git to install on your machine:
In User Home Directory, select Git Clone and switch to appropriate branch:
Install Ansible and create shortcuts:
This section helps you to plan an installation of MOSIP suited to your environment. Before installing MOSIP, it is recommended that the scripts be analyzed in depth before running them.
Suited to your configuration, update hosts.ini. Make sure your configuration matches the system names and IP addresses
In group_vars/all.yml change sandbox_domain_name to domain name of the console machine
By default, installation scripts will try to fetch Letsencrypt's new SSL certificate for the above domain. If you already have the same, however, then set the following variables in the file group
It is the interconnection between a computer and a public or private network. If it is other than “eth0” by your cluster machines, update it to group_vars/k8s.yml
In the Ansible vault _secrets.yml_file, all the secrets (passwords) used in automation are stored. To access the file, the default password is 'foo'. Changing this password with the following command is recommended:
The contents of secrets.yml can be viewed and edited based on following command:
When this equipment is connected to your machine it allows you to install MOSIP modules using command:
If a message prompting you for password, enter default vault password "foo" to proceed installation.
This section provides the following major sections to describe how to configure and verify the proper interface. The sandbox installs with default general configuration. To configure MOSIP differently, refer to the following sections:
DNS translates human readable domain names to machine readable IP addresses. A private DNS (CoreDNS) is mounted on the console machine by default, and /etc/resolv.conf refers to this DNS on all machines.
However, if you want to use DNS cloud providers (like Route53 on AWS), disable the installation of a private DNS by setting the following flag:
Ensure your DNS routing is taken care of by your cloud deployment. Uncomment the Route53 code for AWS in the scripts given in the:
The corends.yml ``playbook configures the CoreDNS and updates the /etc/resolv.conf file for all devices. If a system needs to be restarted, re-run the playbook to restore /etc/resolv.conf.
This part contains information about hosting your own registry using the Local Docker Registry.
Local Registry on Console
Instead of using the default Docker Hub, you may run a local Docker registry. This is particularly useful when the Kubernetes cluster is sealed for protection on the Internet. With this sandbox, a sample Docker registry implementation is available, and you can run the same by triggering the following in group_vars/all.yml.
Notice that this register is running on the computer on the console and can be accessed as console.sb:5000. Control is through http and not through https.
Ensure that in this registry you pull all the appropriate Dockers and update versions.yml.
Caution: If you delete/reset this registry or restart the console computer, all the registry contents will be lost and the Dockers will have to be removed again.
Additional Local Registries:
If you wish to have additional local registries for Dockers, then list them here:
The list here is necessary to ensure that http access from cluster machines is allowed for the above registries.
When you set up a private registry, you assign a server to communicate with Docker Hub over the internet. If you are pulling Dockers in Docker Hub from the private registry, then provide secrets.yml with the Docker Hub credentials and set the following flag in:
Update with versions.yml your Dockers versions.
When installing the default Sandbox, you must have a public domain name, so that the domain name refers to the console computer. However, if you want to access your internal network's Sandbox (for example via VPN), set the following in group_vars/all.yml:
A self-signed certificate is created and the sandbox access URL is hostname}}'
All secrets are stored in secrets.yml. Edit the file and change all of the passwords for a secure Sandbox. For creation and testing, defaults will be used, but be aware that the sandbox will not be secure with defaults. In order to edit secrets.yml.
If you update PostGres passwords, you will need to update their ciphers in the property files. See the section below on Config Server. To be able to find out the text password, all the passwords used in. properties were added to secrets.yml- some of them for purely informational purposes.
Caution : Make sure that secrets.yml is updated when you change any password in. properties.
Config server is one of the more popular centralized configuration servers used in a micro service-based application. For all modules, configurations are defined through property files located in the GitHub repository. For example, for this sandbox, the properties are located within the sandbox folder at .
You can have a repository of your own with a folder containing files for properties. On GitHub, the repo will be private. In group vars/all.yml, configure the following parameters as below (example):
If private: true, then, in group vars/all.yml, update your GitHub username as above. Please change the password to secrets.yml:
The repo is cloned to the NFS mounted folder if local git repo is allowed, and the config server pulls the properties locally. This option is useful if the sandbox is secured without access to the Internet. You should search git-in locally for any changes. Remember, however, that you will have to push them manually if you want the changes to be reflects in the parent GitHub repo. When making improvements to the configuration repo, there is no need to restart the config-server pod.
If you have updated the default passwords in secrets.yml, create these password ciphers and update the changed password property files. After the config server is up, the ciphers can be created from the console machine using the following curl command:
The above command connects via input to the Config server pod of the MZ cluster. You may also use the script to encrypt all the secrets at once by the following methods:
Several secrets are required in Ansible's secrets.yml in the config server property files. We use config server encryption to encrypt the secrets in order to prevent explicit text secrets in properties using the following command:
The script here converts all secrets in secrets.yml using above command implemented in Python.
Prerequisites:
Install required modules using
Ensure config server is running
Set the server URL in config.py
Captcha protects your website from fraud and abuse. It uses an advanced risk analysis engine and adaptive challenges to keep malicious software.
Get Captcha for the sandbox domain from "Google Re-captcha Admin" if you would like to allow Captcha for Pre-Reg UI. Get reCAPTCHA v2 keys for "I'm not a robot"
Set Captcha as:
As below, to receive OTP (one-time password) over email and SMS set properties:
SMS
File:
Before you start installing the sandbox, load country-specific master data:
Ensure the Master Data .csv files are available in a folder, say my_dml
Add the following line in group_vars/all.yml ``-> databases -> mosip_master
For production setups you may want to replicate pods more than the default replication factor of 1. Upgrade podconfig.yml to the same file. A separate production file can be generated and pointed to from group vars/all.yml ``--> podconfig file.
A taint allows a node to refuse pod to be scheduled unless that pod has a matching toleration. Kubernetes offers the functionality of taints to run a pod solely on a node. This is especially useful during performance tests where you would like to assign different nodes to non-MOSIP components.
By default, in the sandbox, taints are not added. The following modules have been provided with provisions to allow taints for:
Postgres
Minio
HDFS
Set the following in group vars/all.yml to allow
Ensure the above setting is done before you install the sandbox.
By default, the sandbox installs a disabled Trusted Platform Module (TPM) Reg Client Downloader.
Reg Client Downloader:
Convert helm template to helm values:
To enable TPM to use trusted private/public Reg client machine private/public keys, do the following:
Update the registered client downloader TPM environment variable:
If, before installing the sandbox, you have done the above, then you may skip this step. Otherwise, if the downloader reg client is already running on your sandbox, delete it and restart as follows:
(Wait for all resources to get terminated)
Add the name and public key in MOSIP-master/machine-master and MOSIP-master/machine-master table of the registered client machine in DB. Using TPM Utility, you can get your machine's public key
Utility to obtain public TPM keys along with the name of the computer
Prerequisites:
Build:
Run:
(Use jar-with-dependencies to run under target folder)
Machine Master Table:
The publicKey, signingPublicKey, keyIndex and signingKeyIndex - all of them to be populated in the machine_master table of mosip_master DB.
Download the registered client from domain name}}/registration-client/1.1.3/reg-client.zip
The sandbox comes with its default ID Schema (in Master DB, identity_schema table) and Pre-Reg UI Schema pre-registration-demographic.json. In order to use different schemas, do the following:
Ensure new ID Schema is updated in Master DB, identity_schematable
Replace mosip-config/sandbox/pre-registration-demographic.json with new Pre-Reg UI Schema
Download Reg Client:
Download zip file from:
Unzip the file and launch registered client by running run.bat
Reg client will generate public/private keys in the following folder
Run MDS:
Run mock MDS as per procedure give here: Mock MDS
Pickup device details from this repo. You will need them for device info updates in the later step
Add Users in Keycloak:
Make sure keycloak admin credentials are updated in config.py
Add users like registration officers and supervisors in csv/keycloak_users.csv with their roles
Run
Device Provider Partner Registration:
Update the following CSVs in PMS DML directory. On sandbox the DMLs are located at /home/mosipuser/mosip-infra/deployment/sandbox-v2/tmp/partner-management-services/db_scripts/mosip_pms/dml
pms-partner.csv
pms-partner_h.csv
IDA Check:
Disable IDA check in registration-mz.properties:
Launch Reg Client:
Set Environment Variable mosip.hostname to {sandbox domain name}
Login as a user (e.g. 110011) with password (MOSIP) to login into the client
Integrations
Guide to Work with Real HSM
Introduction:
The default sandbox uses simulator of HSM called SoftHSM. To connect to a real HSM you need to do the following:
Create client.zip
Update MOSIP properties
Point MOSIP services to HSM
client.zip:
The HSM connects over the network. Client.zip, which is a package of self-dependent PKCS11client.zip file is extracted from the artifactory when Dockers launch, unzipped, and install.sh is executed.
The zip must fulfil the following:
Contain an install.sh
Available in the artifactory
install.sh
This script must fulfil the following:
Have executable permission
Set up all that is needed to connect to HSM
Able to run inside Dockers that are based on Debian, inherited from OpenJDK Dockers
Properties:
Update the following properties in Kernel and IDA property files:
Ensure you restart the services after this change.
Caution: The password is highly critical. To encrypt it, make sure you use a really strong password (using Config Server encryption). In addition, Config Server access should be very tightly regulated.
Artifactory:
Artifactory is built as a Docker in the sandbox and accessed via services. In that Docker, replace the client.zip. The changed Docker can be uploaded to your own Docker Hub registry for subsequent use.
HSM URL
HSM is used by Kernel and IDA services. Point the TCP URL of these services to new HSM host and port:
The above parameter is available in the Helm Chart of respective service.
Integrating Antivirus Scanner
In MOSIP, virus scanners can be implemented at different levels. ClamAV is used as an antivirus scanner by default. If you want your anti-virus (AV) to be incorporated, the same can be achieved as follows:
Registration Client
Running your AV on the registration client machine is sufficient. Not required for integration with MOSIP.
Server
This is implemented as a part of Kernel ClamAV project project. MOSIP uses this project to scan registration packets. You may integrate your anti-virus (AV) in the following ways:
Option 1
The registration packets are stored in Minio. Several AVs provide traffic flow analysis in line with the stream to defend against hazards. This form of implementation based on the network can be carried out without any alteration of the MOSIP code. But to ensure that network traffic passes through your AV, a careful network configuration is required.
Option 2
To support your AV at the code level, the following Java code has to be altered. In VirusScannerImpl.java, the
BioSDK Integration
In reg client, reg proc, and ida, the biosdk library is included. The guide offers steps for these integrations to be enabled here.
Integration with IDA
It is expected that Biosdk will be available as an HTTP service for IDA. The ID Authentication module then calls this service. To build such a service, refer to the reference implementation. /service contains service code; while /client contains client code that is combined with the IDA that connects to the service. This service can be operated as a pod or hosted outside the cluster within the Kubernetes cluster.
It is important to compile the client code into biosdk.zip and copy it to Artifactory. It is currently available at the following address:/artifactory/libs-release-local/biosdk/mock/0.9/biosdk.zip. This zip is downloaded by IDA dockers and installed during docker startup.
Integration with Reg Proc
The above service works for regproc as well.
Integration of External Postgres DB
Sandbox Parameters
****
Make sure the Postgres is configured as 'UTC' for the time zone. This configuration is set to postgresql.conf when you install Postgres.
Integration with External Print Service
Introduction
MOSIP provides a reference implementation of print service that interfaces with the MOSIP system.
Integration Steps
Ensure the Following:
Compliant libraries, is reqartifactoryervices to link to HSM. MOSIP services install the same thing before the services start. The HSM vendor must have this library. The 1. Websub runs as domain name}/websub on MOSIP and is accessible externally via Nginx. Websub runs on DMZ and nginx in the sandbox as configured for this access
Your service is able to register a topic with Websub with a callback url
The callback url is accessible from MOSIP websub
This p12 key and password is used in your print service
Your print service reads the relevant (expected) fields from received credentials
Your print service is able to update MOSIP data share service after successfully reading the credentials
This guide includes numerous tips for using various dashboards made available as part of the default installation of the sandbox. The links to various dashboards are available at:
A default dashboard to display the logs of all MOSIP services is installed as part of the sandbox installation. To view the Dashboard:
Go to Kibana Home
On the drop down on the top left select Kibana->Dashboard
In the list of dashboards search for "MOSIP Service Logs"
Dashboard links:
MZ: domain name}/mz-dashboard
DMZ: domain name}/dmz-dashboard
On the console machine, the tokens for the above dashboards are accessible at_/home/mosipuser/mosip-infra/deployment/sandbox-v2/tmp
Link:
domain name}/grafana
Recommended charts:
11074 (for node level stats)
4784 (for container level stats)
Open the MOSIP Admin portal from the home page of the sandbox. Login with superAdmin username, MOSIP password.
The Sanity Check Procedures are the steps to verify that an installation is ready to be tested by a system administrator. In quality audits sanity check is consider as a major activity. It performs a quick test to check the main functionality of the software.
During deployment all pods should be 'green' on the dashboard of Kubernetes, or both these commands would display pods in 1/1 or 2/2 state if you are on the command line.
Some pods that show status 0/1 Complete are Kubernetes jobs - they will not turn 1/1.
Note the following namespaces
Module
Namespace
To check pods in a particular namespace. Example:
If any pod is 0/1 then the Helm install command times out after 20 minutes
Following are some useful commands:
Some pods have logs available in logger-sidecar as well. These are application logs.
Quick Sanity Check of Pre-Registration
Open Pre-Reg home page:
domain name}/pre-registration-ui/
Enter your email or phone no to create an account
Registration Processor Test Packet Uploader
Prerequisites
Auth Partner Onboarding
Packet Creation
Refer to notes in config.py and data/packet*/ptkconf.py for various parameters of a packet. Parameters here must match records in Master DB.
Following example packets are provided. All these are for new registration:
Packet1: Individual 1 biometrics, no operator biometrics
Packet2 : Individual 2 biometrics different from above, no operator biometrics
Packet2 : Individual 2 biometrics with operator biometrics of Individual 1
Clearing the DB
This is optional. To see your packet clearly, you may want to clear all records of previous packets in mosip_regprc tables:
Provide your postgres password.
Caution: Ensure that you want to clear the DB. Delete this script if you are in production setup.
Upload Registration Packet
Use the following command:
Verify
Verify the transactions as below:
Provide postgres password. Note that it may take several seconds for packet to go through all the stages. You must see a SUCCESS for all stages.
UIN should have got generated
Before we look at how to reset installation, you should ensure you have a recent backup of the clusters and persistence data.
Performing a reset will wipe out all your clusters and delete all persistence data. To reset your machine back to fresh install, run the following script:
If a message prompting you to confirm the reset of machine, select the option “Yes/No” to proceed.
Persistent data in the field of data processing is available over Network File System (NFS) that is hosted on console at location /srv/nfs/mosip.
For any persistent data, all pods write to this location. If required, you can backup this folder.
Note:
Postgres is initialized only once and populated. Postgres is not initialized if persistent data is present in /srv/nfs/mosip/postgres. In order to force an init, execute the following:
Postgres includes data from Keycloak. Keycloak-init does not overwrite any data, but just updates and adds information. If you want to clean up data from Keycloak, you need to manually clean it up or reset all postgres.
There are plenty of tools are installed with preinstall.sh to help in fact shortcuts commands to troubleshoot and diagnose technical issues or just little hacks that make tasks a little quicker.
The second part after adding above:
Tmux means that you can start a Tmux session and then open multiple windows inside that session. To enable it copy the config file as following:
This is tool to compare text and Property to find the difference between two text files**(*.properties)**:
1
4 vCPU, 8 GB RAM
32 GB
K8s MZ workers
9
4 vCPU, 16 GB RAM
32 GB
K8s DMZ master
1
4 vCPU, 8 GB RAM
32 GB
K8s DMZ workers
1
4 vCPU, 16 GB RAM
32 GB
Disable firewalld on all machines
Exchange ssh keys between console machines and K8s cluster machines so that ssh is password-less from console machines:
The node here is the machine on which you would like to exclusively run the module.
Map values in pre-registration-identity-mapping.json to pre-registration-demographic.json as below:
{
"identity": {
"name": {
"value":< id of name field in your demograhic json >
"isMandatory" : true
},\
"proofOfAddress": {
"value" : < id of proof of address field in your demographic json>
},
"postalCode": {
"value" : < id of postal code field in your demographic json>
}
}
}
Update the following properties in pre-registration-mz.properties preregistartion.identity.name=< identity.name.value (above)> preregistration.notification.nameFormat=< identity.name.value>
Restart the Pre-Reg Application service
You will need the public key and key index mentioned in readme.txt for the later step to update master DB
Update Master Data:
In the master DB DML directory, change the following CSVs. The DMLs are located in the sandbox at /home/mosipuser/mosip-infra/deployment/sandbox-v2/tmp/commons/db-scripts/mosip-master/dml
CAUTION*: The above will reset entire DB and load it fresh
Some example CSVs are located at csv/regdevice
Place HSM client configuration file in mosip.kernel.keymanager.softhsm.config-path (see below)
Not set any environment variables. If needed, they should be passed while running the MOSIP service Dockers
scanFile/scanFolder/scanDocument
API must be implemented with your AV SDK.
The print policy was established (be careful about enabled/disabled encryption)
Print partner created and certs uploaded DB Timezone6. The private and certificate of print partner is converted to p12 keystore format. You may use the following command:
Select the dashboard
_. For each dashboard, two tokens are created - admin and view-only. View-only privileges are restricted.
Prometheus
Monitoring
Filebeat
Monitoring
Ingress Controller
Ingress-Nginx
To re-run a module, helm delete module and then start with playbook. Example:
Enter the OTP that you received via email/sms in the selected box, or enter 111111 for Proxy OTP mode
Accept the Terms and Condition and CONTINUE after filling the demographic data
Enter your DOB or age
Select any of the Region, Province, City, Zone from the dropdown
Select any pin code from the dropdown
Phone number should be 10 digits and must not start with 0
CONTINUE after uploading required document of given size and type or skip the document upload process. (Recommended: upload any one document for testing purposes.)
Verify the demographic data and document uploaded previously and CONTINUE. You may edit with BACK if required
Choose any of the Recommended Registration Centre registration and CONTINUE
Select date and time-slot for Registration and add it to Available Applicants by clicking on + and CONTINUE
Now your first Appointment booking is done. You may view or modify your application in Your Application section
The latest transaction must be seen in credential_transaction table of mosip_credential DB
Further, identity_cache table of mosip_ida db should have fresh entries corresponding to the timestamp of UIN generated
Console
1
4 vCPU*, 16 GB RAM
128 GB SSD**
K8s MZ master
1
4 vCPU, 8 GB RAM
32 GB
K8s MZ workers
9
4 vCPU, 16 GB RAM
32 GB
K8s DMZ master
1
4 vCPU, 8 GB RAM
32 GB
K8s DMZ workers
1
4 vCPU, 16 GB RAM
32 GB
Console
1
4 vCPU*, 16 GB RAM
128 GB SSD
$ sudo hostnamectl set-hostname <hostname>
$ sudo yum install -y git
$ cd ~/
$ git clone https://github.com/mosip/mosip-infra
$ cd mosip-infra
$ git checkout 1.1.2
$ cd mosip-infra/deployment/sandbox-v2
docker:
registries:
- '{{groups.console[0]}}:{{local_docker_registry.port}}' # Docker registry running on console
group_vars/all.yml
sandbox_domain_name: '{{inventory_hostname}}'
site:
sandbox_public_url: 'https://{{sandbox_domain_name}}'
ssl:
ca: 'selfsigned' # The ca to be used in this deployment.
$ kc1 delete pod <pod name># To restart a pod
$ kc2 describe pod <pod name># Details of a pod
$ kc1 logs <pod name># Logs of a pod
$ kc2 logs -f <pod name># **Running log
$ helm1 list# All helm installs in mzcluster
$ helm2 list# All helm installs in dmzcluster
Python3 must have been installed during the standard deployment setup for the scripts here.
IDA has to be on boarded as partner. Execute the partner onboarding scripts here.
$ ./cleardb.sh
$ ./test_regproc.py
$ ./checkdb.sh
$ an reset.yml
$ an playbooks/postgres.yml --extra-vars "force_init=true"
alias an='ansible-playbook -i hosts.ini --ask-vault-pass -e @secrets.yml'
alias av='ansible-vault'
alias kc1='kubectl --kubeconfig $HOME/.kube/mzcluster.config'
alias kc2='kubectl --kubeconfig $HOME/.kube/dmzcluster.config'
alias sb='cd $HOME/mosip-infra/deployment/sandbox-v2/'
alias helm1='helm --kubeconfig $HOME/.kube/mzcluster.config'
alias helm2='helm --kubeconfig $HOME/.kube/dmzcluster.config'
alias helmm='helm --kubeconfig $HOME/.kube/mzcluster.config -n monitoring'
alias kcm='kubectl -n monitoring --kubeconfig $HOME/.kube/mzcluster.config
postgres:
...
...
node_affinity:
enabled: true # To run postgres on an exclusive node
node: 'mzworker0.sb' # Hostname**. Run only on this node, and nothing else should run on this node
taint:
key: "postgres" # Key for applying taint on node
value: "only"
Monitoring
MOSIP Java Coding Standards
MOSIP - Java Development Coding Standard
Repository Structure
In MOSIP, the source code modules are categorized under different repositories:
Commons - This contains common reusable library modules and service modules
Kernel - The collection of common reusable library modules and services
ID-Repo - The ID Repository services used by many of the MOSIP modules
Feature Specific Modules (for example)
registration
registration-processor
If a new source code module is planned to be added, and if it is a reusable library / service on which other modules will be depending on, then it should be added under Commons, otherwise, it can be created as a separate repository.
Source code of any feature in MOSIP will be organized as below:
feature-parent
feature-core - jar
feature-common - jar
This should be a POM module that aggregates all the sub-modules. This should contain,
List of all sub-modules
Common properties such as versions used by all sub-modules
Common dependencies used by all of the sub-modules
There should be a JAR module that defines core source code files such as,
APIs (Application Programming Interfaces)
SPIs (Service Provider Interfaces)
Common Utility classes
There can be a JAR module that provides abstract base implementations or common implementations of the APIs and SPIs. Other modules such as service module will be depending on this module using the API/SPI implementations or extending their base implementations.
Any Service implementation class should have 'Impl' suffix.
A feature can have one or more Spring Boot Service modules, each will have one or more related services.
Each Spring Boot Service Modules will be deployed as a separate deployment unit such as a docker container. So each will contain the separate Dockerfile containing the docker build instructions for that module.
Each Spring Boot Service Modules should be configured with Swagger configuration (except specific cases where) for easy understanding of the feature, easy unit-testing and verification for the developers.
In MOSIP following naming of Class/Interfaces their names should be of Camel cases, without any underscore.
They should have following suffixes in their names and they should be under appropriate package name based on their category,
XyzService - For a Service interface. A service class should not be annotated with @Service
All data classes such as DTOs, Entity classes use Lombok annotations to automatically create appropriate constructors, getters and setters.
Make sure to setup the IDE used for the development for using Lombok.
Any JPA repository created in MOSIP should be extending the base MOSIP Repository interface io.mosip.kernel.core.dataaccess.spi.repository.BaseRepository.
Appropriate database configurations properties should be added to the app configuration file.
MOSIP has many common libraries and services implemented under Commons/Kernel repository.
Kernel-Core module contains may common utility classes such as Loggers, DateUtils, StringUtils and Crypto-Core etc… Also many utility services such as Kernel-KeyManager, Kernel-CryptoService, Kernel-Audit-Service, Kernel-Auth-Service, etc... .
If any common utility needs to be implemented, first check Commons/Kernel if such utility is already present and make sure it is not already implemented in Commons/Kernel. It is always welcomed to contribute any new features/ bug fixes for the existing utilities, instead of creating a new utility.
Any request and response content in a service in MOSIP should be of application/json content type.
Any byte arrays to be returned in response should be Base-64-URL encoded within the response.
If any sensitive information is getting transferred in the request/response, the request/response block should be encrypted using the MOSIP public key.
For example:
The number of lines in the Java files is restricted to 2000 lines. Beyond 2000 lines, the java file is refactored into multiple files.
Each java file contains one public class or interface.
When some private classes and interfaces are associated, this can be in the same file.
Declare the public class and interface as the first declaration in the file.
When a java file is written, the following order is maintained,
The beginning comment should be in a C-style comment. Following is the format of the comment.
The first non-comment line is the package statement.
After a line-break below the package statement, import statements are placed. The import statements are grouped and segregated by a line-break. For example,
Do not use asterisk symbol while importing packages.
This comment will be going in to the Javadocs
Then the public class or interface is defined.
Then other private class or interface are followed.
Following is the order of elements inside the class declaration
Constant fields (static and final fields) should be on the top inside a Class
Then any non-final static fields are followed
The public class variables are followed by the protected and the private variables. These can be final or non-final fields.
Initializing Fields in a class
Do not initialize non-primitive fields with null in a Class;
Always initialize non-static fields from constructors in a Class.
Avoid using static non-final fields in a class. If it required for any specific reason, avoid initializing it in a constructor or a post-construct method.
The constructor declarations ordered by the number of parameters.
The methods are ordered by the functionality. The methods need not to be in the order of scope or accessibility.
The indentation unit it TAB.
The number of characters in a line should not exceed 80 characters
When the number of characters exceed the limit, the line should be broken into multiple lines. The following standard is used during the line breaks,
Break the line after the comma
Break before the operator
From higher-level breaks go to the lower-level breaks.
There are two types of comments in Java.
Implementation comments
Documentation comments
Both the comment types are used in the source code of MOSIP.
This is the comment type used for better understanding of the code. Most of the times, the source code will be maintained by different people. The programmer writes these comments so that the other programmers will come to know the functionality of the code in plain English language. Following lines are used.
Java source code can have their implementation comments in various parts of code blocks/lines with appropriate description about what the code block or line is doing.
Specifically the if-else if-else
When the developer needs to explain in detail about some functionality, block comments are used. Block comments are used anywhere in the code. It can be for the class or interface declarations or it can be within the java methods also. Example of block comments:
Single line comments are used for short description. For example,
Trailing comments are given in the same line where the source code resides. For example,
The end-of-line comments are also used in the source file. For example,
Documentation comments are used to generate the javadoc files.
Every source code file in Java should have proper Java Documentation such as description, Author and Version.
All Classes, Interfaces, Methods, Fields should have appropriate clear description about each.
Example:
One variable is declared per line.
Variables are declared at the beginning of the code block. For example,
No space between a method name and the parenthesis "(" starting its parameter list
Open brace "{" appears at the end of the same line as the declaration statement
Closing brace "}" starts a line by itself indented to match its corresponding opening statement,
A method should follow the "Single Responsibility" principle that will perform only one task. If it seems to do multiple sub-tasks, each sub-tasks should be created as a new method and then be invoked in that method.
If there is a logic even of a single line getting repeated in more than one place, it should be made as a separate method.
A method line count should not exceed 80 lines. If required break the blocks of code in the method to separate methods.
Never re-assign a parameter value. This may lead to unpredictable bugs.
Don't use too many number of parameters. Keep the maximum number of method parameters to 5 for simplicity.
Prefer method parameter type to be more generic such as a Super Interface or Super Class. For example, List instead of ArrayList
Never return null for an Array return type. Return an empty array of 0 like return new String[0].
Never return null for a Set/List/Map collection return types. Return corresponding empty values such as Collections.emptySet(), Collections.emptyList() or Collections.emptyMap();
Each line should contain at most one statement. Example:
Compound statements are statements that contain lists of statements enclosed in braces
The enclosed statements should be indented one more level than the compound statement.
The opening brace should be at the end of the line that begins the compound statement; the closing brace should begin a line and be indented to the beginning of the compound statement.
A return statement with a value should not use parentheses unless they make the return value more obvious in some way. Example:
Refer to for more information.
Always curly braces are used in the if-else statements. Even though there is a single statement below the if-else statement, curly braces is used. For example,
If there is a Boolean value to be returned in a method or assigned to a variable based on an if-else condition, the condition itself should be returned or assigned instead of true or false for the condition. For example,
If any binary operator is used before "?" in the ternary operator, then parentheses is used.
Prefer if-else statement over conditional expressions if it gets complex with the condition or the statements.
Avoid using nested conditional expressions for better readability.
A switch statement should have the following form:
Every time a case falls through (doesn't include a break statement), add a comment where the break statement would normally be. This is shown in the preceding code example with the /* falls through */ comment.
Every switch statement should include a default case. The break in the default case is redundant, but it prevents a fall-through error if later another case is added.
Only for the following situations 2 blank lines are used,
Between 2 different sections of the source file
If you have more than one class or interface, use 2 blank lines
Only for the following situations, 1 blank line is used,
Between method declarations.
Between the variable declarations and the method code.
Before the block comment or line comment.
Under the following circumstances, blank space are used,
When a keyword followed by parenthesis, a blank space should be given after the keyword. For example,
In the argument list, the parameters are given a space after comma.
All the package name in MOSIP application starts with io.mosip. Refer to section for various kinds or classes and the package names under which they should be kept.
The names given to classes are always nouns and in camel case. Refer to section for various kinds or classes and their names.
The names given to interface is always noun and in camel case. Refer to section for various kinds or interfaces and their names.
The method names are always verbs and in camel case. For example
The variable names are short and meaningful. Any new observer can understand the meaning of the variable. No single letter variable names are used. Camel case is used when declaring variables.
The constants are given the name in capital letters. The words in the names are separated by underscore.
String literals should not be used in the code directly. Declare them as constant in the class.
Magic Numbers should not be used in code, they should be declared as constants.
The instance variables should not be made public unless you have a specific reason.
Provide the most restrictive access to the fields, methods and Inner Classes such as private, default or protected. Avoid giving public access to them unless it is really required. Avoid using public non-final fields in a Class.
Always use the class name to call the static method. For example,
Numerical values should not be used in the code directly. Declare them and use it in the code. For example,
Avoid multiple assignments in the same line. For example,
Prefer primitive type variables over boxed types wherever possible. For example, prefer int, boolean and long over their Boxed counterparts such as Integer, Boolean and Long.
Use Optional return type in a method to avoid null checking. When there is possible to return null for a method, return Optional.empty().
Use OptionalInt or OptionalLong return type in a method when there is an unknown value of Integer/Long to be returned like -1
Prefer Method Reference over a Lambda Expression
Keep Lambda Expressions Short and Self-explanatory so that it is easy to understand. . Provide clear understandable name to the parameters in Lambda Expressions.
Always use parameter type inference. For example,
Do not use the parenthesis for a single parameter lambda expression.
Prefer Standard Functional Interfaces over creating a similar one unless it is really required. Use Standard Functional interfaces, which are gathered in the java.util.function package, satisfy most developers' needs in providing target types for lambda expressions and method references.
On a new Functional Interface declaration always use @FunctionalInterface annotation. This is not only for the documentation purpose but also to avoid accidentally breaking the Functional Interface behavior.
For example:
Prefer Streams over for loops. Streams are more readable and functional than the "for" loops, as they support operations such as map, flatMap, filter, reduce and collect.
Exception handling in the streams are carefully handled.
Avoid mutating objects within Collection.forEach() or Stream.forEach()
MOSIP applications should never allow to exit abruptly because of a critical error. Even if there is a critical error there should be a graceful exit with proper information about the error.
Each feature should be defining their own Checked and Unchecked Exceptions by extending io.mosip.kernel.core.exception.BaseCheckedException and io.mosip.kernel.core.exception.BaseUncheckedException .
Throw specific exceptions in a method, rather than generic exceptions. For example,
The exceptions are documented clearly. For example,
Always prefer to use try-with-resource block when applicable like instantiating a Input or Output stream/reader or Connection, which are AutoCloseable.
The following example uses a try-with-resources statement to automatically close a java.sql.Statement object:
A try-with-resources statement can have catch and finally blocks just like an ordinary try statement.
Always catch specific exceptions over a more generic exceptions like Exception/Throwable class. For example,
Never leave a catch block empty. Either handle the exception, or say proper reason for doing nothing in it.
Use multi-catch blocks wherever possible to club common handling of multiple exceptions.
Always log exceptions to file in a catch block for debugging purpose.
Error and Throwable are never caught in MOSIP.
Any service module should handle their exceptions in a common place such as a common Exception Handler which can be annotated with @ControllerAdvice or @RestControllerAdvice
Any service in MOSIP should never return error code other than 200. One or more errors to be reported in the response be returned as an array as part of "errors" attribute.
Logs are classified and logged accordingly. Following are the various log levels used in the MOSIP application.
TRACE
DEBUG
INFO
The log levels are configured according to the environment such as Development, Testing, UAT or Production. For example, the log levels in production is from WARN. Whereas in Development and Testing environment, it is from TRACE.
MOSIP's log component from the core-kernel is used to log entries. The log module in the core-kernel is used to log all the log entries.
First create a logger utility class under the core module of the feature like below:
To log any information/error/debug in a class,
create a logger instance in that class as below: private static Logger mosipLogger = XYZLogger.getLogger(MyClass.class);
In appropriate places invoke the appropriate log method of mosipLogger such as error
Every log entry contains the following format,
For example,
Never log any sensitive information such as user credentials, individual identity information to the log, mask the data if required before logging.
Care should be taken, not to log any sensitive information is logged. Modules leads to review the code to ensure that no sensitive information is logged.
Any service in MOSIP should invoke Kernel's AuditManager REST Service for audit logging of the status of the services such as
Success
Failure
Apache Commons is used to handle the common utilities like StringUtil, FileUtil, Hashcode, toString, null check etc., are
In case if Apache Commons doesn't have the necessary utilities, the util project from mosip-core is used.
Following are the miscellaneous practices which are followed in MOSIP.
Parenthesis are used in the code liberally to improve the readability and for precedence clarity.
Never type cast a variable without doing instanceof checking.
Avoid unnecessary type casting when the type of the value/expression is already assigned to a correct variable type/return type.
Avoid using Generic classes without Parameter types. For example:
Use diamond operator while constructing Generic objects. For example:
While chaining multiple method calls, keep one method call per line for better clarity and easy debugging of any issue (especially to get line number in exception stack trace where exactly is the error/exception occurs). For example:
Special comments are used to give a hint for further development. Following are the special comments used in the MOSIP project,
TODO
FIXME
pre-registration
id-authentication
feature-service-1 - SpringBoot service
feature-service-2 - SpringBoot service
Common maven-plugins used by all sub modules
Helper classes
DTO classes
Custom Exception classes
No Spring Boot Service module should be used as a dependency to any other module. Any such code dependency should be going inside the Common Implementation module.
. This will be in the core-module. This will be under
*.spi.xyz.service
package.
XyzServiceImpl - For a Spring Service implementation class. This class should be annotated with @Service. This should not be defined in a core-module. It will be defined in a common or service module. This will be under *.spi.xyz.service.impl package.
XyzRequestDto - For a Request Data Transfer class in a Service. This will be in the core-module. This will be under *.xyz.dto package.
XyzResponseDto - For a Response Data Transfer class in a Service. This will be in the core-module. This will be under *.xyz.dto package.
XyzEntity or XyzDao- For an Entity/ Data Access class, which will use JPA annotations for the entity. This will be in the core-module. This will be under or *.xyz.entity or *.xyz.dao package.
XyzRepository - For a JPA Repository interface, which will be extending the base MOSIP Repository interface io.mosip.kernel.core.dataaccess.spi.repository.BaseRepository. This will be annotated with @Repository annotation. This will be under *.xyz.repository package.
XyzController - For a Spring Controller class, which will be annotated with @Controller annotation. This will be under *.xyz.controller package.
XyzConfiguration - For a Spring configuration, which will be annotated with @Configuration. This will be under *.xyz.config package.
XyzUtil or XyzUtils - For a utility class. This will expose public static utility methods. This will be under *.xyz.util package.
XyzHelper - For a helper class. This will be a Spring Component class annotated with @Component. This will expose public instance helper methods. This will be under *.xyz.helper package.
XyzManager - For any management class. Also for any class that will connect external module using REST service calls. This will be a Spring Component class annotated with @Component.
XyzConstants - For file storing constants. Please prefer to have a Constants file to define common and related constants used across the classes in a feature. This can be inside the core-module or common-module. This will be under *.xyz.constant package.
XyzException - For a custom exception, which will be extending io.mosip.kernel.core.exception.BaseCheckedException and io.mosip.kernel.core.exception.BaseUncheckedException. This will be defined in a core-module. This will be under *.xyz.exception package.
XyzExceptionHandler - For the centralized exception handler class in a service-module, annotated with @ControllerAdvice or @RestControllerAdvice annotation. This will be under *.xyz.exception package.
XyzFactory - For any class/interface defining Factory design pattern. This will be under *.xyz.factory package.
Xyzbuilder - For any class/interface defining Builder design pattern. This will be under *.xyz.builder package.
XyzFacade - For any class/interface defining Facade design pattern.
XyzImpl - For any implementation class that extends an API/SPI interface.
A service implementation should be always with a combination of Service Interface and its Spring Service Implementation Class. It should not be without a Service Interface defined in core-module.
Any Spring Component will be annotated with @Component. A component may or may not be implementing an interface.
Any dependency injection of a Spring Service should only to be assigned to a variable of its Service Interface type but not to its Implementation class type.
For dependency injection of a Spring Component should be assigned to a variable its Interface type if any, otherwise to the class type.
Any service in MOSIP should never return error code other than 200. One or more errors to be reported in the response be returned as an array as part of "errors" attribute.
Each of the "error" attribute should under "errors" should have "errorCode", "errorMessage" and an optional "actionMessage". * For any service, possible "errorCode", "errorMessage" and the optional "actionMessage" should be properly listed documented in its API specification.
Any request/response body should have proper meta-data such as "id, "version" and "requestTime"/"responseTime", etc... .
Avoid using static initializers to initialize static final/non-final fields, instead create private static methods and call it for initializing static fields.
Align the new line with the beginning of the expression at the same level on the previous line.
conditions can have their descriptions about their various conditional expressions.
Any complex piece of code such as a regular expression / mathematical expression can be described with appropriate descriptions about it.
A method documentation should have description about all parameters, exceptions thrown and return value.
Documentation comments can be of two kinds:
Single line documentation comment: /** COMMENT */
Multi-line documentation comment:
Except when it is a null statement the "}" should appear immediately after the "{"
An empty line is there in between the method declarations.
Methods are separated by a blank line.
.
Prefer method return type to be more generic such as a Super Interface or Super Class. For example, List instead of ArrayList.
Avoid having multiple return statements in a method. Prefer to provide a single point of exit to a method. For example:
Use Optional return type to avoid null checking. When there is possible to return null for a method, return Optional.empty().
Use OptionalInt, OptionalLong return types for a method when there is an unknown value of Integer/Long to be returned like -1;
Braces are used around all statements, even single statements, when they are part of a control structure, such as an if-else or for statement. This makes it easier to add statements without accidentally introducing bugs due to forgetting to add braces. For example:
Prefer "switch" statement when possible over having multiple “if-else if-else if-else” statements.
To provide a better readability in between logical blocks, an empty line are used, wherever applicable.
Create XyzConstants class to group related and reused constants within a module/feature.
Prefer variable type to be more generic such as a Super Interface or Super Class. For example,
List
instead of
ArrayList
.
;
Avoid getting value from Optional using Optional.get() without checking for Optional.isPresent() condition, otherwise use Optional.orElse() .
Use primitive optional classes such as OptionalInt or OptionalLong over Optional<Integer> or Optional<Long>.
Use “Effectively Final” Variables in Lambda Expressions. It is not required to mark every target variable as final.
Avoid mutating Object Variables in Lambda Expression.
Avoid using the block lambdas wherever an expression lambda are used. For example:
Instantiate Functional Interfaces with Lambda Expressions instead of creating anonymous inner class instances for that.
Whenever calling the functional interface, place them at last in the parameter list.
, use
Stream.collect()
instead. For example use
Stream.collect(Collectors.toList())
instead of mutating a list for collecting elements to a list.
Use parallel streams where ever possible to boost performance, whenever it does not involve sort/order/limit intermediate operations.
The Checked and Unchecked exceptions should be used appropriately as needed. Make sure which one to use when based on the exception handling requirement.
WARN
ERROR
,
debug
or
info
with appropriate parameters passed to it.
Exception occurred - the error codes and error messages.
Define the appropriate Audit Modules and Audit Events for any feature and use pass them appropriately in the Audit Parameters while invoking the Audit REST service.
Make sure to invoke the Audit REST service Asynchronously to prevent any time lagging in response because of the Audit REST service call.
NOTE
OPTIMIZE
It should be made sure to track the above comments, perform action accordingly, and remove them when they become irrelevant.
Source Code Organization in a MOSIP Repository
Feature-Parent Module
Feature-Core Java Library Module
Common Implementation Module
Spring Boot Service Modules
Classes/Interfaces in MOSIP
Using Lombok for Data classes
MOSIP JPA Repository
Commons/Kernel - MOSIP Common Libraries/Services
REST Services Request and Response:
Java Coding Standard
Number of lines
Class and Interface
Ordering
Beginning documentation comment
Package statement
Import statement
Class or Interface comment for documentation
Public class or interface definition
Other related private class or Interface definition
/**
* Class/Interface description goes here
*
* @version 2.4 05 July 2018
* @author Rajkumar Mahanty
*
*/
/*
* This is the block comment. This is the block comment.
* This is the block comment. This is the block comment. This is
* block comment.
*/
/* This is short description */
if( height > 45) {
...
}
if(height > 45) { /* This is the trailing comment */
...
}
if(width > 45) {
return false; // some description
}
/*
* Copyright 2002-2018 the original author or authors.
*
* Licensed under the Apache License, Version 2.0 (the "License");
* you may not use this file except in compliance with the License.
* You may obtain a copy of the License at
*
* http://www.apache.org/licenses/LICENSE-2.0
*
* Unless required by applicable law or agreed to in writing, software
* distributed under the License is distributed on an "AS IS" BASIS,
* WITHOUT WARRANTIES OR CONDITIONS OF ANY KIND, either express or implied.
* See the License for the specific language governing permissions and
* limitations under the License.
*/
package org.mosip.orm;
import org.mosip.dao.SomeDAO;
import org.mosip.exception.SMSException;
/**
* This class does the so and so activity. And more description goes here. And
* more description goes here. And more description goes here. And more
* description goes here. And more description goes here.
*
* @author SadanandGowda
* @since v1.0
*/
public class SampleReference extends SomeSuperClass {
/**
* someClass is used for so and so purpose
*/
@Nullable
private final Object someClass;
/**
* someIdentifier is used to identify something
*/
@Nullable
private final Object someidentifier;
/**
* Create some functionality with the with the given message, unless so and so
* functionality.
*
* @param msg
* the display message
* @param cause
* the source exception
*/
public SampleReference(String message, Throwable cause) {
super (message, cause);
this.someClass = null ;
this.someidentifier = null ;
}
/**
* Sends the SMS to the given phone number
*
* @param someClass
* this is for this purpose
* @param mobileNumber
* the mobile number to which the SMS have to be sent
* @param msg
* the message sent to the phone number
* @return
*/
public String sendSMS(Class<?> someClass, int mobileNumber, String msg) {
// the SMS sending code comes here.
}
}
void myMethod() {
int int1 = 0; // beginning of method block
if (condition) {
int int2 = 0; // beginning of "if" block
...
}
}
class Sample extends Object {
int ivar1;
int ivar2;
Sample(int i, int j) {
ivar1 = i;
ivar2 = j;
}
int emptyMethod() {}
...
}
// PREFER
public Foo parse(Locale locale, **Function<Locale,Foo> fn** );
// AVOID
public Foo parse( **Function<Locale,Foo> fn** , Locale locale);
public void myMethod()throws Exception{ // AVOID
public void myMethod()throws NumberFormatException{ // PREFER
/**
* The method description goes here ...
*
* @param input
* @throws PacketNotValidException
* if so and so... happens
*/
public void myMethod(String someInput) throws PacketNotValidException {
import io.mosip.kernel.core.logger.spi.Logger;
import io.mosip.kernel.logger.logback.appender.RollingFileAppender;
import io.mosip.kernel.logger.logback.factory.Logfactory;
/**
* Logger for XYZ module which provides implementation from kernel logback.
*
* @author XXX
*
*/
public final class XYZLogger {
private static RollingFileAppender mosipRollingFileAppender;
static {
mosipRollingFileAppender = new RollingFileAppender();
mosipRollingFileAppender.setAppend(true);
mosipRollingFileAppender.setAppenderName("fileappender");
mosipRollingFileAppender.setFileName("logs/id-auth.log");
mosipRollingFileAppender.setFileNamePattern("logs/id-auth-%d{yyyy-MM-dd}-%i.log");
mosipRollingFileAppender.setImmediateFlush(true);
mosipRollingFileAppender.setMaxFileSize("1mb");
mosipRollingFileAppender.setMaxHistory(3);
mosipRollingFileAppender.setPrudent(false);
mosipRollingFileAppender.setTotalCap("10mb");
}
/**
* Instantiates a new XYZ logger.
*/
private XyzLogger() {
}
/**
* Method to get the rolling file logger for the class provided.
*
* @param clazz
* the clazz for which the logger instance to be created.
* @return the logger
*/
public static Logger getLogger(Class<?> clazz) {
return Logfactory.getDefaultRollingFileLogger(mosipRollingFileAppender, clazz);
}
}
2008-09-15T15:53:00+05:00 - ENROLMENT – PACKET_VALIDATOR - VALIDATE – EnrolmentId - 829329 – Packet validator had been called and now we are going to validate the packets.
List nameList = new ArrayList(); // AVOID
List<String> nameList = new ArrayList<>(); //PREFER
new HashMap<String, List<String>>() //AVOID
new HashMap<>() //PREFER
This document guide the developer to find the traceability between functionality and the respective technical component. The provided technical classes are available in the package of 'registration-service' module. In this module the required functions are exposed as public method and that can be used to obtain the required features.
It doesn't detail about each methods level information since that are covered in Javadoc of each component.
Post successful login, session context would be created. That will be used throughout the application at the required places. The user detail and the respective roles are encapsulated inside the context. Without creation of this context object, the packet can't be created.
UserDTO – It should contain info of id, name, roles, center-id. loginMethod – possible values are PWD, OTP, FINGERPRINT, FACE, IRIS. isInitialSetUp – true/false, isUserNewToMachine – true/false, AuthenticationValidatorDTO – should contain id, password, otp
Auth:
Not required.
External Connectivity:
Service and DB
Functionality:
Packet Creation - New Registration / Update UIN/ Lost UIN
Technical Detail:
Based on the business need [New Registration / Update UIN/ Lost UIN] this 'RegistrationDTO' object should be populated with the relevant data and also pass the 'RegistrationMetaDataDTO.RegistrationCategory' as [New/ Update/ Lost].
packetsToBeSynced – The packet details which needs to be Synced.
Functionality:
Packet Upload
Main Service class and method:
PacketUploadService.pushPacket(File packet)
Input Parameter:
File object, which contains the packet to be uploaded.
Functionality:
Packet Export
Main Service class and method:
PacketExportService.getSyncedRecords() - to fetch the packet to be exported. updateRegistrationStatus(List exportedPackets) - update the status once exported.
Input Parameter:
List of packet object.
Functionality:
Download Pre-Registration data during New Registration
Technical Detail:
The user provided pre-registration packet id related [demo/ doc] detail would be downloaded from Pre-registration DB using the respective REST service. After downloading the packet, the data would be mapped to the UI object and render the same to UI to display in the screen.
registrationID – The registration id of the packet that needs to be updated, statusComments - The comment status that needs to be updated for the given registration id of the packet, clientStatusCode - The status code that needs to be updated for the given registration id of the packet.
Functionality:
Sync Data from Server to Client and Vice Versa.
Technical Detail:
This functionality will be executed as specified as sync-frequency in local DB. During start of the application, the scheduler would be loaded with the jobs configured in db and trigger the job. The scheduler would trigger the jobs at the configured frequency. While running the jobs, based on the functionality it would invoke the respective services and invoke the required external services to sync the data from server to client and vice versa. Post completion or every state of the job execution, the status would be updated in local db.
Main Service class and methods
JobConfigurationServiceImpl.executeAllJobs() - This would load all the active jobs from the local db and trigger the jobs.
Functionality:
MDM Integration – Register Device
Technical Detail:
This method automatically scans all devices by connecting to the MDM service, which is running in a particular port and stores it in device registry.
FingerprintDetailsDTO – dto contains the finger print related details, fingerType – Type of the device like Fingerprint/ Iris/Face etc
Functionality:
MDM Integration - Validate bio-metric against the bio value already captured and stored in Database.
Main Service class and method:
BioServiceImpl - validateFingerPrint(String userId) - based on provided user Id the relevant bio information would be fetched from database and same would be validated against the bio data received from MDM service.
Input Parameter:
mosipBioDeviceManager – scan(String deviceType)
Functionality:
MDM Integration - Display video stream
Main Service class and method:
Yet to be implemented
Input Parameter:
Functionality:
TPM Public Key Sync
Technical Detail:
This service will be executed during initial set-up of registration client application. This service gets the Public Part of the Key used for signing from the TPM. Uploads this public key along with the machine name to the server. This service returns the key index which will be used for Master Sync Service
Main Service class and method:
TPMPublicKeySyncService.syncTPMPublicKey()
The packets are created during individual registration process are structured and secured. The detail of the same can be found in this link.
List of packet status maintained in client db while moving the packet to the different state before and after pushing to the server.
Packet Status Desc
Status in Client
Once Packet Created
REGISTERED
Packet Approved
APPROVED
Packet Status Desc
Status from Server
Packet in processing state
PROCESSING
UIN generated for the packet
PROCESSED
Below provided jobs are executed in batch mode through spring batch. The job execution frequencies are mentioned in the DB job related table. These jobs can also be triggered through manual process using 'Sync' option in the Menu, During initial login after successful online authentication and While starting the application if initial sync already completed.
Sl.No:
Service Desc.
Dependent Module
Under 'Sync' Menu
Initial Login
Application Launch
1.
Pre-registration Data Sync
As 'configurability' is the one of the major NFR being considered while designing the application, here listed out the required files where the configurations can be modified that will get reflected in application during runtime.
'registration-qa.properties' - Registration application specific configuration.
'application-qa.properties' - Overall application level common configuration.
These configuration would be downloaded to the client machine through the 'config' sync service. If there is any change with respect to 'kernel' properties then after downloading the properties the application will ask for 'restart'.
Age configuration:
Age limit is configurable in the application. User should modify the max age limit in both 'application' and 'registration' properties file.
Below find the list of tables used in Registration client application. Based on use cases, the table data gets updated during either sync process or transaction in local machine.
There are few jobs are configured to clean the transactions histories from local tables and also pushing the audit data to server.
Sl. No
Table Name
Description
Source
1.
biometric_attribute
It contains the list of biometric attribute description[left slap, right iris..] for each biometric type [Fingerprint, Iris, Photo] with respect to language code
sync from server master table
The UI specific labels and messages are maintained in the language specific property file. Based on the primary and secondary language the respective bundle would be loaded during runtime and displayed in the screen.
messages_en.properties - Messages are in English language.
messages_ar.properties - Messages are in Arabic language.
messages_fr.properties - Messages are in French language.
labels_en.properties - Labels are in English language.
labels_ar.properties - Labels are in Arabic language.
labels_fn.properties - Labels are in French language.
Below find the list of error code and description which are thrown from application during the process.
Class Name
Error Codes
Description
GPSFacade
REG-LGE-002
GPS signal is weak please capture again
SyncStatusValidatorService
Functionality:
Login with UserName and Password/ OTP/ BIO
Functionality Vs technical component mapping
Technical Detail:
Packet Structure
Packet Status
List of Jobs
Configuration Rule
Table Details
UI - labels and messages
Error code and description
ABIS APIs
This document defines the APIs specifications for various operations that ABIS can perform to integrate with MOSIP.
API specification version: 0.9
Published Date: February 05, 2021
Revision Note
Publish Date
Revision
An ABIS system that integrates with MOSIP should support the following operations.
Common parameters used for all ABIS operations:
Name
Description
Restrictions
Type
Code
Status
Code
Reason
The following operations are supported by MOSIP:
ABIS must get biometric data from referenceURL, process it and store it locally within the ABIS reference database. More details about the refernceURL is mentioned in our .
referenceId must not be active prior to this operation i.e., it must not have been used before this operation.
De-duplication must not be performed in this operation.
Insert Request
Success Response
Failure Response
The reference URL is MOSIP's datashare URL which is generated based on a policy defined by MOISP's adopter.
The referenceURL is authenticated and authorized; ABIS needs to send a JWT token inside the request header COOKIE
The referenceURL will be active for a certain time as decided by the MOSIP adopter
The data sent in the referenceURL will be encrypted
Authentication Token
As mentioned above in order to access the request URL the ABIS system needs to send a JWT token inside the request header COOKIE. In order to get the token ABIS needs to call MOSIP's AuthN & AuthZ API with Client ID & Secret Key by passing the credentials (clientid, secretkey and appid) which would be provided by the System Integrator (SI).
Below is the sample API details for getting the authentication token. More details about the API is available in our .
Sample Request URL
POST https://{base_url}/v1/authmanager/authenticate/clientidsecretkey
Sample Request Body
Sample Response
DataShare URL
Below is the sample API detail for reference URL.
Sample Request URL
GET https://{base_url}/v1/datashare/get/mpolicy-default-abis/mpartner-default-abis/mpartner-default-abismpolicy-default-abis20210205062412BlQo0rJB
Sample Encrypted Response
The sample encrypted datashare is available
Encrypted Key Data
KEY_SPLITTER
Encrypted Actual Data
Encrypted Key Data
KEY_SPLITTER
Encrypted Actual Data
Sample Response after Decryption
Sample Response in case of Authentication Failure
All Possible Error codes and Messages from Datashare URL
Error Code
Error Message
All Insert requests added to the queue earlier must be serviced by ABIS when performing an Identify request.
Identify request provides a 1:N comparison. The given input is compared either against the gallery passed or if the gallery is not specified the entire database.
The input for comparison can be provided by referenceID or referenceURL.
Identify request should give all candidates which are considered as a match based on ABIS thresholds.
This request should not match against referenceID that is not in the reference database.
The response now has a section for analytics that contains key value pairs. Values can be JSON objects also. The contents of the analytics section will be agreed upon by the MOSIP adopter with the ABIS provider. Scores are also moved to this section and are not mandatory response parameters any more.
To give an example, please find the following calculation for targetFPIR - which is the error rate at which identification requests are expected to return non-empty candidate list.
Removes only the entry referred by the referenceId.
This operation can be used to remove duplicates found by Identify.
A Ping request should respond with a response on the liveness of the ABIS system.
ABIS responds with the count of requests that are still pending.
ABIS will send a count of records in the reference database
to know about biometric specification in MOSIP
to how MOSIP stores biometric data
to get the JWT token
Input Parameter:
The RegistrationDTO object contains the RID, PRID, registration details of the individual and also contains the officer and supervisor details. This object has the following sub-classes: a. DemographicDTO - Details of the Demographic and Documents, b. BiometricDTO - Biometrics (Fingerprints, Irises, Face and Exception Face) of the individual, parent (or guardian), officer and supervisor, c. RegistrationMetaDataDTO - Metadata related to registration and d. OSIDataDTO - Details of the officer and supervisor who had authenticated the registration.
Auth:
SessionContext is required for creating the packet
External Connectivity
DB, File system
New Registration - Adult
As part of New registration, individual's Demographic, documents[POI and POA] and bio-metric [fingerprint, iris and face] will be captured. If an exception of the bio-metrics is marked, then exception photo will be captured.
New Registration - Child
As part of New registration, individual's Demographic, documents [POI, POA and POR] and anyone of parent's bio-metric [fingerprint/iris/face(if all fingerprint and iris are marked as exception)] along with that Parent's/Guardian's RID/UIN will be captured. If an exception is marked for the parent bio-metrics, an exception photo will be captured for the parent
UIN Update - Adult
As part of UIN Update, individual's will have the option to select the field that would like to update. For Demographic update --> UIN number, Name, Document[only if Name/Address is selected then POI for name and POA for address is mandate], and anyone of the bio-metric will be captured as a mandatory values. For Bio-metric update --> UIN number, Name and Bio-metrics [fingerprint, iris and face] will be captured, if an exception marked then exception photo will be captured
UIN Update-Child
As part of UIN Update, individual's will have the option to select which one they are going to be update. For Demographic update --> UIN Number, Name,POR document along with that Parent/Guardian Name and UIN along with anyone parent bio-metric should be captured; if any exception marked then the exception photo of the Parent/Guardian will be captured.
Lost UIN-Adult
As part of Lost UIN, an individual's all Bio-metrics[fingerprints, iris, and face] will be mandatory to find the lost UIN.
Lost UIN-Child
As part of Lost UIN, Parent/Guardian Bio-metric will be mandatory to find the lost UIN of the child. if an exception marked then the exception photo of the parent/Guardian will be captured.
Auth:
Authentication token required.
External Connectivity:
Packet Sync service REST call
Auth:
Authentication token required while doing file upload. Based on the SessionContext object the advice would attach the token and invoke the required service call.
External Connectivity:
Service, DB, File system
Auth:
No.
External Connectivity:
DB, File system
Input Parameter:
preRegistrationId- The pre reg id
Auth:
Authentication token required while downloading the packets. Based on the SessionContext object the advice would attach the token and invoke the required service call.
External Connectivity:
Pre Reg service REST call
Auth:
NA
External Connectivity:
DB
Input Parameter:
-
Auth:
Auth token required for external services. This would be automatically taken care within this method. Nothing explicitly to be passed.
External Connectivity:
REST API calls, DB
Input Parameter:
No parameter needed.
Auth:
Not required
External Connectivity:
deviceInfo - MDM service REST call
Auth:
Not required
External Connectivity:
Capture - MDM service REST call
Auth:
Not required
External Connectivity:
DB, Capture - MDM service REST call
Auth:
Not required
External Connectivity:
Input Parameter:
NA
Auth:
TPM 2.0 is required for this service
External Connectivity:
TPM, Web Service
'Re-Register' packet approved
RE_REGISTER_APPROVED
Packet Rejected
REJECTED
Packet IDs Synced with Server
SYNCED
Packet pushed to Server
PUSHED
Packet exported to device
EXPORTED
Unable to process the packet.
REREGISTER
Failed while processing packet due to internal issue
RESEND
Packet is received but not uploaded in LANDING_ZONE
RECEIVED
Duplicate found in abis
REJECTED
Pre-reg
Y
N
N
2.
Policy Sync
Kernel
Y
N
N
3.
Registration Client Config Sync
Kernel
Y
Y
Y
4.
Registration Packet Status Reader
Reg-Proc
Y
N
N
5.
User Detail/Role Setup Sync
Kernel
Y
Y
Y
6.
Pre Registration Packet Deletion Job
local job
N
N
N
7.
Registration Packet Deletion Job
Local Job
N
N
N
8.
User Machine Mapping Sync Job
Kernel
Y
N
N
9.
Audit Log Deletion Job
Local Job
N
N
N
10.
Registration Packet Sync
Reg-Proc
Y
N
N
11.
Registration Packet Virus Scan
Reg-Proc
N
N
N
12.
Public key Sync service
Kernel
Y
Y
Y
13.
User Salt Sync service
Kernel
Y
Y
Y
2.
biometric_type
It contains the list of biometric type[Fingerprint, Iris, Photo] while respect to language code
Sync from server master table
3.
blacklisted_words
It contains the list of words which were not allowed during Registration process with respect to language code
Sync from server master table
4.
device_master
It contains master information related to device with respect to language code
Sync from server master table
5.
device_spec
It contains device specifications like brand, model with respect to language code
Sync from server master table
6.
device_type
It contains types of devices[Fingerprint scanner, camera] and their description with respect to language code
Sync from server master table
7.
doc_category
It contains list of document categories[Proof Of Address, Proof Of Identity...] which will be displayed in UI with respect to language code
Sync from server master table
8.
doc_type
It contains list of document types that are allowed for uploading documents in Registration with respect to language code
Sync from server master table
9.
gender
It contains list of gender types that are being used in Registration with respect to language code
Sync from server master table
10.
id_type
It contains list of Id types [Registration Id, Pre Registration Id] that are being used in Registration with respect to language code
Sync from server master table
11.
language
It contains list of languages that are being used in Registration
Sync from server master table
12.
location
It contains list of locations that are being used in Registration with respect to language code
Sync from server master table
13.
machine_master
It contains list of machine related data[mac address, serial number, machine name...] with respect to language code
Sync from server master table
14.
machine_spec
It contains list of machine specifications[brand, model...] with respect to language code
Sync from server master table
15.
machine_type
It contains list of machine types[Desktop,Laptop...] with respect to language code
Sync from server master table
16.
reason_category
It contains list of reason categories[Client Rejection, Manual Adjudication...] with respect to language code
Sync from server master table
17.
reason_list
It contains list of reasons [Invalid Address, Gender-Photo Mismatch...] that are listed during Registration Approval/Rejection with respect to language code
Sync from server master table
18.
registration_center
It contains list of Registration center ids with respect to language code
Sync from server master table
19.
reg_center_device
It contains list of Registration center ids with respect to language code
Sync from server master table
20.
reg_center_machine
It contains list of machine ids which are mapped to corresponding center id
Sync from server master table
21.
reg_center_machine_device
It is mapping table of center, machine and device
Sync from server master table.
22.
reg_center_type
It contains list of center types with respect to language code
Sync from server master table
23.
reg_center_user
It contains list of user ids that are mapped to corresponding center id
Sync from server master table
24.
reg_center_user_machine
It is a mapping table for center, user and machine
During Onboarding process
25.
template
It contains list of Templates that will be displayed during Registration with respect to language code
Sync from server master table
26.
template_type
It contains list of template types[email template, sms template..] with respect to language code
Sync from server master table
27.
title
It contains list of Titles[Mr, Mrs..] with respect to language code
Sync from server master table
28.
valid_document
It contains list of valid documents allowed for Registration with respect to language code
Sync from server master table
29.
sync_job_def
It contains list of Job details[Master Sync, User Detail Sync..] that are required for sync
Sync from server master table
30.
screen_authorization
It contains list of Screen Ids which are required for accessing features[New Registration, EOD..] with respect to roles
Sync from server master table
31.
role_list
It contains list of roles[Registration Officer, Registration Supervisor..] referred in Registration
Sync from server master table
32.
process_list
It contains list of process[login, eod..] happen during registration
Sync from server master table
33.
app_authentication_method
It contains list if authentication methods[PWD, OTP..] with respect to roles and process[login, eod..]
Sync from server master table
34.
app_detail
It contains list of application details[Pre-Registration, Registration Client] with respect to language code
Sync from server master table
35.
app_role_priority
It contains list of role priority details with respect to Process[login, eod..] and roles
Sync from server master table
36.
GLOBAL_PARAM
It contains list of Configuration related details used in Registration application.
Sync from server configuration [registration.properties, application.properties]
37.
user_detail
It contains list of User details[id,name, email..]
Sync from server master table
38.
user_pwd
It contains User Password details
Sync from server master table
39.
user_role
It contains data of roles which were mapped to the user
Sync from server master table
40.
user_biometric
It contains User biometrics[Fingerprint, Iris..] details[minutia, biometric type..]
During Onboarding Process
41.
key_store
It contains Mosip Public key , Packet creation key
During Public key Sync and Policy sync
42.
sync_control
It contains information about the jobs which are executed successfully along with its last time stamp
During Manual Sync and Scheduled Jobs
43.
sync_transaction
It contains data about all sync transactions
During Manual Sync and Scheduled Jobs
44.
registration
It contains data about Registration Packet[Registration Id, Status..]
During Registration process
45.
registration_transaction
It contains data of all transactions during registration process
During Registration process
46.
pre_registration_list
It contains list of Pre Registration details[Pre Registration Id, Status..]
During Pre Registration Sync
47.
audit_log_control
It contains data of Audit logging[From Time, To Time..]
During local transaction.
REG-ICS-006
GPS signal is weak please capture again
SyncStatusValidatorService
REG-ICS-005
GPS device not found. Please connect an on-boarded GPS device.
SyncStatusValidatorService
REG-ICS-005
Please connect the GPS Device
SyncStatusValidatorService
REG-ICS-004
Please insert the GPS device in the Specified Port
RegistrationApprovalController
LGN-UI-SHE
IO Exception
PacketSynchService
REG-PSS
Unable to Sync Packets to the server
PacketUploadService
REG-PUS
Unable to Push Packets to the server
BioService
IRC-IFC
Exception while scanning iris of the individual
BioService
FPC-FCS
Exception while scanning fingerprints of the individual
RestClientAuthAdvice
REG-RCA
Exception while adding authorization token to web-service request
TPMUtil
TPM-UTL-001
Exception while signing the data using TPM
TPMUtil
TPM-UTL-002
Exception while validating the signature provided by TPM
TPMUtil
TPM-UTL-003
Exception while encrypting the data using asymmetric crypto-algorithm through TPM
TPMUtil
TPM-UTL-004
Exception while encrypting the data using asymmetric crypto-algorithm through TPM
TPMUtil
TPM-UTL-005
Exception while getting the public part of the TPM signing key
TPMUtil
TPM-UTL-006
Exception while getting the TPM instance
TPMUtil
TPM-UTL-007
Exception while closing the TPM instance
TPMUtil
TPM-INT-001
Exception while closing the TPM instance
RegIdObjectValidator
REG-IOS-001
Invalid ID Object Schema
RegIdObjectValidator
REG-IOS-002
Invalid ID Object Pattern
RegIdObjectValidator
REG-IOS-003
Invalid Master Data Object Pattern
RestClientAuthAdvice
REG-RCA-001
Generic Exception reported by server, while invoking web-service.
RestClientAuthAdvice
REG-RCA-002
Exception while generating the signature of request body
RestClientAuthAdvice
REG-SDU-004
Response header received from the web-service is not as expected
DemographicDetailController
KER-IDV-102
PRID should not contain any sequential and repeated block of number for 2 or more than two digits
MOSIP will provide biometric data in CBEFF format to ABIS as a response of referenceURL and the data will be encrypted and encoded as mentioned below.
KER-ATH-401
Authentication Failed
KER-ATH-403
Forbidden
If the referenceID is given it is used as the preferred option. The given referenceID must be existing in the ABIS database else ABIS will throw and error.
If the referenceID is omitted or NULL and the referenceURL is passed the ABIS retrieves the biometrics provided in the referenceURL and compares the same against either a gallery or its database.
If in case, both referenceID and referenceURL are missing ABIS throws an error.
Ordering or ranking of results is not explicitly specified and can be agreed upon between the MOSIP adopter and the ABIS provider.
The flags section of the request can be used to customize or control ABIS behavior by sending specific key value pairs.
"targetFPIR" or "maxResults" are examples of such flags that can alter the ABIS behavior. These are optional attributes for MOSIP during an identify request. MOSIP expects the adopters to define these parameters based on the accuracy expectations and the work-flow requirements. These can be set at the ABIS configuration level and need not be part of the individual request at all.
This is the first formal publication of the interface as a version-ed specification. Earlier draft are superseded by this document. The interface is revamped to make it friendlier to programmers and also has a new method for conversion.
June 09, 2020
A note related to targetFPIR was added
June 26, 2020
New failure reason (code - 6, 8, 9, 10, 11, 12) for ABIS have been added.
August 04, 2020
Analytics section has been added to the overall response for Identify and the failure reason have been updated.
November 19, 2020
Note on encryption of biometric data share using referenceURL has been added.
{
"id": "mosip.abis.identify",
"version": "1.1",
"requestId": "01234567-89AB-CDEF-0123-456789ABCDEF",
"requesttime": "2020-03-29T07:01:24.692Z",
"referenceId": "987654321-89AB-CDEF-0123-456789ABCDEF",
"referenceURL": "",//will be an empty string, if not used
"flags": { //optional
//maxResults is an example and not a prescribed flag
"maxResults": "10",
//targetFPIR is an example and not a prescribed flag
"targetFPIR": "30",
//there can be more following this
"flag1": "value1",
"flag2": "value2"
},
"gallery": {
"referenceIds": [
{
"referenceId": "2abe7b7d-b58a-4466-a006-c79297281123"
},
{
"referenceId": "7acce7b7d-b58a-4466-a006-c79297281456"
},
{
"referenceId": "3bce7b7d-b58a-4466-a006-c79297281678"
},
{
"referenceId": "5cce7b7d-b58a-4466-a006-c79297281098"
},
{
"referenceId": "2cce7b7d-b58a-4466-a006-c79297281321"
}
]
}
}
{
"id": "mosip.abis.identify",
"requestId": "01234567-89AB-CDEF-0123-456789ABCDEF",
"responsetime": "2020-03-29T07:01:24.692Z",
"returnValue": "1",
"candidateList": {
"count": "1",
"candidates": [
{
"referenceId": "7acce7b7d-b58a-4466-a006-c79297281456",
"analytics": {
//internalScore is an example and not prescribed
"internalScore": "112",
//confidence is an example and not prescribed
"confidence": "90",
//there can be more following this
"key1": "value1",
"key2": "value2"
},
// modality wise analytics
"modalities": [
{
"biometricType": "FIR",
"analytics": {
"confidence": "90",
"internalScore": "112",
"key1": "value1",
"key2": "value2"
}
},
{
"biometricType": "IIR",
"analytics": {
"confidence": "90",
"internalScore": "112",
"key1": "value1",
"key2": "value2"
}
},
{
"biometricType": "FID",
"analytics": {
"confidence": "90",
"internalScore": "112",
"key1": "value1",
"key2": "value2"
}
}
]
}
]
"analytics": {
//This is a optional section
//Data in this section can be agreed upon between the MOSIP adopter and the ABIS Provider
}
}
}
All ABIS operations are via. a message queue and are asynchronous. The data sent in ABIS can be byte array or text based on a configure in registration processor.
Parameters
Common Parameters
Standard Return Codes
Failure Reasons
ABIS Operations
Insert
Request and Response Structre for Insert
Reference URL
The P12 file for the above encrypted CBEFF file is available here: cbeff.p12.
The other details for the p12 file are:
certificate.keystore=PKCS12
certificate.alias=cbeff
certificate.password=password
The structure of the encrypted data downloaded from referenceURL in MOSIP 1.1.5.5 or prior versions
The data downloaded would be base64 encoded. Hence, after decoding the data will be in the below format. It will be divided in two Parts after splitting using #KEY_SPLITTER#.
Block 1:
Block 1, i.e. the encrypted key data is again split into two parts,
The first part is the Certificate Thumbprint i.e. the key identifier which is the first 32 bytes in Block 1.
The second part is the Encrypted Random AES Key which is encrypted with RSA OAEP - SHA256-MFG1. This cosistutes the remaining 256 bytes of Block 1.
Block 2:
Block 2, i.e. the encrypted actual data is again split into two parts,
The 1st part is the Encrypted data, encrypted using AES GCM PKCS5Padding.
The 2nd part is IV/Nonce i.e. the last 32 bytes appended after encrypted data.
The structure of the encrypted data downloaded from referenceURL in MOSIP 1.2.0 or later versions
The data downloaded would be URL safe base64 encoded. Hence, after decoding the data will be in the below format. It will be divided in two Parts after splitting using #KEY_SPLITTER#.
Block 1:
Block 1, i.e. the encrypted key data is again split into three parts,
The 1st part is VER_BYTES (version bytes). The Current version constant is set as VER_R2 and this is present in the first 6 bytes of Block 1.
The 2nd part is the Certificate Thumbprint i.e. the key identifier which is present in the next 32 bytes after VER_BYTES.
The 3rd part is the Encrypted Random AES Key, encrypted with the RSA OAEP - SHA256-MFG1. This cosistutes the remaining 256 bytes of Block 1.
Block 2:
Block 2, i.e. the encrypted actual data is again split into two parts,
The 1st part is the random 32 bytes which will be used as AAD in AES encryption(first 32 bytes). From this 32 bytes AAD data, the first 12 bytes is IV/Nonce.
The 2nd part is the encrypted data which is encrypted using AES GCM PKCS5Padding.
Please note that, for all the functional failures MOSIP sends response code as 200.
Identify
We are not using the referenceURL in Identify request for our current implementation. Hence, it will be an empty string for Identify request. MOSIP adopters can have customized work-flows where the referenceURL can be used.
The objective of this specification document is to establish the technical and compliance standards/ protocols that are necessary for a biometric device to be used in MOSIP solutions.
Target Audience
This is a biometric device specification document and aims to help the biometric device manufacturers, their developers, and their designers in building MOSIP-compliant devices. It is assumed that the readers are familiar with MOSIP registration and authentication services.
MOSIP Devices
All devices that collect biometric data for MOSIP should operate within the specification of this document.
Revision History
Version
State
Date
Changes
Device Provider - An entity that manufactures or imports the devices in their name. This entity should have legal rights to obtain an organization-level digital certificate from the respective authority in the country.
FTM Provider - An entity that manufactures or guarantees the trustworthiness of the foundational trust module. This can be the device provider as well.
Device - A hardware capable of capturing biometric information.
The MOSIP device specification provides compliance guidelines devices for that to work with MOSIP. The compliance is based on device capability, trust and communication protocols. A MOSIP-compliant device would follow the standards established in this document. It is expected that the devices are compliant with this specification and tested and validated. The details of each of these are outlined in the subsequent sections.
The MOSIP-compliant device is expected to perform the following,
Should have the ability to collect one or more biometric
Should have the ability to sign the captured biometric image or template.
Should have the ability to protect secret keys
For details about biometric data specifications please view the page .
We recommend that countries look at ergonomics, accessibility, ease of usage, and common availability of devices while choosing devices for use in registration and authentication scenarios.
MOSIP-compliant devices provide a trusted environment for the devices to be used in registration, KYC and AUTH scenarios. The trust level is established based on the device support for trusted execution.
L1 - The trust is provided by a secure chip with a secure execution environment.
L0 - The trust is provided at the software level. No hardware-related trust exists. This type of compliance is used in controlled environments.
The foundational trust module would be created using a secure microprocessor capable of performing all required biometric processing and secure storage of keys. The foundational device trust would satisfy the below requirements.
The module can securely generate, store and process cryptographic keys.
Generation of asymmetric keys and symmetric keys with TRNG.
The module can protect keys from extraction.
The foundational device trust derived from this module is used to enable trust-based computing for biometric capture. The foundational device trust module provides a trusted execution environment based on the following:
Secure Boot
Ability to cryptographically verify code before execution.
Ability to check for integrity violations of the module/device.
The FTM should have at least one of the following certifications in each category to meet the given requirement.
Category: Cryptographic Algorithm Implementation
CAVP (RSA, AES, SHA256, TRNG (DRBGVS), ECC)
Category: FTM Chip
(ONE of the following certifications)
FIPS 140-2 L3 or above
PCI PTS 5 or above (Pre-certified)
PCI - PED 2.0 or above (Pre-Certified)
System/Device Level Tamper (optional)
System/Device Level Tamper Responsiveness is recommended (not mandatory). In this case, FTM should be capable of showcasing Tamper Responsiveness (keys must be erased) against a tamper at the system/device level.
The FTM should protect against the following threats.
Hardware cloning attacks - Ability to protect against attacks that could result in a duplicate with keys.
Hardware Tamper attacks
Physical tamper - No way to physically tamper and obtain its secrets.
Upon FTM provider approval by the MOSIP adopters, the FTM provider would submit a self-signed public certificate to the adopter. Let us call this the FTM root. The adopter would use this certificate to seed their device's trust database. The FTM root and their key pairs should be generated and stored in FIPS 140-2 Level 3 or more compliant devices with no possible mechanism to extract the keys. The foundational module upon its first boot is expected to generate a random asymmetric key pair and provide the public part of the key to obtain a valid certificate. The FTM provider would validate to ensure that the chip is unique and would issue a certificate with the issuer set to an FTM certificate chain. The entire certificate issuance would be in a secured provisioning facility. Auditable upon notice by the adopters or its approved auditors. The certificate issued to the module will have a defined validity period as per the MOSIP certificate policy document defined by the MOSIP adopters. This certificate and private key within the FTM chip is expected to be in its permanent memory.
MOSIP devices are most often used to collect biometrics. The devices are expected to follow the specification for all levels of compliance and their usage. The MOSIP devices fall under the category of Trust Level 3 (TL3) as defined in MOSIP architecture. At TL3 device is expected to be whitelisted with a fully capable PKI and secure storage of keys at the hardware.
L0 - A device can obtain L0 certification when it uses a software-level cryptographic library with no secure boot or FTM. These devices will follow different device identities and the same would be mentioned as part of exception flows.
L1 - A device can obtain L1 certification when it is built in a secure facility with one of the certified FTM.
All devices that connect to MOSIP must be identifiable. MOSIP believes in cryptographic Identity as its basis for trust.
Physical ID
An identification mark that shows MOSIP compliance and a readable unique device serial number (minimum of 12 alphanumeric characters) make and model. The same information has to be available over a 2D QR Code or Barcode. This is to help field support and validation.
Digital ID
A digital device ID in MOSIP would be a signed JSON (RFC 7515) as follows:
Signed with the JSON Web Signature (RFC 7515) using the "Foundational Trust Module" Identity key, this data is the fundamental identity of the device. Every MOSIP-compliant device will need the foundational trust module.
The only exception to this rule is for the L0-compliant devices that have the purpose of "Registration". L0 devices would sign the Digital Id with the device key.
A signed digital ID would look as follows:
The header in the digital id would have:
MOSIP assumes that the first certificate in the x5c is the FTM's chip public certificate issued by the FTM root certificate.
An unsigned digital ID would look as follows:
Payload is the Digital ID JSON object.
Accepted Values for Digital ID
Parameters
Description
List of keys used in the device and their explanation.
Device Key
Each biometric device would contain an authorized private key after the device registration. This key is rotated frequently based on the requirement of the respective adopter of MOSIP. By default, MOSIP recommends a 30-day key rotation policy for the device key. The device keys are created by the device providers inside the FTM during a successful registration. The device keys are used for signing the biometric. More details of the signing and its usage will be . This key is issued by the device provider and the certificate of the device key is issued by the device provider key which in turn is issued by the MOSIP adopter after approval of the device provider's specific model.
FTM Key
The FTM key is the root of the identity. This key is created by the FTM provider during the manufacturing/provisioning stage. This is a permanent key and would never be rotated. This key is used to sign the Digital ID.
MOSIP Key
The MOSIP key is the public key provided by the MOSIP adopter. This key is used to encrypt the biometric. Details of the encryption are listed below. We recommend rotating this key every 1 year.
The section explains the necessary details of the biometric device connectivity, accessibility, discover-ability and protocols used to build and communicate with the device.
The device should implement only the following set of APIs. All the APIs are independent of the physical layer and the operating system, with the invocation being different across operating systems. While the operating system names are defined in this spec a similar technology can be used for unspecified operating systems. It is expected that the device service ensures that the device is connected locally to the host.
Device discovery would be used to identify MOSIP-compliant devices in a system by the applications. The protocol is designed as a simple plug-and-play with all the necessary abstractions to the specifics.
type - "Biometric Device", "Finger", "Face", "Iris"
Parameters
Description
All the device API will be based on the HTTP specification. The device always binds to any of the available ports ranging from 4501 - 4600. The IP address used for binding has to be 127.0.0.1 and not localhost.
The applications that require access to MOSIP devices could discover them by sending the HTTP request to the supported port range. We will call this port the device_service_port in the rest of the document.
HTTP Request:
HTTP Response:
For details on android specifications please view the section - .
The device information API would be used to identify the MOSIP-compliant devices and their status by the applications.
NA
NA
So the API would respond in the following format.
Parameters
Description
The applications that require more details of the MOSIP devices could get them by sending the HTTP request to the supported port range. The device always binds to any of the available ports ranging from 4501 - 4600. The IP address used for binding has to be 127.0.0.1 and not localhost.
HTTP Request:
HTTP Response:
For details on android specifications please view the section - .
The capture request would be used to capture a biometric from MOSIP-compliant devices by the applications. The captured call will respond with success to only one call at a time. So, in case of a parallel call, the device info details are sent with the status "Busy".
Parameters
Description
NFIQ v1.0 on a scale of 0-100 (quality score).
Scale
NFIQ v1.0
Parameters
Description
The entire data object is sent in JWT format. So, the data object will look like this:
The applications that require capturing biometric data from a MOSIP device could do so by sending the HTTP request to the supported port range.
HTTP Request:
HTTP Response:
For details on android specifications please view the section - .
The device would open a stream channel to send live video streams. This would help when there is an assisted operation to collect biometrics. Please note the stream APIs are available only for the registration environment.
Used only for registration module-compatible devices. This API is visible only for the devices that are registered for the purpose of "Registration".
Parameters
Description
Live Video stream with a quality of 3 frames per second or more using .
The applications that require more details of the MOSIP devices could get them by sending the HTTP request to the supported port range.
HTTP Request:
HTTP Response: HTTP Chunk of frames to be displayed. Minimum frames 3 per second.
For details on android specifications please view the section - .
The registration client application will discover the device. Once the device is discovered the status of the device is obtained with the device info API. During the registration, the registration client sends the RCAPTURE API and the response will provide the actual biometric data in a digitally signed non-encrypted form. When the Device Registration Capture API is called the frames should not be added to the stream. The device is expected to send the images in ISO format.
The requestedScore is on a scale of 1-100 (NFIQ v2.0 for fingerprints). So, in cases where you have four fingers the average of all will be considered for the capture threshold. The device would always send the best frame during the capture time even if the requested score is not met.
The API is used by devices that are compatible with the registration module. This API should not be supported by devices that are compatible with authentication.
Parameters
Description
Parameters
Description
The applications that require more details of the MOSIP devices could get them by sending the HTTP request to the supported port range.
HTTP Request:
HTTP Response: HTTP response.
For details on android specifications please view the section - .
The MOSIP server would provide the following retrieve encryption certificate API which is white-listed to the management servers of the device provider or their partners.
POST https://{base_url}/v1/masterdata/device/encryptioncertficates
Version: v1
The request is sent in a JWT format. So the final request will look like this:
The entire response is sent in a JWT format. So the final response will look like this:
The management server has the following objectives.
Validate the devices to ensure they genuine devices from the respective device provider. This can be achieved using the device info and the certificates for the Foundational Trust Module.
Register the genuine device with the MOSIP device server.
Manage/Sync time between the end device and the server. The time to be synced should be the only trusted time accepted by the device.
The management client is the interface that connects the device with the respective management server. The communication between the management server and its clients must be designed with scalability, robustness, performance and security. The management server may add many more capabilities than what is described here, But the basic security objectives should be met at all times irrespective of the offerings.
For better and more efficient handling of the device at large volumes, we expect the devices to auto-register to the Management Server.
All communication to the server and from the server should follow the below properties.
All communication is digitally signed with the approved algorithms
L1 Certified Device / L1 Device - A device certified as capable of performing encryption on the device inside its trusted zone.
L0 Certified Device / L0 Device - A device certified as one where the encryption is done on the host inside its device driver or the MOSIP device service.
Secure provisioning applies to both the FTM and the Device providers.
The devices and FTM should have a mechanism to protect against fraudulent attempts to create or replicate.
The device and FTM trust should be programmed in a secure facility that is certified by the respective MOSIP adopters.
The organization should have a mechanism to segregate the FTMs and Devices built for MOSIP using a cryptographically valid and repeatable process.
API
Compatible
Supported algorithms:
Usage
Algorithm
Key Size
Storage
In all the above APIs, some of the requests and responses are signed with various keys to verify the requester's authenticity. Here we have detailed the key used for signing a particular block in a request or response body of various APIs.
Request/Response
Block
Signature Key
This section explains the mechanism for the SBI devices to communicate in the android operating system.
Draft document V 0.9
Discovery will return the appId of the discovered items. Users will be given a choice to choose one of the discovered SBI app. The selected app responds back to the intent using the default intent callback functionality.
Request: io.sbi.device
action: io.sbi.device
data: no change
type: application/json
Request Schema: No change in the data structure. The serialized request data as byte array is set in the intent extras with the key as “input”.
Response Schema: No change in the data structure. The serialized response data (byte array) is set in the intent extras with the key as “response”.
callbackId should be set to the appId, and can not be empty in android.
Request: appId.Info
action: appId.Info
data: no change
type: application/json
Request Schema: No change in the data structure. The serialized request data as a byte array is set in the intent extras with the key as “input”.
Response Schema: No change in the data structure. The serialized response data as a byte array is set in the intent extras with the key as “response”.
deviceInfo: callbackId should be set to the appId, can not be empty in android.
Request: appId.Capture
action: appId.Capture
data: no change
type: application/json
flag: FLAG_GRANT_READ_URI_PERMISSION
Request Schema: No change in the data structure. The serialized request data as a byte array is set in the intent extras with the key as “input”.
Response Schema: No change in the data structure. The response content is set as content URI “content://authority/path/id” in the intent extras as a string with the key as “response”.
URI must be invalidated right after the read.
Request: appId.rCapture
action: appId.rCapture
data: no change
type: application/json
flag: FLAG_GRANT_READ_URI_PERMISSION
Request Schema: No change in the data structure. The serialized request data as a byte array is set in the intent extras with the key as “input”.
Response Schema: No change in the data structure. The response content is set as content URI “content://authority/path/id” in the intent extras as a string with the key as “response”.
The content provider should not support insert, update, delete
On receiving rCapture request MDS must show the stream within its UI in the foreground.
Ensure to set the correct authority in the manifest and set the android:exported as “False”
Android 9 (API Level 28) and above with hardware-backed key store.
Code
Message
13-Jun-2020
0.9.5
Draft
10-Aug-2020
Signature for API to retrieve encryption certificate has been changed from GET to POST and Device Stream now supports an optional parameter - timeout
0.9.5
Draft
04-Dec-2020
In the header of JWT Signature, the key to store the type has been changed to "typ" from "type" as per JWT standards. Kindly view the digital id specification for the change.
0.9.5
Draft
26-Feb-2021
Updated the to include PCI PED 2.0 and CC.
0.9.5
Draft
24-Mar-2021
The reference to L2 devices has been removed from this document.
The biometric specification listed here has been moved to a new section and the old specification is now in for reference.
0.9.5
Draft
07-Apr-2021
Device De registration API spec was updated.
0.9.5
Draft
08-Apr-2021
We will be following datetime values in ISO 8601 with format yyyy-mm-ddTHH:MM:ssZ. The same has been updated throughout the document.
0.9.5
Draft
24-May-2021
Clarification on hash and previousHash definition has been provided
0.9.5
Draft
04-Apr-2022
Register and De-register of devices have been removed from MOSIP. Device validation in MOSIP will be done via cryptography. Here onwards, registering a device will mean a device obtaining a certificate from the management server.
0.9.5
Draft
27-Jul-2022
Added the section on
0.9.5
Draft
24-Oct-2023
Added error code for devices in busy or not ready state. Also added validation for transactionID in request parameters.
L1 Certified Device / L1 Device - A device certified as capable of performing encryption in line with this spec in its trusted zone.
L0 Certified Device / L0 Device - A device certified as one where the encryption is done on the host machine device driver or the MOSIP device service.
FTM Provider Certificate - A digital certificate issued to the "Foundational Trust Provider". This certificate proves that the provider has successfully gone through the required Foundational Trust Provider evaluation. The entity is expected to keep this certificate in secure possession in an HSM. All the individual FTM trust certificates are issued using this certificate as the root. This certificate would be issued by the countries in conjunction with MOSIP.
Device Provider Certificate - A digital certificate issued to the "Device Provider". This certificate proves that the provider has been certified for L0/L1 respective compliance. The entity is expected to keep this certificate in secure possession in an HSM. All the individual trust certificates are issued using this certificate as the root. This certificate is issued by the countries in conjunction with MOSIP.
Registration - The process of applying for a Foundational Id.
KYC - Know Your Customer. The process of providing consent to perform profile verification and update.
Auth - The process of verifying one’s identity.
FPS - Frames Per Second
Management Server - A server run by the device provider to manage the life cycle of the biometric devices.
Device Registration - The process of a device obtaining a certificate from the management server.
Signature - All signatures should be as per RFC 7515.
header in signature - The header in the signature means the attribute with "alg" set to RS256 and x5c set to base64encoded certificate.
payload is the byte array of the actual data, always represented as base64urlencoded.
signature - base64urlencoded signature bytes
ISO format timestamp | ISO 8601 with the format yyyy-mm-ddTHH:MM:ssZ (Example: 2020-12-08T09:39:37Z). This value should be in UTC (Coordinated Universal Time).
Should have no mechanism to inject the biometric
The module has to protect the keys from physical tampering, temperature, frequency and voltage-related attacks.
The module could withstand Hardware cloning.
The module could withstand probing attacks
The module provides memory segregation for cryptographic operations and protection against buffer overflow attacks
The module provides the ability to withstand cryptographic side-channel attacks like Differential Power analysis attacks, Timing attacks.
CAVP validated the implementation of the cryptographic algorithm.
The module can perform a cryptographically validatable secure boot.
The module can run trusted applications.
Halt upon failure.
Ability to securely upgrade and perform forward-only upgrades, to thwart downgrade attacks.
SHA256 hash equivalent or above should be used for all hashing requirements
All root of trust is provisioned upon first boot or before.
All upgrades would be considered a success only after the successful boot with proper hash and signature verification.
The boot should fail upon hash/signature failures and would never operate in an intermediary state.
A maximum of 10 failed attempts should lock the upgrade process and brick the device. However, chip manufacturers can decide to be less than 10.
Secure application
Ability to run applications that are trusted.
Protect against the downgrading of applications.
Isolated memory to support cryptographic operations.
All trust is anchored during the first boot and not modifiable.
One of the following Common Criteria (CC) certification
Voltage & frequency related attacks - Should shield against voltage leaks and should prevent low voltage. The FTM should always be in either the state operational normally or inoperable. The FTM should never be operable when its input voltages are not met.
Temperature attacks on the crypto block - Low or High the FTM are expected to operate or reach an inoperable state. No state in between.
Differential Power Analysis attack.
Probing attacks - FTM should protect its surface area against any probe-related attacks.
Segregation of memory for execution of cryptographic operation (crypto block should be protected from buffer overflow type attacks).
Vulnerability of the cryptographic algorithm implementation.
Attacks against secure boot & secure upgrade.
TEE/Secure processor OS attack (if applicable).
type
Currently allowed values for device type are "Finger", "Iris" or "Face".
More types can be added based on Adopter's implementation.
deviceSubType
The device subtype is based on the device type.
For Finger - "Slap", "Single" or "Touchless"
For Iris - "Single" or "Double"
deviceProvider
Name of the device provider.
The device provider should be a legal entity in the country.
dateTime
The current time during the issuance of the request.
This is in ISO format.
deviceId
Internal ID to identify the actual biometric device within the device service.
deviceSubId
Allowed values are 1, 2 or 3.
The device sub-id could be used to enable a specific module in the scanner appropriate for a biometric capture requirement.
Device sub id is a simple index which always starts with 1 and increases sequentially for each sub-device present.
callbackId
This differs as per the OS.
In the case of Linux and windows operating systems, it is an HTTP URL.
In the case of android, it is the intent name.
digitalId
Digital ID as per the Digital ID definition but it will not be signed.
deviceCode
Same as serialNo in digital ID.
specVersion
An array of supported MDS specification versions. The array element zero will always contain the spec version using which the response is created.
purpose
Purpose of the device in the MOSIP ecosystem. Allowed values are "Auth" or "Registration".
error
Relevant errors as defined under the of this document.
error.errorCode
A standardized error code is defined in the .
error.errorInfo
Description of the error that can be displayed to the end user. Multi-lingual support.
deviceInfo.firmware
The exact version of the firmware.
In the case of L0, this is the same as serviceVersion.
deviceInfo.certification
Allowed values are "L0" or "L1" based on the level of certification.
deviceInfo.serviceVersion
The version of the MDS specification that is supported.
deviceInfo.deviceId
Internal ID to identify the actual biometric device within the device service.
deviceSubId
Allowed values are 1, 2 or 3.
The device sub-id could be used to enable a specific module in the scanner appropriate for a biometric capture requirement.
Device sub id is a simple index which always starts with 1 and increases sequentially for each sub-device present.
deviceInfo.callbackId
This differs as per the OS.
In the case of Linux and windows operating systems, it is an HTTP URL.
In the case of android, it is the intent name.
deviceInfo.digitalId
The digital id is as per the digital id definition.
For L0 devices which is not registered, the digital id will be unsigned.
For L0 devices which are registered, the digital id will be signed using the device key.
deviceInfo.env
The target environment.
For devices that are not registered the environment is "None".
For a device that is registered, then send the environment in which it is registered.
deviceInfo.purpose
The purpose of the device in the MOSIP ecosystem.
For devices that are not registered the purpose is empty.
Allowed values are "Auth" or "Registration".
deviceInfo.specVersion
An array of supported MDS specification versions. The array element Zero will always contain the spec version using which the response is created.
error
Relevant errors as defined under the of this document.
error.errorCode
A standardized error code is defined in the .
error.errorInfo
Description of the error that can be displayed to the end user. Multi-lingual support.
timeout
Max time the app will wait for the capture.
It's expected that the API will respond back before the timeout with the best frame.
All timeouts are in milliseconds.
captureTime
Time of capture in ISO format.
The time is as per the requested application.
domainUri
URI of the authentication server.
This can be used to federate across multiple providers or countries or unions.
transactionId
Unique Id of the transaction.
This is an internal Id to the application that's requesting a capture.
Different IDs should be used for every request.
bio.type
Allowed values are "Finger", "Iris" or "Face".
bio.count
The number of biometric data that is collected for a given type.
The device should validate and ensure that this number is in line with the type of biometric that's captured.
Upon reaching the quality score the biometric device is expected to auto-capture the image. If the requested score is not met, until the timeout, the best frame during the capture sequence must be captured/returned. This value will be scaled from 0 - 100 for NFIQ v1.0. The logic for scaling is mentioned below.
bio.deviceId
Internal Id to identify the actual biometric device within the device service.
bio.deviceSubId
Allowed values are 1, 2 or 3.
The device sub-id could be used to enable a specific model of the scanner appropriate for a biometric capture requirement.
Device sub id is a simple index that always starts with 1 and increases sequentially for each sub-device present.
bio.previousHash
For the first capture, the previousHash is the SHA256 hash of an empty UTF-8 string. From the second capture the previous capture's "hash" is used as input. This is used to chain all the captures across modalities so all captures have happened for the same transaction and during the same time.
customOpts
In case, the device vendor wants to send additional parameters they can use this to send key-value pairs if necessary.
The values cannot be hard coded and have to be configured by the app's server and should be modifiable upon need by the applications.
Vendors are free to include additional parameters and fine-tune the process.
Allowed values are "Staging", "Developer", "Pre-Production" or "Production".
data.domainUri
URI of the authentication server.
This can be used to federate across multiple providers or countries or unions.
data.bioValue
Biometric data is encrypted with a random symmetric (AES GCM) key and base-64-URL encoded. For symmetric key encryption of bioValue, (biometrics.data.timestamp XOR transactoinId) is computed and the last 16 bytes and the last 12 bytes of the results are set as the aad and the IV(salt) respectively. Look at the Authentication document to understand more about encryption.
data.transactionId
Same transactionId shared in the request should be used.
data.timestamp
Time as per the biometric device.
Note: The biometric device is expected to sync its time from the management server at regular intervals so accurate time could be maintained on the device.
data.requestedScore
Floating point number to represent the minimum required score for the capture. This value will be scaled from 0 - 100 for NFIQ v1.0. The logic for scaling is mentioned above.
data.qualityScore
The floating point number represents the score for the current capture. This value will be scaled from 0 - 100 for NFIQ v1.0. The logic for scaling is mentioned above.
hash
sha256 in hex format in upper case (previous "hash" + sha256 hash of the current biometric ISO data before encryption)
sessionKey
The session key (used for the encryption of the biodata (ISO)) is encrypted using the MOSIP public certificate with RSA/ECB/OAEPWITHSHA-256ANDMGF1PADDING algorithm and then encode the encrypted session key with base64 URL safe encoding.
thumbprint
SHA256 representation of the certificate (HEX encoded) that was used for encryption of the session key. All texts are to be treated as uppercase without any spaces or hyphens.
error
Relevant errors as defined under the of this document.
error.errorCode
Standardized error code defined in the .
error.errorInfo
Description of the error that can be displayed to the end-user. Multi-lingual support.
timeout
Max time the app will wait for the capture.
Its expected that the API will respond back before timeout with the best frame.
All timeouts are in milliseconds.
captureTime
Time of capture in ISO format.
The time is as per the requesting application.
transactionId
Unique Id of the transaction.
This is an internal Id to the application that's requesting a capture.
Different IDs should be used for every request.
bio.type
Allowed values are "Finger", "Iris" or "Face".
bio.count
Number of biometric data that is collected for a given type.
The device should validate and ensure that this number is in line with the type of biometric that's captured.
bio.bioSubType
Array of bioSubType for respective biometric type.
Upon reaching the quality score the biometric device is expected to auto capture the image.
bio.deviceId
Internal Id to identify the actual biometric device within the device service.
bio.deviceSubId
Allowed values are 1, 2 or 3.
The device sub id could be used to enable a specific module in the scanner appropriate for a biometric capture requirement.
Device sub id is a simple index that always starts with 1 and increases sequentially for each sub-device present.
bio.previousHash
For the first capture the previousHash is the SHA256 hash of an empty UTF-8 string. From the second capture the previous capture's "hash" is used as input. This is used to chain all the captures across modalities so all captures have happened for the same transaction and during the same time.
customOpts
In case, the device vendor wants to send additional parameters they can use this to send key value pair if necessary.
The values cannot be hard coded and have to be configured by the apps server and should be modifiable upon need by the applications.
Vendors are free to include additional parameters and fine-tuning the process.
data.digitalId
The digital id as per the digital id definition in JWT format.
For L0 devices, the digital id will be signed using the device key.
For L1 devices, the digital id will be signed using the FTM key.
Allowed values are "Staging", "Developer", "Pre-Production" or "Production".
data.purpose
The purpose of the device in the MOSIP ecosystem.
Allowed values are "Auth" or "Registration".
data.bioValue
Base64-URL-encoded biometrics (in ISO format)
data.transactionId
Same transactionId shared in the request should be used.
data.timestamp
Time as per the biometric device.
Note: The biometric device is expected to sync its time from the management server at regular intervals so accurate time could be maintained on the device.
data.requestedScore
Floating point number to represent the minimum required score for the capture.
data.qualityScore
Floating point number representing the score for the current capture.
hash
sha256 in hex format in upper case (previous "hash" + sha256 hash of the current biometric ISO data).
error
Relevant errors as defined under the of this document.
error.errorCode
Standardized error code defined in the .
error.errorInfo
Description of the error that can be displayed to end user. Multi lingual support.
Ability to issue commands to the end device for
De-registration of the device (Device Keys)
Collect device information to maintain, manage, support and upgrade a device remotely.
A central repository of all the approved devices from the device provider.
Safe storage of keys using HSM FIPS 140-2 Level 3. These keys are used to issue the device certificate upon registration. The Management Server is created and hosted by the device provider outside of MOSIP software. The communication protocols between the MDS and the Management Server can be decided by the respective device provider. Such communication should be restricted to the above-specified interactions only. No transactional information should be sent to this server.
Should have the ability to push updates from the server to the client devices.
All communication to the server is encrypted using one of the approved public key cryptography (HTTPS – TLS1.2/1.3 is required with one of the approved algorithms.
All request has timestamps attached in ISO format to the milliseconds inside the signature.
All communication back and forth should have the signed digital id as one of the attributes.
It's expected that auto-registration has an absolute way to identify and validate the devices.
The management client should be able to detect the devices in a plug-and-play model.
All key rotations should be triggered from the server.
Should have the ability to detect if it's speaking to the right management server.
All upgrades should be verifiable and the client should have the ability to verify software upgrades.
Should not allow any downgrade of software.
Should not expose any API to capture biometrics. The management server should have no ability to trigger a capture request.
No logging of biometric data is allowed. (Both in the encrypted and unencrypted format)
All debug options within the FTM or device should be disabled permanently
All key creations need for provisioning should happen automatically using FIPS 140-2 Level 3 or higher devices. No individual or group or organization should have a mechanism to influence this behaviour.
Before the devices/FTM leaves the secure provisioning facility all the necessary trust should be established and should not be re-programmable.
Registration Capture
L0/L1
RSA OAEP
>=2048
FTM trusted memory
Encryption session key data outside of FTM
ECC curve 25519
>=256
FTM trusted memory
Biometric Signature
RSA
>=2048
Key never leaves FTM created and destroyed
Biometric Signature
ECC curve 25519
>=256
Key never leaves FTM created and destroyed
Secure Boot
RSA
>=256
FTM trusted memory
Secure Boot
ECC curve 25519
>=256
FTM trusted memory
NA as it will not be signed
Device Info Response
Device Info
NA in case of unregistered device
Device Key in case of registered device
Device Info Response
Digital ID
For L0 device using device key
For L1 device using FTM chip key
Capture Response
Data
Device key is used
Capture Response
Digital ID
FTM chip key is used
Registration Capture Response
Data
Device key is used
Registration Capture Response
Digital ID
For L0 device using device key
For L1 device using FTM chip key
102
Technical error during extraction.
103
Device tamper detected
104
Unable to connect to the management server
105
Image orientation error
106
Device not found
107
Device public key expired
108
Domain public key missing
109
Requested number of biometric (Finger/IRIS) not supported
110
Device is not ready
111
Device is Busy
112
Invalid Transaction ID
5xx
Custom errors. The device provider is free to choose his error code and error messages.
0.9.2
Frozen
Aug-2019
0.9.3
Frozen
Feb-2020
0.9.5
{
"serialNo": "Serial number",
"make": "Make of the device",
"model": "Model of the device",
"type": "Type of the biometric device",
"deviceSubType": "Subtypes of the biometric device",
"deviceProvider": "Device provider name",
"deviceProviderId": "Device provider id",
"dateTime": "Current datetime in ISO format"
}
"alg": "RS256",
"typ": "JWT",
"x5c": "<Certificate of the FTM chip, If in case the chain of certificates are sent then the same will be ignored">
"digitalId": "base64urlencoded(payload)"
serialNo
Serial number of the device.
This value should be same as printed on the device (Refer Physical ID).
make
Brand name.
This value should be the same as printed on the device (Refer to Physical ID).
model
{
"type": "type of the device"
}
[
{
"deviceId": "Internal ID",
"deviceStatus": "Device status",
"certification": "Certification level",
"serviceVersion": "Device service version",
"deviceSubId": ["Array of supported device sub Ids"],
"callbackId": "Base URL to reach the device",
"digitalId": "Unsigned Digital ID of the device",
"deviceCode": "Same as serialNo in digital ID",
"specVersion": ["Array of supported MDS specification version"],
"purpose": "Auth or Registration or empty if not registered",
"error": {
"errorCode": "101",
"errorInfo": "Invalid JSON Value Type For Discovery.."
}
},
...
]
deviceStatus
Allowed values are "Ready", "Busy", "Not Ready" or "Not Registered".
Error codes should be sent for device in "Busy", "Not Ready" and "Not Registered" from the below error code section.
certification
Allowed values are "L0" or "L1" based on the level of certification.
HTTP/1.1 200 OK
CACHE-CONTROL:no-store
LOCATION:http://127.0.0.1:<device_service_port>
Content-Length: length in bytes of the body
Content-Type: application/json
Connection: Closed
[
{
"deviceInfo": {
"deviceStatus": "Current status",
"deviceId": "Internal ID",
"firmware": "Firmware version",
"certification": "Certification level",
"serviceVersion": "Device service version",
"deviceSubId": ["Array of supported device sub Ids"],
"callbackId": "Baseurl to reach the device",
"digitalId": "Signed digital id as described in the digital id section of this document.",
"deviceCode": "Same as serialNo in digital ID",
"env": "Target environment",
"purpose": "Auth or Registration",
"specVersion": ["Array of supported MDS specification version"],
},
"error": {
"errorCode": "101",
"errorInfo": "Invalid JSON Value "
}
}
...
]
[
{
"deviceInfo": "base64urlencode(header).base64urlencode(payload).base64urlencode(signature)"
"error": {
"errorCode": "100",
"errorInfo": "Device not registered. In this case, the device info will be only base64urlencode(payload)"
}
}
]
deviceInfo
The deviceInfo object is sent as JSON Web Token (JWT).
For a device which is not registered, the deviceInfo will be unsigned.
For a device which is registered, the deviceInfo will be signed using the device key.
deviceInfo.deviceStatus
This is the status of the device.
Allowed values are "Ready", "Busy", "Not Ready" or "Not Registered".
Error codes should be sent for device in "Busy", "Not Ready" and "Not Registered" from the below error code section.
HTTP/1.1 200 OK
CACHE-CONTROL:no-store
LOCATION:http://127.0.0.1:<device_service_port>
Content-Length: length in bytes of the body
Content-Type: application/json
Connection: Closed
{
"env": "Target environment",
"purpose": "Auth or Registration",
"specVersion": "Expected version of the MDS spec",
"timeout": "Timeout for capture",
"captureTime": "Capture request time in ISO format",
"domainUri": "URI of the auth server",
"transactionId": "Transaction Id for the current capture",
"bio": [
{
"type": "Type of the biometric data",
"count": "Finger/Iris count, in case of face max, is set to 1",
"bioSubType": ["Array of subtypes"],
"requestedScore": "Expected quality score that should match to complete a successful capture",
"deviceId": "Internal Id",
"deviceSubId": "Specific Device Sub Id",
"previousHash": "Hash of the previous block"
}
],
"customOpts": {
//Max of 50 key-value pairs. This is so that vendor-specific parameters can be sent if necessary. The values cannot be hardcoded and have to be configured by the apps server and should be modifiable upon need by the applications. Vendors are free to include additional parameters and fine-tuning parameters. None of these values should go undocumented by the vendor. No sensitive data should be available in the customOpts.
}
}
env
The target environment.
Allowed values are "Staging", "Developer", "Pre-Production" or "Production".
purpose
The purpose of the device in the MOSIP ecosystem.
For devices that are not registered the purpose is empty.
Allowed values are "Auth" or "Registration".
specVersion
81 - 100
1
61 - 80
2
41 - 60
{
"biometrics": [
{
"specVersion": "MDS spec version",
"data": {
"digitalId": "digital Id as described in this document",
"deviceCode": "Same as serialNo in digital ID",
"deviceServiceVersion": "MDS version",
"bioType": "Finger",
"bioSubType": "UNKNOWN",
"purpose": "Auth or Registration",
"env": "Target environment",
"domainUri": "URI of the auth server",
"bioValue": "Encrypt biodata (ISO) with random 256-bit AES key (session key) and encode encrypted biodata with base64 URL safe encoding.",
"transactionId": "Unique transaction id",
"timestamp": "Capture datetime in ISO format",
"requestedScore": "Floating point number to represent the minimum required score for the capture",
"qualityScore": "Floating point number representing the score for the current capture"
},
"hash": "sha256 in hex format in upper case (previous "hash" + sha256 hash of the current biometric ISO data before encryption)",
"sessionKey": "Encrypt the session key (used to encrypt the bioValue) with MOSIP public key and encode encrypted session key with base64 URL safe encoding.",
"thumbprint": "SHA256 representation of the certificate (HEX encoded) that was used for encryption of session key. All texts to be treated as uppercase without any spaces or hyphens.",
"error": {
"errorCode": "101",
"errorInfo": "Invalid JSON Value"
}
},
{
"specVersion": "MDS spec version",
"data": {
"digitalId": "Digital Id as described in this document",
"deviceCode": "Same as serialNo in digital ID",
"deviceServiceVersion": "MDS version",
"bioType": "Finger",
"bioSubType": "Left IndexFinger",
"purpose": "Auth or Registration",
"env": "target environment",
"domainUri": "URI of the auth server",
"bioValue": "Encrypt biodata (ISO) with random 256-bit AES key (session key) and encode encrypted biodata with base64 URL safe encoding.",
"transactionId": "unique transaction id",
"timestamp": "Capture datetime in ISO format",
"requestedScore": "Floating point number to represent the minimum required score for the capture",
"qualityScore": "Floating point number representing the score for the current capture"
},
"hash": "sha256 in hex format in upper case (previous "hash" + sha256 hash of the current biometric ISO data before encryption)",
"sessionKey": "Encrypt the session key (used to encrypt the biovalue) with MOSIP public key and encode encrypted session key with base64 URL safe encoding.",
"thumbprint": "SHA256 representation of the certificate (HEX encoded) that was used for encryption of session key. All texts to be treated as uppercase without any spaces or hyphens.",
"error": {
"errorCode": "101",
"errorInfo": "Invalid JSON Value"
}
}
]
}
specVersion
The version of the MDS specification using which the response was generated.
data
The data object is sent as JSON Web Token (JWT).
The data block will be signed using the device key.
data.digitalId
"data" : "base64urlencode(header).base64urlencode(payload).base64urlencode(signature)
payload - is defined as the entire byte array of the data block.
HTTP/1.1 200 OK
CACHE-CONTROL:no-store
LOCATION:[http://127.0.0.1](http://127.0.0.1):<device_service_port>
Content-Length: length in bytes of the body
Content-Type: application/json
Connection: Closed
{
"deviceId": "Internal Id",
"deviceSubId": "Specific device sub Id",
"timeout": "Timeout for stream"
}
deviceId
Internal Id to identify the actual biometric device within the device service.
deviceSubId
Allowed values are 1, 2 or 3.
The device sub-id could be used to enable a specific module in the scanner appropriate for a biometric capture requirement.
Device sub id is a simple index which always starts with 1 and increases sequentially for each sub-device present.
In the case of Finger/Iris, it's 1 for left slap/iris, 2 for right slap/iris and 3 for two thumbs/irises.
The device sub id should be set to 0 if we don't know any specific device sub id (0 is not applicable for fingerprint slap).
{
"env": "Target environment",
"purpose": "Auth or Registration",
"specVersion": "Expected MDS spec version",
"timeout": "Timeout for registration capture",
"captureTime": "Time of capture request in ISO format",
"transactionId": "Transaction Id for the current capture",
"bio": [
{
"type": "Type of the biometric data",
"count": "Finger/Iris count, in case of face max, is set to 1",
"bioSubType": ["Array of subtypes"], //Optional
"exception": ["Finger or Iris to be excluded"],
"requestedScore": "Expected quality score that should match to complete a successful capture",
"deviceId": "Internal Id",
"deviceSubId": "Specific device Id",
"previousHash": "Hash of the previous block"
}
],
"customOpts": {
//max of 50 key-value pairs. This is so that vendor-specific parameters can be sent if necessary. The values cannot be hardcoded and have to be configured by the apps server and should be modifiable upon need by the applications. Vendors are free to include additional parameters and fine-tuning parameters. None of these values should go undocumented by the vendor. No sensitive data should be available in the customOpts.
}
}
env
The target environment.
Allowed values are "Staging", "Developer", "Pre-Production" or "Production".
purpose
The purpose of the device in the MOSIP ecosystem.
For devices that are not registered the purpose is empty.
Allowed values are "Auth" or "Registration".
specVersion
{
"biometrics": [
{
"specVersion": "MDS Spec version",
"data": {
"digitalId": "Digital id of the device as per the Digital Id definition..",
"bioType": "Biometric type",
"deviceCode": "Same as serialNo in digital ID",
"deviceServiceVersion": "MDS version",
"bioSubType": "Left IndexFinger",
"purpose": "Auth or Registration",
"env": "Target environment",
"bioValue": "base64urlencoded biometrics (ISO format)",
"transactionId": "Unique transaction id sent in request",
"timestamp": "2019-02-15T10:01:57Z",
"requestedScore": "Floating point number to represent the minimum required score for the capture. This ranges from 0-100.",
"qualityScore": "Floating point number representing the score for the current capture. This ranges from 0-100."
},
"hash": "sha256 in hex format in upper case (previous "hash" + sha256 hash of the current biometric ISO data)",
"error": {
"errorCode": "101",
"errorInfo": "Invalid JSON Value Type For Discovery.. ex: {type: 'Biometric Device' or 'Finger' or 'Face' or 'Iris' } "
}
},
{
"specVersion": "MDS Spec version",
"data": {
"deviceCode": "Same as serialNo in digital ID",
"bioType": "Finger",
"digitalId": "Digital id of the device as per the Digital Id definition.",
"deviceServiceVersion": "MDS version",
"bioSubType": "Left MiddleFinger",
"purpose": "Auth or Registration",
"env": "Target environment",
"bioValue": "base64urlencoded extracted biometric (ISO format)",
"transactionId": "Unique transaction id sent in request",
"timestamp": "2019-02-15T10:01:57Z",
"requestedScore": "Floating point number to represent the minimum required score for the capture. This ranges from 0-100",
"qualityScore": "Floating point number representing the score for the current capture. This ranges from 0-100"
},
"hash": "sha256 in hex format in upper case (previous "hash" + sha256 hash of the current biometric ISO data)",
"error": {
"errorCode": "101",
"errorInfo": "Invalid JSON Value Type For Discovery.. ex: {type: 'Biometric Device' or 'Finger' or 'Face' or 'Iris' }"
}
}
]
}
specVersion
Version of the MDS specification using which the response was generated.
data
The data object is sent as JSON Web Token (JWT).
The data block will be signed using the device key.
{
"id": "io.mosip.auth.country.certificate",
"version": "certificate server API version as defined above",
"request": {
"data": {
"env": "target environment",
"domainUri": "uri of the auth server"
}
},
"requesttime": "current timestamp in ISO format"
}
env - Allowed values are Staging| Developer| Pre-Production | Production
domainUri - unique uri per auth providers. This can be used to federate across multiple providers or countries or unions.
{
"id": "io.mosip.auth.country.certificate",
"version": "certificate server API version as defined above",
"responsetime": "Current time in ISO format",
"response": [
{
"certificate": "base64encoded certificate as x509 V3 format"
}
]
}
No storage, Key is created with TRNG/DRBG inside FTM
Device Discovery Response
Device Info
NA as it will not be signed
Device Discovery Response
0
Success
100
Device not registered
101
Glossary of Terms
Device Specification
Device Capability
Base Specifications for Devices
Device Trust
Foundational Trust Module (FTM)
Certification
The supported algorithm and curves are listed here
Threats to Protect
Foundational Trust Module Identity
The validity of the chip certificate can not exceed 20 years from the date of manufacturing.
Device
Device Identity
For an L0 unregistered device, the digital id will be unsigned. In all other scenarios, except for a discovery call, the digital ID will be signed either by the chip key (L1) or the device key (L0).
Keys
Device Service - Communication Interfaces
Device Discovery
Device Discovery Request
Accepted Values for Device Discovery Request
"Biometric Device" - is a special type and is used in case you are looking for any biometric device.
Device Discovery Response
Accepted Values for Device Discovery Response
The response is an array that we could have a single device enumerating with multiple biometric options.
The service should ensure to respond only if the type parameter matches the type of device or the type parameter is a "Biometric Device".
This response is a direct JSON as shown in the response.
Windows/Linux
The payloads are JSON in both cases and are part of the body.
CallbackId would be set to the http://127.0.0.1:<device_service_port>/. So, the caller will use the respective HTTP verb/method and the URL to call the service.
Android
Device Info
Device Info Request
Accepted Values for Device Info Request
Device Info Response
Allowed values for Device Info Response
The response is an array that we could have a single device enumerating with multiple biometric options.
The service should ensure to respond only if the type parameter matches the type of device or the type parameter is a "Biometric Device".
Windows/Linux
The payloads are JSON in both cases and are part of the body.
Android
Capture
Capture Request
The count value should be driven by the count of the bioSubType for Iris and Finger. For Face, there will be no bioSubType but the count should be "1".
Allowed Values for Capture Request
Capture Response
Accepted Values for Capture Response
Windows/Linux
The payloads are JSON in both cases and are part of the body.
Android
Device Stream
Device Stream Request
Allowed Values for device Stream Request
Device Stream Response
The preview should have quality markings and segment markings. The preview would also be used to display an error message on the user screen. All error messages should be localized.
Error Response for Device Stream
Windows/Linux
Android
Registration Capture
Registration Capture Request
To capture the exception photo exception value for Iris or Finger should be sent in bio.exception for bio.type = 'Face'. ICAO checks are not mandatory here but one face must be present within the frame.
Accepted Values for Registration Capture Request
Registration Capture Response
Allowed Values for Registration Capture Response
Windows/Linux
Android
Certificates
Retrieve Encryption Certificate Request URL
Retrieve Encryption Certificate Request
Accepted Values for Retrieve Certificate Request
Encryption Certificate Response
Management Server and Management Client
Management Server Functionalities and Interactions
As there is no adopter-specific information being exchanged at the management server or the FTM provisioning server, there are no mandates from MOSIP where these are located globally. However, the adopter is recommended to have an audit and contractual mechanisms to validate the compliance of these components at any point in time.
Management Client
Compliance
Secure Provisioning
As there is no adopter-specific information being exchanged at the management server or the FTM provisioning server, there are no mandates from MOSIP where these are located globally. However, the adopter is recommended to have an audit and contractual mechanisms to validate the compliance of these components at any point in time.*
Upon receiving a request to add Location hierarchy (e.g., Country - Region - Province - City- LAA) with the input parameters (code, name, hierarchy_level, hierarchy_level_name, parent_loc_code ,lang_code and is_active), the system stores the Location hierarchy in the Database
While storing the location hierarchy in the database, the system performs the following steps:
Validates if all required input parameters have been received as listed below for each specific request
code - character (36) - Mandatory
name - character (128) - Mandatory
hierarchy_level - smallint - Mandatory
hierarchy_level_name - character (64) - Mandatory
parent_loc_code - character (32) - Optional
lang_code - character (3) - Mandatory
is_active - boolean - Mandatory
Validate if the Location name received does not already exist in the hierarchy for which the location is getting created
If Location name already exist under the hierarchy level, throw an appropriate error
The API should not allow creation of the Location if the data is not received in default language
If the data for the Location is not received in all the configured languages, the API should allow the Location to be created given the Point 3 is satisfied.
The API should activate the Location while creation provided the data for all the configured languages is received during the initial creation
If the data for all the configured languages is not received, deactivate the Location while creation
While storing the location,
cr_by should be the Username of the user who is accessing this API
cr_dtimes should be the date-time at which the user is creating the Location
Responds with the Location Hierarchy created successfully
The component restricts the bulk creation of Master Data through API. However it could be done through a script as need be depending on the requirement of the country.
In case of exceptions, system triggers error messages as received from the Database
On receiving a request to update a Location with the input parameters (code, name, hierarchy_level, hierarchy_level_name, parent_loc_code, lang_code and is_active), the system updates the Location in the Location Database for the code received.
The system performs the following steps to update the location in the Master Database:
Validates if all required input parameters have been received as listed below for each specific request
code character (36) - Mandatory
name character (128) - Mandatory
Upon receiving a request to validate the Location Name with input parameters (Location Name), the system checks the Location Name in the Master Database
While checking the location in the Database, the system performs the following steps:
Validates if the request contains the following input parameters
Location Name - Mandatory
If the mandatory input parameters are missing, throw the appropriate message
Fetch Location Hierarchy Levels based on a Language Code
Upon receiving a request to fetch the Location Hierarchy Levels with input parameters (Language Code), the system fetches the Location Hierarchy Levels in the requested language. The following steps are performed by the system:
Validates if the request contains following input parameters (Language Code)
Language Code - Mandatory
Validates if the response contains the Location Hierarchy Levels with the following attributes
Fetch the Location Hierarchy Data based on a Location Code and a Language Code
Upon receiving a request to fetch all the Location Hierarchy Data with input parameters (Location Code and Language Code), the system fetches the Location Hierarchy Data based on requested Location code and language code. The following steps are performed by the system:
Validates if the request contains the following input parameters
Location Code - Mandatory
Language Code - Mandatory
Fetch the Location Hierarchy Data for the bottom next hierarchy based on a Location Code and a Language Code
Upon receiving a request to fetch all the Location Hierarchy Data with input parameters (Location Code and Language Code), the system fetches the Location Hierarchy Data for the next hierarchy level. The following steps are performed by the system:
Validates if the request contains the following input parameters
Location Code - Mandatory
Language Code - Mandatory
Delete a Location
On receiving a request to delete a Location with the input parameters (code), the system updates the is_deleted flag to true in the Location Database against the code received.
The system performs the following steps in order to delete the loaction received in the code:
Validates if all required input parameters have been received as listed below for each specific request
Delete all records for the code received
Deleted record are not be deleted again
Upon receiving a request to add Holiday Data with the input parameters (location_code, holiday_date, holiday_name, holiday_desc, lang_code and is_active), the system stores the Holiday in the Database. The following steps are performed by the system:
This API should only be accessible to Global Admin
The API should accept only the below parameters
location_code - Character - 128 - Mandatory
This API should only be accessible to Global Admin
The API should accept only the below parameter
id - Character - 36 - Mandatory
On receiving a request to fetch the list of Holidays with the input parameters (Registration Center ID, Year and Language Code), the system fetches the list of Holidays mapped to a Registration Center and for the year and Language Code received in input parameter as per the below steps:
Validates if the received request contains the following input parameters
Registration Center ID - Mandatory
Year - Mandatory
On receiving a request to add Biometric Authentication Type (e.g., Fingerprint, Iris) with the input parameters (code, name, descr, lang_code and is_active), the system stores the Biometric Authentication Type in the Database as per the below steps:
Validates if all required input parameters have been received as listed below for each specific request
code - character (36) - Mandatory
name - character (64) - Mandatory
On receiving a request to fetch the List of Biometric Authentication Type with input parameters (Language Code), the system fetches the List of Biometric Authentication Type against the Language Code as per the below steps:
Validates if the request to add Biometric Authentication Type contains the following parameters
Language Code - Mandatory
If the mandatory input parameters are missing, responds with all the data.
On receiving a request to add Biometric Attribute (e.g., Right Thumb, Left Thumb) with the input parameters (code, name, descr, bmtyp_code, lang_code and is_active), the system stores the Biometric Attribute in the Database as per the below steps:
Validates if all required input parameters have been received as listed below for each specific request
code - character (36) - Mandatory
name - character (64) - Mandatory
On receiving a request to fetch the List of Biometric Attributes with input parameters (Biometric Authentication Type and Language Code), the system fetches the List of Biometric Attributes against the Biometric Authentication Type and the Language Code Received as per the below steps:
Validates if the request contains the following input parameters
Biometric Authentication Type - Mandatory
Language Code - Mandatory
This API should only be accessible to Global Admin
The API should accept only the below parameters
name - Character - 64 - Mandatory
On receiving a request to update a Gender Type with the input parameters (code, name, lang_code and is_active), the system updates the Gender Type in the Gender Type Database for the code received as per the below steps:
This API should only be accessible to Global Admin
The API should accept only the below parameters
code - Character - 36 - Mandatory
On receiving a request to validate the Gender Name with input parameters (Gender Name), the system checks the Gender Name in the Master Database as per the below listed steps:
Validates if the request contains the following input parameters
Gender Name - Mandatory
If the mandatory input parameters are missing, throws the appropriate message.
On receiving a request to fetch the List of Gender Types with the input parameters (Language Code), the system fetches the List of Gender Types against the Language Code received as per the below listed steps:
Validates if the request contains the following input parameters
Language Code - Mandatory
If the Language code is missing, responds with all the data.
On receiving a request to add Document Category with the input parameters (code, name, descr, lang_code and is_active), the system stores the Document Category in the Database as per the below listed steps:
This API should only be accessible to Global Admin
The API should accept only the below parameters
name - Character - 64 - Mandatory
On receiving a request to update a Document Category with the input parameters (code, name, descr, lang_code and is_active), the system update the Document Category in the Document Category Database for the Code received as per the below listed steps:
The API should only be accessible to Global Admin
The API should accept only the below parameters
code - Character - 36 - Mandatory
On receiving a request to fetch Document Category Details with the input parameters (Language Code), the system fetches all the Document Categories for the Language Code Received as per the below listed steps:
Validates if all required input parameters have been received as listed below for each specific request
Language Code - Mandatory
If the mandatory input parameters are missing, responds with all the data.
On receiving a request to add Document Type with the input parameters (code, name, descr, lang_code and is_active), the system stores the Document Type in the Database
Refer below for the process:
Validates if all required input parameters have been received as listed below for each specific request
code - character (36) - Mandatory
name - character (64) - Mandatory
On receiving a request to update a Document Type with the input parameters (code, name, descr, lang_code and is_active), the system updates the Document Type in the Document Type Database for the Code received
Refer below for the process:
Validates if all required input parameters have been received as listed below for each specific request
code - character (36) - Mandatory
name - character (64) - Mandatory
On receiving a request to delete a Document Type with the input parameters (code), the system updates the is_deleted flag to true in the Document Type Database against the code received
Refer below for the process:
Validates if all required input parameters have been received as listed below for each specific request
code - character (36) - Mandatory
Delete all records for the code received
Upon receiving a request to fetch List of Document Categories with the input parameters (Applicant Type Code), the system fetches all the Document Categories for the Applicant Type Code Received
While fetching the list of documents, the system performs the following steps:
Validates if all required input parameters have been received as listed below for each specific request
Applicant Type Code - Mandatory
If the mandatory input parameter is missing, responds with the appropriate error message
Upon receiving a request to fetch List of Document Category-Document Type mappings with input parameters (Applicant Type and List of Language Codes), the system fetches the required data
While fetching the data, the system performs the following steps:
Validates if the request contains the following input parameters
Applicant Type - Mandatory
List of Language Codes - Mandatory
On receiving a request to delete a Document Category-Type mapping with the input parameters (doccat_code, doctyp_code), the system updates the is_deleted flag to true in the Document Category-Type mapping Database against the input received
The system performs the following steps:
Validates if all required input parameters have been received as listed below for each specific request
doccat_code - character (36) - Mandatory
doctyp_code - character (36) - Mandatory
On receiving a request to get Applicant type with input parameters (Individual Type Code, Date of Birth, Gender Type Code and Biometric Exception Type), the system derives the Applicant Type from the input parameter and performs the following steps:
Validates if the request contains the following input parameters
Individual Type Code - Mandatory
Date of Birth - Mandatory
On receiving a request to check the mapping of Applicant Type-Document Category-Document Type mapping parameters (Applicant Type, Document Category Name and Document Type Name), the system checks the mapping and performs the following steps:
Validates if the request contains the following input parameters
Applicant Type Code
Document Category Name
Upon receiving a request to add a Reason with the input parameters (code, name, descr, rsncat_code, lang_code and is_active), the system stores the Reason in the Database
The system performs the following steps:
Validates if all required input parameters have been received as listed below for each specific request
code - character (36) - Mandatory
code - character (64) - Mandatory
Upon receiving a request to Fetch the requested List of Reasons with the required input parameters (Reason 1. Category Code, Language Code), the system fetches the requested List of reasons stored against the Reason Category Code and Language Code received.
The system performs the following steps:
Validates if the request contains the following input parameters
Language Code - Mandatory
Reason Category Code - Mandatory
After receiving a request to add Language Details with the input parameters (code, name, family, native_name and is_active), the system stores the Language Details in the Database and performs the following steps:
Validates if all required input parameters have been received as listed below for each specific request
code - character (3) - Mandatory
name - character (64) - Mandatory
After receiving a request to fetch the List of Languages, the system fetches the List of Languages and performs the following steps:
Validates if the response contains the List of all Languages with the following attributes
Language Code - Mandatory
Language Name - Mandatory
Update
After receiving a request to update a Language with the input parameters (code, name, family, native_name and is_active), the system updates the Language Details in the List of languages Database for the Code received in request
The system performs the following steps:
Validates if all required input parameters have been received as listed below for each specific request
code - character (3) - Mandatory
name - character (64) - Mandatory
Delete
After receiving a request to delete a Language with the input parameters (code), the system updates the is_deleted flag to true in the List of languages Database against the code received in request
The system performs the following steps:
Validates if all required input parameters have been received as listed below for each specific request
code - character (3) - Mandatory
Deleted record should not be deleted again
On receiving a request to add a Title (e.g., MR., Mrs.) with the input parameters (code, name, descr, lang_code and is_active), the system stores the Title in the Database and performs the following steps:
The API should only be accessible to Global Admin
The API should accept only the below parameters
name - Character - 64 - Mandatory
On receiving a request to update a Title with the input parameters (code, name, descr, lang_code and is_active), the system updates the Title in the Title Database for the code received and performs the following steps:
This API should only be accessible to Global Admin
The API should accept only the below parameters
code - Character - 36 - Mandatory
On receiving a request to fetch Title Details with the input parameters (Language Code), the system fetches all the Titles with all the attributes for the Language Code Received
The system performs the following steps:
Validates if all required input parameters have been received as listed below for each specific request
Language Code - Mandatory
If the mandatory input parameters are missing, responds with all the data.
On receiving a request to add Template File Format with the input parameters (code, descr, lang_code and is_active), the system stores the Template File Format in the Database and performs the following steps:
Validates if all required input parameters have been received as listed below for each specific request
code - character (36) - Mandatory
descr - character (256) - Mandatory
Update and Delete a Template File Format in Template File Format Master Database
Update
On receiving a request to update a Template File Format with the input parameters (code, descr, lang_code and is_active), the system updates the Template File Format in the Template File Format Database for the Code received
While updating the Template File Format, the system performs the following steps:
Validates if all required input parameters have been received as listed below for each specific request
code - character (36) - Mandatory
descr - character (256) - Optional
Delete
On receiving a request to delete a Template File Format with the input parameters (code), the system updates the is_deleted flag to true in the Template File Format Database against the code received
While deleting the Template File Format, the system performs the following steps:
Validates if all required input parameters have been received as listed below for each specific request
code - character (36) - Mandatory
Delete all records for the code received
MOSIP system can create Template Type in the Master Database.
Upon receiving a request to add Template Type (e.g., SMS Notification template - New Registration) with the input parameters (code, descr, lang_code and is_active), the system stores the Template Type in the Database and performs the following steps:
Validates if all required input parameters have been received as listed below for each specific request
code - character (36) - Mandatory
descr - character (256) - Mandatory
On receiving a request to add a Template with the input parameters (id, name, descr, file_format_code, model, file_txt, module_id, module_name, template_typ_code, lang_code and is_active), the system stores the Template in the Database and performs the following steps:
This API should only be accessible to Global Admin
The API should accept only the below parameters
name - Character - 128 - Mandatory
On receiving a request to fetch a Template with the input parameters (Template Type Code and List of Language Code), the system fetches the Template for the Template Type Code and all Language Codes received
Refer below for the process:
Validates if all required input parameters have been received as listed below for each specific request
Template Type Code - Mandatory
List of Language Code - Mandatory
On receiving a request to update a Template with the input parameters (id, name, descr, file_format_code, model, file_txt, module_id, module_name, template_typ_code, lang_code and is_active), the system updates the Template in the Template Database for the id received and performs the following steps:
This API should only be accessible to Global Admin
The API should accept only the below parameters
id - Character - 36 - Mandatory
Upon receiving a request to add a Blacklisted Word with the input parameters (code, name, descr, lang_code and is_active), the system stores the Blacklisted Word in the Database and performs the following steps:
Validates if all required input parameters have been received as listed below for each specific request
word - character (128) - Mandatory
descr - character (256) - Optional
Upon receiving request to update a Blacklisted Word with the input parameters (code, name, descr, lang_code and is_active), the system updates the Blacklisted Word in the Blacklisted Word Database for the code received and performs the following steps:
Validates if all required input parameters have been received as listed below for each specific request
word- character (128) - Mandatory
descr - character (256) - Optional
Upon receiving a request to delete a Blacklisted Word with the input parameters (code), the system updates the is_deleted flag to true in the Blacklisted Word Database against the code received and performs the following steps:
Validates if all required input parameters have been received as listed below for each specific request
word- int - Mandatory
Deleted record are not deleted again
Upon receiving a request to Fetch the List of Blacklisted words with input parameters (Language Code), the system fetches the List of Blacklisted words against the Language Code received
While fetching the black listed words, the system performs the following steps:
Validates if the request contains the following input parameters
Language Code - Mandatory
If the mandatory input parameters are missing, throws the appropriate message.
MOSIP system can create a Reason Category in Master Database
Upon receiving a request to add Reason Category with the input parameters (code, name, descr, lang_code and is_active), the system stores the Reason Category in the Database and performs the following steps:
Validates if all required input parameters have been received as listed below for each specific request
code - character (36) - Mandatory
name - character (64) - Mandatory
Upon receiving a request to add Application with the input parameters (code, name, descr, lang_code and is_active), the system stores the Application in the Database
Refer below for the process:
Validates if all required input parameters have been received as listed below for each specific request
code - character (36) - Mandatory
name - character (64) - Mandatory
Fetch the List of all Applications
Upon receiving a request to Fetch List of Applications, the system fetches all the List of Applications and performs the following steps:
Validates if the response contains the following attributes for each Application
Application ID
Application Detail
Fetch the Application detail based on a Language Code and Application ID
Upon receiving a request to Fetch List of Applications with the required input parameters (Application ID, Language Code), the system fetches the Application Detail based on the Application ID and Language Code received
Refer below for the process:
Validates if all required input parameters have been received as listed below for each specific request
Application ID - Mandatory
Language Code - Mandatory
Upon receiving a request to add an ID Type with the input parameters (code, name, descr, lang_code and is_active), the system stores the ID Type in the Database
Refer below for the process:
Validates if all required input parameters have been received as listed below for each specific request
code - character (36) - Mandatory
code - character (64) - Mandatory
Upon receiving a request to fetch the List of ID Types with input parameters (Language Code), the system fetches the List of ID Types against the Language Code Received
Refer below for the process:
Validates if the request contains the following input parameters
Language Code - Mandatory
If the mandatory input parameters are missing, throws the appropriate message. Refer "Messages" section below.
Upon receiving a request to fetch the user history record with input parameters (User ID and Date Timestamp), the system fetches all the attributes of the user from the history table and performs the following steps:
Validates if all required input parameters have been received as listed below for each specific request.
User ID - Mandatory
Date Timestamp - Mandatory
Receive request to retrieve RID based on input parameter (User ID, App ID)
User ID and App ID both will be mandatory
Fetch the RID
Upon receiving a request to add a mapping of Document Type and Document Category with the input parameters (doctyp_code, doccat_code) the system stores the Mapping of Document type and Document category in the Database
Refer below for the process:
Validates if all required input parameters have been received as listed below for each specific request
doctyp_code - character - 36 - mandatory
doccat_code - character - 36 - mandatory
Refer below for the process:
The API should support taking Center ID and Language Code as an mandatory input parameter
The API should respond to the source with all the days of the week for the Center in the language received
Each day should have an attribute marking whether the day is a working day or off-work day
If the working days are not defined against the Center, the API should fetch the globally defined working and non-working days.
The API should throw error messages in scenarios mentioned in error messages section.
Refer below for the process:
Validates if all required input parameters have been received as listed below for each specific request
Center ID - character - 10 - mandatory
API should respond to the source with all the exceptional holiday dates for the Center ID received
On receiving a request to add Registration Center Type with the input parameters (code, name, descr, lang_code and is_active), the system stores the Registration Center Type in the Database
Refer below for the process:
This API should only be accessible to Global Admin
The API should accept only the below parameters
name - Character - 64 - Mandatory
On receiving a request to update a Registration Center Type with the input parameters (code, name, descr, lang_code and is_active), the system Updates the Registration Center Type Details in the Registration Center Type Database for the Code received
Refer below for the process:
This API should only be accessible to Global Admin
The API should accept only the below parameters
code - Character - 36 - Mandatory
Upon receiving a request to add Registration Center with the input parameters, the system Stores the Registration Center in the Database
Refer below for the process:
The system validates if all required input parameters have been received as listed below for each specific request
name - character (128) - mandatory
cntrtyp_code - character (36) - mandatory
On receiving a request to update a Registration Center with the input parameters, the system updates the Registration Center Details in the List of Registration Center Database for the center_id received
Refer below for the process:
The system validates if all required input parameters have been received as listed below for each specific request
center_id - character (36) - mandatory
name - character (128) - mandatory
Upon receiving a request to Decommission a Registration Center with the input parameters (center_id), the system updates the is_deleted flag to true in the List of Registration Center Database against the center_id received
Refer below for the process:
Validate if all required input parameters have been received as listed below for each specific request
center_id - character (36) - Mandatory
Change the “is_Deleted” flag against Registration Center ID to “True”
On receiving a request to fetch Registration Center Details with the input parameters (Registration Center ID and Language Code), the system fetches all the Registration Center attributes for the Registration Center ID and Language Code received. The system only fetches active Registration Centers.
Refer below for the process:
While fetching the registration center details the system validates if all required input parameters have been received as listed below for each specific request
Registration Center ID - Mandatory
Language Code - Mandatory
On receiving a request to fetch Registration Center Creation/Updation History Detail with the input parameters (Registration Center ID, Date and Language Code), the system fetches all the attributes of Registration Center from the history table for the Registration Center ID, Date and Language Code received
Refer below for the process:
While fetching registration center records the system validates if all required input parameters have been received as listed below for each specific request
Registration Center ID - Mandatory
Date - Mandatory
Upon receiving a request to fetch the List of Registration Centers with the input parameter (Location Code and Language Code), the system fetches the list of all the Registration Centers against the Location Code and Language Code received with all the attributes for each Registration Center. The system only fetches active Registration Centers.
Refer below for the process:
While fetching the registration center details the system validates if all required input parameters have been received as listed below for each specific request
Location Code
Language Code
On receiving a request to fetch the List of Registration Centers with the input parameter (Longitude and Latitude, Proximity distance and Language Code), the system fetches the List of Registration Centers against the input parameters received. The system only fetches active Registration Centers.
Refer below for the process:
While fetching the registration center details the system validates if all required input parameters have been received as listed below for each specific request
Longitude
Latitude
Upon receiving a request to fetch the List of Registration centers with input parameters (Location Hierarchy Level, Text Input and a Language Code), the system fetches the List of Registration centers. The system only fetches active Registration Centers.
Refer below for the process:
While fetching the list of registration centers the system validates if the request contains the following input parameters
Location Hierarchy Level - Mandatory
Text Input - Mandatory
On receiving a request to fetch Registration Center Details with the input parameters (Registration Center ID and Date-Timestamp), the system determines the status of the Registration center as per the logic defined.
Refer below for the process:
While determining the status of registration center the system validates if all required input parameters have been received as listed below for each specific request
Registration Center ID - Mandatory
Date-Timestamp - Mandatory
Upon receiving a request to add Machine Type (e.g., Dongle/Desktop) with the input parameters (code, name, descr, lang_code and is_active), the system stores the Machine Type in the Database
Refer below for the process:
This API should only be accessible to Global Admin
The API should accept only the below parameters
name - Character - 64 - Mandatory
This API should only be accessible to Global Admin
The API should accept only the below parameters
code - Character - 36 - Mandatory
On receiving a request to add Machine Specifications with the input parameters (name, brand, model, mtyp_code, min_driver_ver, descr, lang_code and is_active) the system stores the Machine Specifications in the Database
Refer below for the process:
This API should only be accessible to Global Admin
The API should accept only the below parameters
name - Character - 64 - Mandatory
On receiving a request to update a Machine Specification with the input parameters (id, name, brand, model, mtyp_code, min_driver_ver, descr, lang_code and is_active), the system updates the Machine Specification Details in the Machine Specification Database for the id received
This API should only be accessible to Global Admin
The API should accept only the below parameters
id - Character - 36 - Mandatory
On receiving a request to add Machine with the input parameters, the system Stores the Machine Details in the Database
Refer below for the process:
While creating the machine IDs the system validates if all required input parameters have been received as listed below for each specific request
machine_id - character (36) - mandatory
name - character (64) - mandatory
On receiving a request to update a Machine with the input parameters, the system Updates the Machine Details in the List of Machines Database for the machine_id received
Refer below for the process:
While updating the machine ID the system Validates if all required input parameters have been received as listed below for each specific request
machine_id - character (36) - mandatory
name - character (64) - mandatory
On receiving a request to decommission a Machine with the input parameters (machine_id), the system Updates the is_deleted flag to true in the List of Machines Database against the machine_id received
Refer below for the process:
While deleting the machine IDs the system Validates if all required input parameters have been received as listed below for each specific request
machine_id - character (36) - Mandatory
Change the “is_Deleted” flag against Machine ID to “True”
Upon receiving a request to fetch Machine History Registration/Updation Detail with the input parameters (Machine ID, Date and Language Code), the system Fetches all the attributes of Machine from the history table for the Machine ID, Date and Language Code received
The record fetched is the latest record existing on or before the date received in the input parameter
Refer below for the process:
While fetching the machine registration and updation history the system Validates if all required input parameters have been received as listed below for each specific request
Machine ID - Mandatory
Date - Mandatory
On receiving a request to Fetch Machine Details with the input parameters (Machine ID and Language Code), the system Fetches all the Machine attributes for the Machine ID and the Language Code Received
Refer below for the process:
While fetching the machine IDs the system Validates if all required input parameters have been received as listed below for each specific request
Machine ID - Mandatory
Language Code
On receiving a request to add a mapping of Center, User and Machine with the input parameters (regcntr_id, usr_id, machine_id and is_active), the system Stores the Mapping of Center, User and Machine in the Database
Refer below for the process:
While mapping the system Validates if all required input parameters have been received as listed below for each specific request
regcntr_id - character (10) - Mandatory
usr_id- character (36) - Mandatory
On receiving a request to delete a Center-Machine-User mapping with the input parameters (regcntr_id, machine_id, usr_id), the system Updates the is_deleted flag to true in the Center-Machine-User mapping Database against the input received
Refer below for the process:
While deleting the system Validates if all required input parameters have been received as listed below for each specific request
regcntr_id - character (36) - Mandatory
machine_id - character (36) - Mandatory
On receiving a request to fetch Mapping History of Registration, Machine and User with input parameters (Registration Centre ID, Machine ID, User ID and Date), the system Fetches all the attributes of Registration, Machine and User Mapping from the history table for the Machine ID and Date received
The record fetched is the latest record existing on or before the date received in the input parameter
Refer below for the process:
While fetching the mappings the system Validates if all required input parameters have been received as listed below for each specific request
Registration Center ID - Mandatory
Machine ID - Mandatory
On receiving request to add a device with the input parameters, the system Stores the device in the Database
Refer below for the process:
While creating a device the system Validates if all required input parameters have been received as listed below for each specific request
name - character (64) - Mandatory
mac_address - character (64) - Mandatory
Upon receiving a request update a Device with the input parameters, the system Updates the Device Details in the List of Devices Database for the id received
Refer below for the process:
While updating the device in device type list the system Validates if all required input parameters have been received as listed below for each specific request
id - character (36) - Mandatory
name - character (64) - Mandatory
Upon receiving a request to decommission a Device with the input parameters (id) and Update the is_deleted flag to true in the List of Devices Database against the id received
Refer below for the process:
While deleting the device in the device list the system validates if all required input parameters have been received as listed below for each specific request
id - character (36) - Mandatory
Change the “is_Deleted” flag against Device ID to “True”
On receiving request to Fetch list of all Device with the requirement input parameter (Language Code and/or Device Type), the system Fetches all the Devices against the Language Code and/or Device Type as requested
Refer below for the process:
While fetching the device types the system Validates if the request contains the following input parameters
Device Type - Optional
Language Code - Mandatory
On receiving request to fetch Device History Registration/Update Detail with the input parameters (Device ID, Date and Language Code), the system fetches all the attributes of Device from the history table for the Device ID, Date and Language Code received
The record fetched is the latest record existing on or before the date received in the input parameter
Refer below for the process:
While fetching the device registration and update history the system validates if all required input parameters have been received as listed below for each specific request
Device ID - Mandatory
Date - Mandatory
On receiving request to add Device Specifications with the input parameters (name, brand, model, dtype_code, min_driver_ver, descr, lang_code and is_active), the system Stores the Device Specifications in the Database
Refer below for the process:
This API should only be accessible to Global Admin
The API should accept only the below parameters
name - Character - 64 - Mandatory
On receiving request to fetch the List of Device Specifications with input parameters (Language Code and/or Device Type) the system fetches the List of Device Specifications against the Language Code and/or Device Type
While fetching the List of Device Specifications against the Language Code and/or Device Type the system performs the following steps
Validates if the request contains the following input parameters
Language Code - Mandatory
Device Type - Optional
On receiving a request to update a Device Specification with the input parameters (id, name, brand, model, dtype_code, min_driver_ver, descr, lang_code and is_active) the system updates the Device Specification Details in the Device Specification Database for the id received
This API should only be accessible to Global Admin
The API should accept only the below parameters
id - Character - 36 - Mandatory
Upon receiving a request to add Device Type with the input parameters (code, name, descr, lang_code and is_active), the system Stores the Device Type in the Database
Refer below for the process:
This API should only be accessible to Global Admin
The API should accept only the below parameters
name - Character - 64 - Mandatory
This API should only be accessible to Global Admin
The API should accept only the below parameters
code - Character - 36 - Mandatory
Upon receiving a request to add a mapping of Machine and Center with the input parameters (regcntr_id, machine_id, and is_active), the system stores the Mapping of Machine and Center in the Database
Refer below for the process:
Validates if all required input parameters have been received as listed below for each specific request
regcntr_id - character (10) – Mandatory (refers to a Registration Center stored in Registration Center)
machine_id - character (10) – Mandatory (refers to a Machine stored in Machine Masterdata)
Upon receiving a request to delete a Center-Machine mapping with the input parameters (regcntr_id, machine_id), the system updates the is_active flag to false in the Center-Machine mapping Database against the input received
Refer below for the process:
Validates if all required input parameters have been received as listed below for each specific request
regcntr_id - character (36) - Mandatory
machine_id - character (36) - Mandatory
Upon receiving a request to add a mapping of Device and Center with the input parameters (regcntr_id, device_id), the system stores the Mapping of Device and Center in the Database
Refer below for the process:
Validates if all required input parameters have been received as listed below for each specific request
regcntr_id - character (10) – Mandatory (refers to a Registration Center stored in Registration Center)
device_id - character (36) – Mandatory (refers to a Device stored in Device Masterdata)
Upon receiving a request to delete a Center-Device mapping with the input parameters (regcntr_id, device_id), the system updates the is_active flag to false in the Center-Device mapping Database against the input received
Refer below for the process:
Validates if all required input parameters have been received as listed below for each specific request
regcntr_id - character (36) - Mandatory
device_id - character (36) - Mandatory
On receiving a request to fetch Mapping History of Center and Device with input parameters (Registration Center ID, Device ID and Date Timestamp) the system fetches all the attributes of Center and Device Mapping from the history table for the Registration Center ID, Device ID and Date received
The record fetched is the latest record existing on or before the date received in the input parameter
While fetching the attributes of Center and Device Mapping from the history table the system performs the following steps
Validates if all required input parameters have been received as listed below for each specific request
Registration Center ID - Mandatory
Device ID - Mandatory
Upon receiving a request to add a mapping of Center, Machine and Device with the input parameters (regcntr_id, machine_id, device_id, and is_active), the system stores the Mapping of Center, Machine and Device in the Database
Refer below for the process:
Validates if all required input parameters have been received as listed below for each specific request
regcntr_id - character (36) – Mandatory (refers to a Registration Center stored in Registration Center Masterdata)
machine_id - character (36) – Mandatory (refers to a Registration Center stored in Registration Center Masterdata)
Upon receiving a request to delete a Center-Machine-Device mapping with the input parameters (regcntr_id, machine_id, device_id), the system updates the is_deleted flag to true in the Center-Machine-Device mapping Database against the input received
Refer below for the process:
Validates if all required input parameters have been received as listed below for each specific request
regcntr_id - character (36) - Mandatory
machine_id - character (36) - Mandatory
Upon receiving a request to add a mapping of User and Center with the input parameters (regcntr_id, usr_id, and is_active), the system stores the Mapping of User and Center in the Database
Refer below for the process:
Validates if all required input parameters have been received as listed below for each specific request
regcntr_id - character (10) – Mandatory (refers to a Registration Center stored in Registration Center)
usr_id - character (36) – Mandatory (refers to a User stored in User Masterdata)
Upon receiving a request to delete a Center-User mapping with the input parameters (regcntr_id, usr_id), the system updates the is_active flag to false in the Center-User mapping Database against the input received
Refer below for the process:
Validates if all required input parameters have been received as listed below for each specific request
regcntr_id - character (36) - Mandatory
usr_id - character (36) - Mandatory
The system receives a request to create a MISP with input parameters (MISP ID, MISP Organization Name, MISP Contact Number, MISP Email ID, MISP Address, MISP User name, MISP Password, MISP License Key, MISP License Key Status, IsActive)
Stores the data in the database
Responds to the source with the required message
The system receives a request to fetch a MISP with input parameters (MISP ID and/or MISP Organization Name)
Fetches the data existing against the input parameter received.
If only MISP ID is received, fetches data against the MISP ID from the database
The system receives a request to update a MISP with input parameters (MISP ID, MISP Organization Name, MISP Contact Number, MISP Email ID, MISP Address, MISP User name, MISP Password, MISP License Key, MISP License Key Status, IsActive
Updates the data and Responds to the source with the required message
MISP ID will serves as search criteria to update the record in the database
The system receives a request to delete a MISP with input parameters (MISP ID)
Deletes the data as mentioned as requested
Responds to the source with the required message
hierarchy_level smallint - Mandatory
hierarchy_level_name character (64) - Mandatory
parent_loc_code character (32) - Mandatory
lang_code character (3) - Mandatory
is_active boolean - Mandatory
Validate if the Location name received does not already exist in the hierarchy of the Location
If Location name already exist under the hierarchy level, throw an appropriate error
The API should not allow activation of Location if the data for the Location is not present in all the languages which are configured for a country
For the code received in the request, replaces all the data received in the request against the data existing in the Location database against the same code.
While receiving the request for activation, If the Location is already Active, the API should throw an error message. Refer messages section.
While receiving the request for deactivation, If the Location is already Inactive, the API should throw an error message. Refer messages section
If for a Location data, is_active flag is being sent as “False” and there are active child Locations (also the subsequent child locations) being mapped to received location, do not deactivate the location. Respond with appropriate message. Refer messages section
Deleted record are not be updated
upd_by should be the Username of the user who is accessing this API
upd_dtimes should be the date-time when the Location is being updated
Responds with data not found error if deleted record is received in the request
Responds with appropriate message if the Location is updated successfully
In case of Exceptions, system triggers relevant error messages
In case of Exceptions, system triggers relevant error messages
Hierarchy Level
Hierarchy Name
IsActive
In case of Exceptions, system triggers relevant error messages
If the mandatory input parameters are missing, throw the appropriate message.
Validates if the response contains the following location hierarchy data and the corresponding attributes against the Location Code and Language Code received in the input parameter (i) List of Countries against the Location Code
Country Code
Country Name
IsActive
(ii) List of Regions against the Location Code
Region Code
Region Name
IsActive
(iii) List of Provinces against the Location Code
Province Code
Province Name
IsActive
(iv) List of Cities against the Location Code
City Code
City Name
IsActive
(v) List of Local Administrative authorities against the Location Code
Local Administrative Authority Code
Local Administrative Authority Name
IsActive
(vi) List of Pincodes against the Location Code
Pincode
IsActive
Responds to the source with all the Location Hierarchy Data based on the Location Code
In case of Exceptions, system triggers relevant error messages.
If the mandatory input parameters are missing, throws the appropriate message.
Fetches the Location data of only the child hierarchy of location code received (For e.g., if the location code for a particular Province is received, responds with the data of all the Cities existing in that Province, similarly if location code of a City is received, responds all the data regarding the Local Administrative Authorities existing under that City)
Responds to the source with the data fetched
In case of Exceptions, system should trigger an error message.
Responds with data not found error if deleted record is received in the request
Responds with dependency found error if a record to be deleted is used as foreign key in the dependent table
Responds with the Code for the Location Hierarchy deleted successfully
code - character (36) - Mandatory
In case of Exceptions, system triggers relevant error messages.
holiday_date - Date Format (yyyy-mm-dd) - Mandatory
holiday_name - Character - 64 - Mandatory
holiday_desc - Character - 128 - Optional
lang_code - Character - 3 - Mandatory
is_active - boolean (true/false) - Mandatory
All the mandatory input parameter(s) should be present in the reqeust. If not, throw an appropriate error message
The API should validate the data type and length for each attribute as mentioned above.
In case of any failed validation, API should respond with appropriate error message.
'location_code' received should be from list of 'codes' from 'location' masterdata table
If not, the API should throw an error.
If all the above validations are successfull, the API should update the data in the database agianst the id received
API should perfrom below multi-language validations on the Holiday data recieved
If in the database, all the mandatory data is present in primary langauge but not in the secondary langauge, API should update the data but mark the Holiday as Inactive (is_acitve = false) regardless of what is received in the request for is_active flag
API should store upd_by as the Username of the user who is accessing this API
API should store upd_dtimes as the date-time at which the user is modiying the Holiday details
API should only allow creation of one record at a time and should restrict bulk creation
API should audit the relevant data when the API is called successfully or when an error is encountered
location_code - Character - 128 - Mandatory
holiday_date - Date Format (yyyy-mm-dd) - Mandatory
holiday_name - Character - 64 - Mandatory
holiday_desc - Character - 128 - Optional
lang_code - Character - 3 - Mandatory
is_active - boolean (true/false) - Mandatory
All the mandatory input parameter(s) should be present in the reqeust. If not, throw an appropriate error message
The API should validate the data type and length for each attribute as mentioned above.
In case of any failed validation, API should respond with appropriate error message.
'location_code' received should be from list of 'codes' from 'location' masterdata table
If not, the API should throw an error.
If all the above validations are successfull, the API should update the data in the database agianst the id received
API should perfrom below multi-language validations on the Template data recieved
If in the database, all the mandatory data is present in primary langauge but not in the secondary langauge, API should update the data but mark the Template as Inactive (is_acitve = false) regardless of what is received in the request for is_active flag
API should store upd_by as the Username of the user who is accessing this API
API should store upd_dtimes as the date-time at which the user is modiying the Template details
API should only allow creation of one record at a time and should restrict bulk creation
API should audit the relevant data when the API is called successfully or when an error is encountered
Language Code - Mandatory
If the mandatory input parameters are missing, throws the appropriate message
Validates if the response contains the List of Holidays against the Registration Center ID and the year received and contains the following attributes for a Region
Holiday ID
Holiday Date
Holiday Name
IsActive
Responds to the source with the List of Holidays
In case of Exceptions, system triggers relevant error messages
descr - character (256) - Optional
lang_code - character (3) - Mandatory
is_active - boolean - Mandatory
Responds with the Biometric Authentication Type Code and Language Code for the Biometric Authentication Type created successfully
The component restricts the bulk creation of Master Data
In case of Exceptions, system triggers error messages as received from the Database.
Validates if the response contains the List of Biometric Authentication Type against the Language Code along with the IsActive Flag for each Biometric Authentication Type
Responds to the source with List of Biometric Authentication Type
In case of Exceptions, system triggers relevant error messages
descr - character (128) - Optional
bmtyp_code - character (36) - Mandatory
lang_code - character (3) - Mandatory
is_active - boolean - Mandatory
Responds with the Biometric Attribute Code and Language Code for the Biometric Attribute created successfully
The component restricts the bulk creation of Master Data
Responds to the source with the appropriate message.
In case of Exceptions, system triggers error messages as received from the Database
If no data is present in the Database for the input parameter received, responds with an appropriate message.
If both the input parameter is missing, responds with all the data.
If one of the input parameters is missing, throw the appropriate message. Refer "Messages" section.
Validates if the response contains the List of Biometric Attributes with all the attributes against Biometric Authentication Type and Language Code Received
Biometric Attribute Code - Mandatory
Biometric Attribute Name - Mandatory
Biometric Attribute Description - Optional
IsActive – Mandatory
Responds to the source with the Fetched Data
In case of Exceptions, system triggers relevant error messages
lang_code - Character - 3 - Mandatory
is_active - boolean (true/false) - Mandatory
All the mandatory input parameter(s) should be present in the reqeust. If not, throw an appropriate error message
The API should validate the data type and length for each attribute as mentioned above.
In case of any failed validation, API should respond with appropriate error message. Refer messages section
API should perfrom below multi-language validations on the Gender Type data recieved
If, the data is recieved in secondary language and the data for primary language is not present in the database, the API should not allow creation of the Gender Type and throw an error message. Refer messages section
If in the request, all the mandatory data is received in primary langauge but not in the secondary langauge, API should store the data but mark the Gender Type as Inactive (is_acitve = false) regardless of what is received in the request for is_active flag
If all the above validations are successfull, the API should store the data the the database Gender Type Code should be generated at the back-end for any Gender Type added using a UUID generator
API should store cr_by as the Username of the user who is accessing this API
API should store cr_dtimes as the date-time at which the user is creating the Gender Type
API should only allow creation of one record at a time and should restrict bulk creation
API should audit the relevant data when the API is called successfully or when an error is encountered
name - Character - 64 - Mandatory
lang_code - Character - 3 - Mandatory
is_active - boolean (true/false) - Mandatory
All the mandatory input parameter(s) should be present in the reqeust. If not, throw an appropriate error message
The API should validate the data type and length for each attribute as mentioned above.
In case of any failed validation, API should respond with appropriate error message. Refer messages section
If all the above validations are successfull, the API should update the data in the database agianst the code received
API should perfrom below multi-language validations on the Gender Type data recieved
If in the database, all the mandatory data is present in primary langauge but not in the secondary langauge, API should update the data but mark the Gender Type as Inactive (is_acitve = false) regardless of what is received in the request for is_active flag
API should store upd_by as the Username of the user who is accessing this API
API should store upd_dtimes as the date-time at which the user is modiying the Gender Type details
API should only allow creation of one record at a time and should restrict bulk creation
API should audit the relevant data when the API is called successfully or when an error is encountered
Responds to the source with the appropriate message
In case of Exceptions, system triggers relevant error messages
Validates if the response contains the List of Gender Types with the following attributes
Gender Code
Gender Name
isActive
Responds to the source with the List of Gender Types
In case of Exceptions, system triggers relevant error messages
descr - Character - 128 - Optional
lang_code - Character - 3 - Mandatory
is_active - boolean (true/false) - Mandatory
All the mandatory input parameter(s) should be present in the reqeust. If not, throw an appropriate error message
The API should validate the data type and length for each attribute as mentioned above.
In case of any failed validation, API should respond with appropriate error message.
API should perfrom below multi-language validations on the Document Category data recieved
If, the data is recieved in secondary language and the data for primary language is not present in the database, the API should not allow creation of the Document Category and throw an error message.
If in the request, all the mandatory data is received in primary langauge but not in the secondary langauge, API should store the data but mark the Document Category as Inactive (is_acitve = false) regardless of what is received in the request for is_active flag
If all the above validations are successfull, the API should store the data the the database
Document Category Code should be generated at the back-end for any Document Category added using a UUID generator
API should store cr_by as the Username of the user who is accessing this API
API should store cr_dtimes as the date-time at which the user is creating the Document Category
API should only allow creation of one record at a time and should restrict bulk creation
API should audit the relevant data when the API is called successfully or when an error is encountered
name - Character - 64 - Mandatory
descr - Character - 128 - Optional
lang_code - Character - 3 - Mandatory
is_active - boolean (true/false) - Mandatory
All the mandatory input parameter(s) should be present in the reqeust. If not, throw an appropriate error message
The API should validate the data type and length for each attribute as mentioned above.
In case of any failed validation, API should respond with appropriate error message.
If all the above validations are successfull, the API should update the data in the database agianst the code received
API should perfrom below multi-language validations on the Document Category data recieved
If in the database, all the mandatory data is present in primary langauge but not in the secondary langauge, API should update the data but mark the Document Category as Inactive (is_acitve = false) regardless of what is received in the request for is_active flag
API should store upd_by as the Username of the user who is accessing this API
API should store upd_dtimes as the date-time at which the user is modiying the Document Category details
API should only allow creation of one record at a time and should restrict bulk creation
API should audit the relevant data when the API is called successfully or when an error is encountered
Validates if the response contains the following attributes for the Document Category Code
Document Category Code - Mandatory
Document Category Name - Mandatory
Document Category Description - Optional
IsActive - Mandatory
In case of Exceptions, system triggers relevant error messages
descr - character (128) - Optional
lang_code - character (3) - Mandatory
is_active - boolean - Mandatory
The API should not allow creation of the Document Type if the data is not received in default language
If the data for the Document Type is not received in all the configured languages, the API should allow the Document Type to be created given the Point 2 is satisfied.
The API should activate the Document Type while creation provided data for all the configured languages is received during the initial creation
cr_by should be the Username of the user who is accessing this API
cr_dtimes should be the date-time when the user is creating the Document Type
If the data for all the configured languages is not received, deactivate the Document Type while creation
Responds with an appropriate message for the Document Type created successfully
In case of Exceptions, system triggers relevant error messages
descr - character (128) - Optional
lang_code - character (3) - Mandatory
is_active - boolean - Mandatory
For the code received in the request, replaces all the data received in the request against the data existing in the Document Type database against the same code
upd_by should be the Username of the user who is accessing this API upd_dtimes should be the date-time when the user updates the Document Type Details
The API should not allow activation of Document Type if the data for the Document Type is not present in all the languages which are configured for a country
While receiving the request for activation, If the Document Type is already Active, the API should throw an error message. Refer messages section.
While receiving the request for deactivation, If the Document Type is already Inactive, the API should throw an error message. Refer messages section.
Deleted record are not be updated
Responds with data not found error if deleted record is received in the request
Responds with the appropriate message for the Document Category updated successfully
In case of Exceptions, system triggers relevant error messages
Deleted record are not be deleted again
Responds with data not found error if deleted record is received in the request
Responds with dependency found error if a record to be deleted is used as foreign key in the dependent table
Responds with the Document Category Code for the Document Category deleted successfully
In case of Exceptions, system triggers relevant error messages
Validates if the response contains the following attributes for each Document Category Code
Document Category Code
Name
Description
Language Code
Is Active
In case of Exceptions, system triggers relevant error messages
If the mandatory input parameters are missing, throws the appropriate message.
Fetches the Document Category-Document Type mapping for all language codes received in response
The response contains the List of Mappings of Document Category and Document Type against each Document Category
Each Document Category contains the below attributes
Document Category Code
Name
Description
Language Code
Is Active
Each Document Type contains the below attributes
Document Type Code
Name
Description
Language Code
Is Active
In case of Exceptions, system triggers relevant error messages
Responds with the doc_type Code and doccat_code for the Document Category-Type mapping deleted successfully
In case of Exceptions, system triggers relevant error messages.
Gender Type Code - Mandatory
Biometric Exception Type - Optional
Derives the Age Group Type based on following logic
Child if Age < 5
Adult if Age >= 5
If the mandatory input parameters are missing, throws the appropriate message
Derives the applicant type as per the define logic
In case of Exceptions, system triggers relevant error messages
Document Type Name
If the mandatory input parameters are missing, throws the appropriate message.
If the mapping exists, responds with "Valid".
If the mapping does not exist, responds with "Invalid".
In case of Exceptions, system triggers relevant error messages
descr - character (256) - Mandatory
rsncat_code - character (36) – Mandatory (The parameter rsncat_code refers to a Language stored in Language Masterdata)
lang_code - character (3) – Mandatory (The parameter lang_code refers to a Language stored in Language Masterdata)
is_active - boolean - Mandatory
Validates if the response contains the following attributes for a Reason Category Code added
Code
Language Code
Rsncat_code (Reason Category Code)
Responds to the source with the appropriate message.
In case of Exceptions, system triggers relevant error messages.
If either of the mandatory input parameters is missing, responds with the appropriate message as define below in message sections
Validates if the response contains the:
Requested list based on the requested Language Code and Reason Category Code
List of Reasons with the corresponding attributes for the list
Reason ID
Reason Name (per Reason ID)
Language Code
Reason Category Code
IsActive
Responds to the source with the relevant List of Reasons, as per the stated business rules
In case of Exceptions, system triggers relevant error messages as listed below
family - character (64) - Optional
native_name - character (64) - Optional
is_active - boolean - Mandatory
Responds with the Language Code for the language successfully created
In case of Exceptions, system triggers relevant error messages
IsActive – Mandatory
Responds to the source with the List of Languages
In case of Exceptions, system triggers relevant error messages
family - character (64) - Optional
native_name - character (64) - Optional
is_active - boolean - Mandatory
For the Code received in the request, replaces all the data received in the request against the data existing in the List of languages database against the same code.
Deleted record are not updated
Responds with data not found error if deleted record is received in the request
Responds with the Language Code for the language successfully updated
In case of Exceptions, system triggers relevant error messages
Responds with data not found error if deleted record is received in the request
Responds with the Language Code for the language successfully deleted
In case of Exceptions, system triggers relevant error messages.
descr - Character - 128 - Optional
lang_code - Character - 3 - Mandatory
is_active - boolean (true/false) - Mandatory
All the mandatory input parameter(s) should be present in the reqeust. If not, throw an appropriate error message
The API should validate the data type and length for each attribute as mentioned above.
In case of any failed validation, API should respond with appropriate error message. Refer messages section
API should perfrom below multi-language validations on the Title data recieved
If, the data is recieved in secondary language and the data for primary language is not present in the database, the API should not allow creation of the Title and throw an error message. Refer messages section
If in the request, all the mandatory data is received in primary langauge but not in the secondary langauge, API should store the data but mark the Title as Inactive (is_acitve = false) regardless of what is received in the request for is_active flag
If all the above validations are successfull, the API should store the data the the database
Title Code should be generated at the back-end for any Title added using a UUID generator
API should store cr_by as the Username of the user who is accessing this API
API should store cr_dtimes as the date-time at which the user is creating the Title
API should only allow creation of one record at a time and should restrict bulk creation
API should audit the relevant data when the API is called successfully or when an error is encountered
name - Character - 64 - Mandatory
descr - Character - 128 - Optional
lang_code - Character - 3 - Mandatory
is_active - boolean (true/false) - Mandatory
All the mandatory input parameter(s) should be present in the reqeust. If not, throw an appropriate error message
The API should validate the data type and length for each attribute as mentioned above.
In case of any failed validation, API should respond with appropriate error message. Refer messages section
If all the above validations are successfull, the API should update the data in the database agianst the code received
API should perfrom below multi-language validations on the Title data recieved
If in the database, all the mandatory data is present in primary langauge but not in the secondary langauge, API should update the data but mark the Title as Inactive (is_acitve = false) regardless of what is received in the request for is_active flag
API should store upd_by as the Username of the user who is accessing this API
API should store upd_dtimes as the date-time at which the user is modiying the Title details
API should only allow creation of one record at a time and should restrict bulk creation
API should audit the relevant data when the API is called successfully or when an error is encountered
Validates if the response contains List of Titles against the received Language Code along with the following attributes for the Title Code
Title Code - Mandatory
Title Name - Mandatory
Title Description - Optional
IsActive - Mandatory
In case of Exceptions, system triggers relevant error messages
lang_code - character (3) - Mandatory
is_active - boolean - Mandatory
Validates if the response contains the following attributes for a Template File Format added
Code
Language Code
Responds with the Template File Format Code and Language Code for the Template File Format created successfully
In case of Exceptions, system triggers relevant error messages.
lang_code - character (3) - Mandatory
is_active - boolean - Mandatory
For the code received in the request, replaces all the data received in the request against the data existing in the Template File Format database against the same code.
Deleted record are not updated
Responds with data not found error if deleted record is received in the request
Responds with the Template File Format Code and Language Code for the Template File Format updated successfully
In case of Exceptions, system triggers relevant error messages
Deleted record are not deleted again
Responds with data not found error if deleted record is received in the request
Responds with dependency found error (Refer Acceptance criteria) if a record to be deleted is used as foreign key in the dependent table
Responds with the Template File Format Code for the Template File Format deleted successfully
In case of Exceptions, system triggers relevant error messages.
lang_code - character (3) - Mandatory
is_active - boolean – Mandatory
Responds with the Template Type Code and Language Code for the Template Type created successfully
This component also restricts the bulk creation of Master Database
In case of Exceptions, system triggers relevant error messages as listed below.
descr - Character - 256 - Optional
file_format_code - 36 - Mandatory
model - Character - 128 - Optional
file_txt - Character - 4086 - Mandatory
module_id - Character - 36 - Mandatory
module_name - Character - 128 - Mandatory
template_typ_code - Character - 36 - Mandatory
lang_code - Character - 3 - Mandatory
is_active - boolean (true/false) - Mandatory
All the mandatory input parameter(s) should be present in the reqeust. If not, throw an appropriate error message
The API should validate the data type and length for each attribute as mentioned above.
In case of any failed validation, API should respond with appropriate error message.
'file_format_code' received should be from list of 'codes' from 'template_file_format' masterdata table
If not, the API should throw an error.
'template_typ_code' received should be from list of 'codes' from 'template_type' masterdata table
If not, the API should throw an error.
If all the above validations are successfull, the API should update the data in the database agianst the id received
API should perfrom below multi-language validations on the Template data recieved
If in the database, all the mandatory data is present in primary langauge but not in the secondary langauge, API should update the data but mark the Template as Inactive (is_acitve = false) regardless of what is received in the request for is_active flag
API should store upd_by as the Username of the user who is accessing this API
API should store upd_dtimes as the date-time at which the user is modiying the Template details
API should only allow creation of one record at a time and should restrict bulk creation
API should audit the relevant data when the API is called successfully or when an error is encountered
If the mandatory input parameters are missing, throws the appropriate message. Refer "Messages" section.
Response must contain templates for all the language codes received in the input parameter
Validates if the response contains the Template along with the following attributes
Template Type Code - Mandatory
Template - Mandatory
IsActive
In case of Exceptions, system triggers relevant error messages
name - Character - 128 - Mandatory
descr - Character - 256 - Optional
file_format_code - 36 - Mandatory
model - Character - 128 - Optional
file_txt - Character - 4086 - Mandatory
module_id - Character - 36 - Mandatory
module_name - Character - 128 - Mandatory
template_typ_code - Character - 36 - Mandatory
lang_code - Character - 3 - Mandatory
is_active - boolean (true/false) - Mandatory
All the mandatory input parameter(s) should be present in the reqeust. If not, throw an appropriate error message
The API should validate the data type and length for each attribute as mentioned above.
In case of any failed validation, API should respond with appropriate error message. Refer messages section
'file_format_code' received should be from list of 'codes' from 'template_file_format' masterdata table
If not, the API should throw an error.
'template_typ_code' received should be from list of 'codes' from 'template_type' masterdata table
If not, the API should throw an error.
If all the above validations are successfull, the API should update the data in the database agianst the id received
API should perfrom below multi-language validations on the Template data recieved
If in the database, all the mandatory data is present in primary langauge but not in the secondary langauge, API should update the data but mark the Template as Inactive (is_acitve = false) regardless of what is received in the request for is_active flag
API should store upd_by as the Username of the user who is accessing this API
API should store upd_dtimes as the date-time at which the user is modiying the Template details
API should only allow creation of one record at a time and should restrict bulk creation
API should audit the relevant data when the API is called successfully or when an error is encountered
lang_code - character (3) - Mandatory
is_active - boolean - Mandatory
cr_by should be the Username of the user who is accessing this API
cr_dtimes should be the date-time when the user is creating the Blacklisted Word
Responds with the appropriate message for the Device created successfully
The component should restricts the bulk creation of Master Database
In case of Exceptions, system triggers error messages as received from the Database.
lang_code - character (3) - Mandatory
is_active - boolean - Mandatory
For the code received in the request, replaces all the data received in the request against the data existing in the Blacklisted Word database against the same code
upd_by should be the Username of the user who is accessing this API
upd_dtimes should be the date-time when the user updates the Blacklisted Word Details
Deleted record are not updated
Responds with data not found error if deleted record is received in the request
Responds with the appropriate message for the Blacklisted word updated successfully
In case of Exceptions, system triggers relevant error messages as listed below
Responds with data not found error if deleted record is received in the request
Responds with the Word for the Blacklisted word deleted successfully
In case of Exceptions, system triggers relevant error messages as listed below
Validates if the response contains the List of Blacklisted words against Language Code and the corresponding attributes for the Blacklisted word
Blacklisted Word
IsActive
In case of Exceptions, system triggers relevant error messages.
descr - character (256) - Mandatory
lang_code - character (3) - Mandatory
is_active - boolean - Mandatory
Validates if the response contains the following attributes for a Reason Category added
Code
Language Code
Responds with the Reason Category code and Language Code for the Reason Category created successfully
In case of Exceptions, system triggers relevant error messages as listed below
descr- character (256) - Mandatory
lang_code - character (3) – Mandatory (The parameter lang_code refers to a Language stored in Language Masterdata. Refer)
is_active - boolean - Mandatory
Validates if the response contains the following attributes for an Application added
Code
Language Code
Responds with the Application ID and Language Code for the Application created successfully
In case of Exceptions, system triggers relevant error messages as listed below
IsActive
The response must contain the list of applications in all the languages present in the Database
Responds to the source with all the Application attributes.
Responds with the Application Data against the Application ID and Language Code Received
Validates if the response contains the following attributes for each Application
Application ID
Application Detail
IsActive
Responds to the source with the Application Detail
If the mandatory input parameters are missing, responds with all the data.
In case of Exceptions, system triggers relevant error messages as listed below
descr - character (256) - Mandatory
lang_code - character (3) – Mandatory (refers to a Language stored in Language Masterdata)
is_active - boolean - Mandatory
Validates if the response contains the following attributes for an ID Type added
Code
Language Code
Responds with the ID Type Code and Language Code for the ID type created successfully
In case of Exceptions, system triggers relevant error messages as listed below.
Validates if the response contains the List of ID Types with the following attributes
ID Type Name
ID Type Code
IsActive
In case of Exceptions, system triggers relevant error messages.
The record fetched are the latest record existing on or before the date received in the input parameter.
If the mandatory input parameters are missing, then the system triggers the appropriate message.
Response will contain all the attributes for the user including the Active/Inactive status.
In case of exceptions, system triggers relevant error messages.
Respond to the source with the fetched data
Respond with error 'User doesn't exist' if no user is found for User ID received
If the mapping does not exist
is_active flag should be stored as true when the mapping is created
Store the default language code against the mapping
cr_by should be the User ID of the user who is accessing this API
cr_dtimes should be the date-time at which the user is creating the Document Category - Document Type Mapping
if the mapping already exist but is in inactive state
Update the is_acitve flag as “True”
Updated the upd_by and upd_dtimes values against the mapping
If the mapping already exist in active state, throw appropriate error message
Responds with the appropriate message for the mapping being created successfully
The API restricts the bulk creation of Master Data
In case of Exceptions, system triggers error messages as received from the Database.
If the Document Type is already un-mapped from Document Category, throw an appropriate error message
upd_by should be the User ID of the user who is accessing this API
upd_dtimes should be the date-time when the Document Category - Document Type Mapping is being updated
Change the Is_active flag to “False” for removing the mapping
Responds with the appropriate message for the mapping being created successfully
The API restricts the bulk creation of Master Data
In case of Exceptions, system triggers error messages as received from the Database.
Each day should have an attribute defing the calenday order of days of the week
API should throw relevant error messages in any error scenarios
lang_code - Character - 3 - Mandatory
is_active - boolean (true/false) - Mandatory
All the mandatory input parameter(s) should be present in the reqeust. If not, throw an appropriate error message
The API should validate the data type and length for each attribute as mentioned above.
In case of any failed validation, API should respond with appropriate error message. Refer messages section
API should perfrom below multi-language validations on the Gender Type data recieved
If, the data is recieved in secondary language and the data for primary language is not present in the database, the 8. API should not allow creation of the Gender Type and throw an error message.
If in the request, all the mandatory data is received in primary langauge but not in the secondary langauge, API should store the data but mark the Gender Type as Inactive (is_acitve = false) regardless of what is received in the request for is_active flag
If all the above validations are successfull, the API should store the data the the database
Gender Type Code should be generated at the back-end for any Gender Type added using a UUID generator
API should store cr_by as the Username of the user who is accessing this API
API should store cr_dtimes as the date-time at which the user is creating the Gender Type
API should only allow creation of one record at a time and should restrict bulk creation
API should audit the relevant data when the API is called successfully or when an error is encountered
name - Character - 64 - Mandatory
lang_code - Character - 3 - Mandatory
is_active - boolean (true/false) - Mandatory
All the mandatory input parameter(s) should be present in the reqeust. If not, throw an appropriate error message
The API should validate the data type and length for each attribute as mentioned above.
In case of any failed validation, API should respond with appropriate error message. Refer messages section
If all the above validations are successfull, the API should update the data in the database agianst the code received
API should perfrom below multi-language validations on the Gender Type data recieved
If in the database, all the mandatory data is present in primary langauge but not in the secondary langauge, API should update the data but mark the Gender Type as Inactive (is_acitve = false) regardless of what is received in the request for is_active flag
API should store upd_by as the Username of the user who is accessing this API
API should store upd_dtimes as the date-time at which the user is modiying the Gender Type details
API should only allow creation of one record at a time and should restrict bulk creation
API should audit the relevant data when the API is called successfully or when an error is encountered
addr_line1 - character (256) - mandatory
addr_line2 - character (256) - optional
addr_line3 - character (256) - optional
latitude - character (32) - mandatory
longitude - character (32) - mandatory
location_code - character (36) - mandatory
contact_phone - character (16) - optional
contact_person - character (256) - optional
working_hours - character (32) - mandatory
per_kiosk_process_time - time - mandatory
center_start_time - time - mandatory
center_end_time - time - mandatory
lunch_start_time - time - optional
lunch_end_time - time - optional
holiday_loc_code - character (36) - mandatory
timezone - string (128) - optional
lang_code - character (3) - mandatory
zone_code - character (36) - mandatory
is_active should be set as “False”
number_of_kiosks should be kept as zero for creation of a Registration Center
center_end_time should not be before the center_start_time
Latitude and Longitude should be in format of “(-)XX.XXXX”
Latitude and Longitude should contain at-least 4 digits after decimal
If lunch_end_time and lunch_start_time is sent in the request,
lunch_end_time should not be before the lunch_start_time
The Zone received should be either same as the Zone mapped of the Administrator or a child zone of the Administrator's Zone
cr_by should be the Username of the user who is accessing this API
cr_dtimes should be the date-time at which the user is creating the Registration Center
Center ID should be generated by calling the Registration Center ID Generator and stored against every new Center Created
If, the data is recieved in secondary language and the data for primary language is not present in the database, the API should not allow creation of the Registration Center
Responds with the appropriate message for the Registration Center created successfully
History record should be stores for every creation of a new Registration Center
The API should restricts the bulk creation of Master Data
In case of Exceptions, system triggers error messages as received from the Database.
cntrtyp_code - character (36) - mandatory
addr_line1 - character (256) - mandatory
addr_line2 - character (256) - optional
addr_line3 - character (256) - optional
latitude - character (32) - mandatory
longitude - character (32) - mandatory
location_code - character (36) - mandatory
contact_phone - character (16) - optional
contact_person - character (256) - optional
working_hours - character (32) - mandatory
per_kiosk_process_time - time - mandatory
center_start_time - time - mandatory
center_end_time - time - mandatory
lunch_start_time - time - optional
lunch_end_time - time - optional
holiday_loc_code - character (36) - mandatory
timezone - string (128) - optional
lang_code - character (3) - mandatory
zone_code - character (36) - mandatory
is_active - boolean - mandatory
For the center_id received in the request, replaces all the data received in the request against the data existing in the List of Registration Center database against the same center_id.
All the mandatory input parameters should be present
center_end_time should not be before the center_start_time
Latitude and Longitude should be in format of “(-)XX.XXXX”
Latitude and Longitude should contain at-least 4 digits after decimal
If lunch_end_time and lunch_start_time is sent in the request,
lunch_end_time should not be before the lunch_start_time
The Zone received should be either same as the Zone mapped of the Administrator or a child zone of the Administrator's Zone
If in the database, all the mandatory data is present in primary langauge but not in the secondary langauge, API should update the data but mark the Registration Center as Inactive (is_acitve = false) regardless of what is received in the request for is_active flag
upd_by should be the Username of the user who is accessing this API
upd_dtimes should be the date-time at which the user is creating the Registration Center
History record should be stores for every modification of a Registration Center
Responds with the Registration Center Code and Language Code for the Registration Center updated successfully
In case of Exceptions, system triggers relevant error messages
Change the “is_Active” flag to “False” against the Registration Center.
upd_by should be the Username of the user who is accessing this API
del_dtimes should be the date-time when the Registration Center is being decommissioned
Validate if any Machine, Devices or Users are mapped to the Registration Center
If any Machine, Device or User is assigned to the Registration Center, do no decommission the Registration Center, throw an appropriate error message. Refer “Messages Section”.
The User accessing the API should only be able to decommission a Center under its administrative zone only
Responds with the appropriate message for the Registration Center decommissioned successfully
In case of Exceptions, system triggers relevant error messages
If the mandatory input parameters are missing, throws the appropriate message.
System also validates if the response contains the following attributes for the Registration Center ID along with values as applicable
Registration Center ID
Registration Center Name
Longitude
Latitude
IsActive
Center Type Code
Address
Working Hours
Contact Number
No. of kiosk
Per kiosk Processing time
Starting time
End time
IsActive
In case of Exceptions, system triggers relevant error messages.
Language Code - Mandatory
The record fetched is the latest record existing on or before the date received in the input parameter
If the mandatory input parameters are missing, system throws the appropriate message.
Validates if the response contains the following attributes for the Registration Center ID along with values as applicable
Registration Center ID
Registration Center Name
Longitude
Latitude
IsActive
Center Type Code
Address
Working Hours
Contact Number
No. of kiosk
Per koisk Processing time
Starting time
End time
IsActive
In case of Exceptions, system triggers relevant error messages.
If the mandatory input parameters are missing, throws the appropriate message
Validates if the response contains all the Registration Center against the Location Code received with the following attributes for the Registration Centers
Registration Center ID
Registration Center Name
Longitude
Latitude
IsActive
Center Type
Address
Working Hours
Contact Number
No. of kiosk
Per koisk Processing time
Starting time
End time
IsActive
In case of Exceptions, system triggers relevant error messages
Proximity Distance
Language Code
If the mandatory input parameters are missing, throw the appropriate message
The responses contain the list of all the Registration Centers in the radius of Proximity distance radius of the Longitude and the Latitude received with all the attributes for each Registration Center
System fetches the record against the Language Code Received
Validates if the response contains all the Registration Center against the Longitude and the Latitude and the Language Code received with the following attributes for the Registration Centers
Registration Center ID
Registration Center Name
Longitude
Latitude
IsActive
Center Type
Address
Working Hours
Contact Number
No. of kiosk
Per koisk Processing time
Starting time
End time
IsActive
In case of Exceptions, system triggers relevant error messages
Language Code - Mandatory
If the mandatory input parameters are missing, throws the appropriate message
The list of registration center is fetched based on the combination of Location Hierarchy level and Text received.
System also fetches the list based on the language code received.
The response contains below mentioned attributes for each registration center
Registration Center ID
Registration Center Name
Longitude
Latitude
IsActive
Center Type Code
Address
Working Hours
Contact Number
No. of kiosk
Per kiosk Processing time
Starting time
End time
IsActive
In case of Exceptions, system triggers relevant error messages.
If the mandatory input parameters are missing, system throws the appropriate message.
Responds with "Accept" message if both the following conditions are met:
The Registration Center corresponding to the Registration Center ID received must be not on a holiday on the date received in the input parameter.
The Timestamp received in the input parameter must be greater the Registration Center Opening time and Less than or equal to Closing time + 1 Hour.
Responds with the reject scenario if the above two conditions together are not met.
E.g., If the Registration center in not on a holiday and its opening and closing time is (9:00 AM to 5:00 PM). Find the sample response below for different timestamp received.
Timestamp - 4:00 PM - Accepted
Timestamp - 5:00 PM - Accepted
Timestamp - 6:00 PM - Accepted
Timestamp - 6:01 PM - Rejected
In case of Exceptions, system triggers relevant error messages
descr - Character - 128 - Optional
lang_code - Character - 3 - Mandatory
is_active - boolean (true/false) - Mandatory
All the mandatory input parameter(s) should be present in the reqeust. If not, throw an appropriate error message
The API should validate the data type and length for each attribute as mentioned above.
In case of any failed validation, API should respond with appropriate error message. Refer messages section
API should perfrom below multi-language validations on the Machine Type data recieved
If, the data is recieved in secondary language and the data for primary language is not present in the database, the API should not allow creation of the Machine Type and throw an error message. Refer messages section
If in the request, all the mandatory data is received in primary langauge but not in the secondary langauge, API should store the data but mark the Machine Type as Inactive (is_acitve = false) regardless of what is received in the request for is_active flag
If all the above validations are successfull, the API should store the data the the database
Machine Type Code should be generated at the back-end for any Machine Type added using a UUID generator
API should store cr_by as the Username of the user who is accessing this API
API should store cr_dtimes as the date-time at which the user is creating the Machine Type
API should only allow creation of one record at a time and should restrict bulk creation
API should audit the relevant data when the API is called successfully or when an error is encountered
name - Character - 64 - Mandatory
descr - Character - 128 - Optional
lang_code - Character - 3 - Mandatory
is_active - boolean (true/false) - Mandatory
All the mandatory input parameter(s) should be present in the reqeust. If not, throw an appropriate error message
The API should validate the data type and length for each attribute as mentioned above.
In case of any failed validation, API should respond with appropriate error message. Refer messages section
If all the above validations are successfull, the API should update the data in the database agianst the code received
API should perfrom below multi-language validations on the Machine Type data recieved
If in the database, all the mandatory data is present in primary langauge but not in the secondary langauge, API should update the data but mark the Machine Type as Inactive (is_acitve = false) regardless of what is received in the request for is_active flag
API should store upd_by as the Username of the user who is accessing this API
API should store upd_dtimes as the date-time at which the user is modiying the Machine Type details
API should only allow creation of one record at a time and should restrict bulk creation
API should audit the relevant data when the API is called successfully or when an error is encountered
brand - Character - 32 - Mandatory
model - Character - 16 - Mandatory
mtyp_code - Character - 36 - Mandatory
min_driver_version - Character - 16 - Mandatory
descr - Character - 256 - Optional
lang_code - Character - 3 - Mandatory
is_active - boolean (true/false) - Mandatory
All the mandatory input parameter(s) should be present in the reqeust. If not, throw an appropriate error message
The API should validate the data type and length for each attribute as mentioned above.
In case of any failed validation, API should respond with appropriate error message. Refer messages section
mtyp_code received should be from list of 'codes' from machine_type masterdata table
If not, the API should throw an error. Refer messages section
API should perfrom below multi-language validations on the Machine Specification data recieved
If, the data is recieved in secondary language and the data for primary language is not present in the database, the API should not allow creation of the Machine Specification and throw an error message. Refer messages section
If in the request, all the mandatory data is received in primary langauge but not in the secondary langauge, API should store the data but mark the Machine Specification as Inactive (is_acitve = false) regardless of what is received in the request for is_active flag
If all the above validations are successfull, the API should store the data the the database
Machine Specification Id should be generated at the back-end for any Machine Specification added using a UUID generator
API should store cr_by as the Username of the user who is accessing this API
API should store cr_dtimes as the date-time at which the user is creating the Machine Specification
API should only allow creation of one record at a time and should restrict bulk creation
API should audit the relevant data when the API is called successfully or when an error is encountered
name - Character - 64 - Mandatory
brand - Character - 32 - Mandatory
model - Character - 16 - Mandatory
mtyp_code - Character - 36 - Mandatory
min_driver_version - Character - 16 - Mandatory
descr - Character - 256 - Optional
lang_code - Character - 3 - Mandatory
is_active - boolean (true/false) - Mandatory
All the mandatory input parameter(s) should be present in the reqeust. If not, throw an appropriate error message
The API should validate the data type and length for each attribute as mentioned above.
In case of any failed validation, API should respond with appropriate error message. Refer messages section
mtyp_code received should be from list of 'codes' from machine_type masterdata table
If not, the API should throw an error.
If all the above validations are successfull, the API should update the data in the database agianst the id received
API should perfrom below multi-language validations on the Machine Specification data recieved
If in the database, all the mandatory data is present in primary langauge but not in the secondary langauge, API should update the data but mark the Machine Specification as Inactive (is_acitve = false) regardless of what is received in the request for is_active flag
API should store upd_by as the Username of the user who is accessing this API
API should store upd_dtimes as the date-time at which the user is modiying the Machine Specification details
API should only allow creation of one record at a time and should restrict bulk creation
API should audit the relevant data when the API is called successfully or when an error is encountered
mac_address - character (64) - mandatory
serial_num - character (64) - mandatory
ip_address- character (17) - optional
validity_end_dtimes - timestamp
mspec_id - character (36) - mandatory
lang_code - character (3) - mandatory
zone_code - character (36) - mandatory
is_active - boolean - mandatory
The Zone received should be either same as the Zone mapped of the Administrator or a child zone of the Administrator's Zone
cr_by should be the Username of the user who is accessing this API
cr_dtimes should be the date-time at which the user is creating the Machine
Machine ID should be generated by calling the Machine ID Generator and stored against every new Machine Created
If, the data is recieved in secondary language and the data for primary language is not present in the database, the API should not allow creation of the Machine and throw an error message. Refer messages section
If in the request, all the mandatory data is received in primary langauge but not in the secondary langauge, API should store the data but mark the Machine as Inactive (is_acitve = false) regardless of what is received in the request for is_active flag
If the request has been received for Deactivating an active machine, and the machine is mapped to a Registration Center, reduce the number of kiosk by 1 for that Registration Center in the Registration Center Master DB.
If the request has been received for Activating an Inactive machine, and the machine is mapped to a Registration Center, increase the number of kiosk by 1 for that Registration Center in the Registration Center Master DB.
Responds with the appropriate message for the Machine created successfully
History record should be stores for every creation of a new Machine
The API should restricts the bulk creation of Master Data
In case of Exceptions, system triggers error messages as received from the Database.
mac_address - character (64) - mandatory
serial_num - character (64) - mandatory
ip_address- character (17) - optional
validity_end_dtimes - timestamp
mspec_id - character (36) - mandatory
lang_code - character (3) - mandatory
zone_code - character (36) - mandatory
is_active - boolean - mandatory
For the machine_id received in the request, replaces all the data received in the request against the data existing in the List of Registration Center database against the same machine_id.
All the mandatory input parameters should be present
The Zone received should be either same as the Zone mapped of the Administrator or a child zone of the Administrator's Zone
The API should not allow activation of Machine if the data for the Machine is not present in all the languages which are configured for a country
If in the request, all the mandatory data is received in primary langauge but not in the secondary langauge, API should store the data but mark the Machine as Inactive (is_acitve = false) regardless of what is received in the request for is_active flag
upd_by should be the Username of the user who is accessing this API
upd_dtimes should be the date-time at which the user is creating the Machine
History record should be stores for every modification of a Machine
Responds with the Registration Center Code and Language Code for the Machine updated successfully
In case of Exceptions, system triggers relevant error messages
Change the “is_Active” flag to “False” against the Machine.
upd_by should be the Username of the user who is accessing this API
del_dtimes should be the date-time when the Machine is being decommissioned
Validate if the Machine is mapped to the Registration Center
If yes, do no decommission the Machine, throw an appropriate error message. Refer “Messages Section”.
The User accessing the API should only be able to decommission a Machine under its administrative zone only
Responds with the appropriate message for the Machine decommissioned successfully
In case of Exceptions, system triggers relevant error messages
Language Code - Mandatory
If the mandatory input parameters are missing, throws the appropriate message
Validates if the response contains the following attributes for the Machine ID and Language Code Received
Machine ID
Machine Name
Mac Address
IP Address
Serial Number
Machine Spec ID
IsActive
In case of Exceptions, system triggers relevant error messages
If the request has come for fetching all the machine details, responds with all the list of machines
If the mandatory input parameters are missing, throws the appropriate message.
Validates if the response contains the following attributes for the Machine ID
Machine ID
Machine Name
Mac Address
IP Address
Serial Number
Machine Spec ID
IsActive
In case of Exceptions, system triggers relevant error messages.
machine_id - character (10) - Mandatory
is_active - boolean - Mandatory
Responds with the Center ID, Machine ID ad User ID for the Center, User and Machine mapping created successfully
The component restricts the bulk creation of Master Data
In case of Exceptions, system triggers error messages as received from the Database.
usr_id - character (36) - Mandatory
Responds with the Center ID, Machine ID ad User ID for the Center, User and Machine mapping deleted successfully
In case of Exceptions, system triggers relevant error messages.
User ID - Mandatory
Date - Mandatory
If the mandatory input parameters are missing, system throws the appropriate message.
Validates if the response contains following attributes
Registration Center ID
Machine ID
User ID
IsActive
In case of Exceptions, system triggers relevant error messages.
serial_num - character (64) - Mandatory
ip_address - character (17) - Optional
dspec_id - character (36) - Mandatory
validity_end_date - date - Optional
lang_code - character (3) - Mandatory
is_active - boolean - Mandatory
The Zone received should be either same as the Zone mapped of the Administrator or a child zone of the Administrator's Zone
cr_by should be the Username of the user who is accessing this API
cr_dtimes should be the date-time at which the user is creating the Device
Device ID should be generated by calling the Device ID Generator and stored against every new Device Created
If, the data is recieved in secondary language and the data for primary language is not present in the database, the API should not allow creation of the Device and throw an error message. Refer messages section
If in the request, all the mandatory data is received in primary langauge but not in the secondary langauge, API should store the data but mark the Device as Inactive (is_acitve = false) regardless of what is received in the request for is_active flag
Responds with the appropriate message for the Device created successfully
History record should be stores for every creation of a new Device
The API should restricts the bulk creation of Master Data
In case of Exceptions, system triggers error messages as received from the Database.
mac_address - character (64) - Mandatory
serial_num - character (64) - Mandatory
ip_address - character (17) - Optional
dspec_id - character (36) - Mandatory
validity_end_date - date - Optional
lang_code - character (3) - Mandatory
is_active - boolean - Mandatory
For the device_id received in the request, replaces all the data received in the request against the data existing in the List of Registration Center database against the same device_id.
All the mandatory input parameters should be present
The Zone received should be either same as the Zone mapped of the Administrator or a child zone of the Administrator's Zone
The API should not allow activation of Device if the data for the Device is not present in all the languages which are configured for a country
If in the database, all the mandatory data is present in primary langauge but not in the secondary langauge, API should update the data but mark the Device as Inactive (is_acitve = false) regardless of what is received in the request for is_active flag
upd_by should be the Username of the user who is accessing this API
upd_dtimes should be the date-time at which the user is creating the Device
History record should be stores for every modification of a Device
Responds with the Registration Center Code and Language Code for the Device updated successfully
In case of Exceptions, system triggers relevant error messages
Change the “is_Active” flag to “False” against the Device.
upd_by should be the Username of the user who is accessing this API
del_dtimes should be the date-time when the Device is being decommissioned
Validate if the Device is mapped to the Registration Center
If yes, do no decommission the Device, throw an appropriate error message. Refer “Messages Section”.
The User accessing the API should only be able to decommission a Device under its administrative zone only
Responds with the appropriate message for the Machine decommissioned successfully
In case of Exceptions, system triggers relevant error messages
If the mandatory input parameters are missing, system throws the appropriate message.
If the input parameters contain only Language Code:
The response contains all the list of devices for all device types against the Languages code received
If the input parameters contain both Device Type and Language Code:
The response contains the list of devices against the Languages code for that Device Type only
After validation, the above listed parameters system responds with an appropriate message if data does not exist against the Language code/Device Type received.
Validates if the response contains the following attributes for each Device ID, if the input parameters contain only Language Code:
Device ID - Mandatory
Machine Name - Mandatory
Mac Address - Mandatory
IP address - Optional
Serial Number - Mandatory
Device Spec ID - Mandatory
IsActive - Mandatory
Validates if the response contains the following attributes for each Device ID, if the input parameters contain Device Type and Language Code:
Device Type-Mandatory
Device ID - Mandatory
Machine Name - Mandatory
Mac Address - Mandatory
IP address - Optional
Serial Number - Mandatory
Device Spec ID - Mandatory
IsActive - Mandatory
In case of Exceptions, system triggers relevant error messages.
Language Code - Mandatory
If the mandatory input parameters are missing, system throws the appropriate message
Validates if the response contains the following attributes for the Device ID and Language Code Received
Device ID - Mandatory
Device Name - Mandatory
Mac Address - Mandatory
IP address - Optional
Serial Number - Mandatory
Device Spec ID - Mandatory
Validity Time - Optional
Language Code - Mandatory
IsActive - Mandatory
In case of Exceptions, system triggers relevant error messages.
brand - Character - 32 - Mandatory
model - Character - 16 - Mandatory
dtyp_code - Character - 36 - Mandatory
min_driver_version - Character - 16 - Mandatory
descr - Character - 256 - Optional
lang_code - Character - 3 - Mandatory
is_active - boolean (true/false) - Mandatory
All the mandatory input parameter(s) should be present in the reqeust. If not, throw an appropriate error message
The API should validate the data type and length for each attribute as mentioned above.
In case of any failed validation, API should respond with appropriate error message. Refer messages section
dtyp_code received should be from list of 'codes' from device_type masterdata table
If not, the API should throw an error. Refer messages section
API should perfrom below multi-language validations on the Device Specification data recieved
If, the data is recieved in secondary language and the data for primary language is not present in the database, the API should not allow creation of the Device Specification and throw an error message. Refer messages section
If in the request, all the mandatory data is received in primary langauge but not in the secondary langauge, API should store the data but mark the Device Specification as Inactive (is_acitve = false) regardless of what is received in the request for is_active flag
If all the above validations are successfull, the API should store the data the the database
Device Specification Id should be generated at the back-end for any Device Specification added using a UUID generator
API should store cr_by as the Username of the user who is accessing this API
API should store cr_dtimes as the date-time at which the user is creating the Device Specification
API should only allow creation of one record at a time and should restrict bulk creation
API should audit the relevant data when the API is called successfully or when an error is encountered
If the mandatory input parameters are missing, throws the appropriate message.
If the input parameters contain only Language Code:
The response contains all the list of device specs against all the devices for the requested Language Code
If the input parameters contain Device Type and Language Code:
The response contains only the list of device specs against the requested device type for the requested Language Code
Validates if the response contains the List of Device Specifications with the following attributes, if the input parameters contain only Language Code
Device Specification ID
Device Name
Device Brand
Device Model
Device Type
Minimum Driver Version
IsActive
Validates if the response contains the List of Device Specifications with the following attributes, if the input parameters contain Device Type and Language Code
Device Type
Device Specification ID
Device Name
Device Brand
Device Model
Device Type
Minimum Driver Version
IsActive
In case of Exceptions, system triggers relevant error messages
name - Character - 64 - Mandatory
brand - Character - 32 - Mandatory
model - Character - 16 - Mandatory
dtyp_code - Character - 36 - Mandatory
min_driver_version - Character - 16 - Mandatory
descr - Character - 256 - Optional
lang_code - Character - 3 - Mandatory
is_active - boolean (true/false) - Mandatory
All the mandatory input parameter(s) should be present in the reqeust. If not, throw an appropriate error message
The API should validate the data type and length for each attribute as mentioned above.
In case of any failed validation, API should respond with appropriate error message. Refer messages section
dtyp_code received should be from list of 'codes' from device_type masterdata table
If not, the API should throw an error.
If all the above validations are successfull, the API should update the data in the database agianst the id received
API should perfrom below multi-language validations on the Device Specification data recieved
If in the database, all the mandatory data is present in primary langauge but not in the secondary langauge, API should update the data but mark the Device Specification as Inactive (is_acitve = false) regardless of what is received in the request for is_active flag
API should store upd_by as the Username of the user who is accessing this API
API should store upd_dtimes as the date-time at which the user is modiying the Device Specification details
API should only allow creation of one record at a time and should restrict bulk creation
API should audit the relevant data when the API is called successfully or when an error is encountered
descr - Character - 128 - Optional
lang_code - Character - 3 - Mandatory
is_active - boolean (true/false) - Mandatory
All the mandatory input parameter(s) should be present in the reqeust. If not, throw an appropriate error message
The API should validate the data type and length for each attribute as mentioned above.
In case of any failed validation, API should respond with appropriate error message. Refer messages section
API should perfrom below multi-language validations on the Device Type data recieved
If, the data is recieved in secondary language and the data for primary language is not present in the database, the API should not allow creation of the Device Type and throw an error message. Refer messages section
If in the request, all the mandatory data is received in primary langauge but not in the secondary langauge, API should store the data but mark the Device Type as Inactive (is_acitve = false) regardless of what is received in the request for is_active flag
If all the above validations are successfull, the API should store the data the the database
Device Type Code should be generated at the back-end for any Device Type added using a UUID generator
API should store cr_by as the Username of the user who is accessing this API
API should store cr_dtimes as the date-time at which the user is creating the Device Type
API should only allow creation of one record at a time and should restrict bulk creation
API should audit the relevant data when the API is called successfully or when an error is encountered
name - Character - 64 - Mandatory
descr - Character - 128 - Optional
lang_code - Character - 3 - Mandatory
is_active - boolean (true/false) - Mandatory
All the mandatory input parameter(s) should be present in the reqeust. If not, throw an appropriate error message
The API should validate the data type and length for each attribute as mentioned above.
In case of any failed validation, API should respond with appropriate error message. Refer messages section
If all the above validations are successfull, the API should update the data in the database agianst the code received
API should perfrom below multi-language validations on the Device Type data recieved
If in the database, all the mandatory data is present in primary langauge but not in the secondary langauge, API should update the data but mark the Device Type as Inactive (is_acitve = false) regardless of what is received in the request for is_active flag
API should store upd_by as the Username of the user who is accessing this API
API should store upd_dtimes as the date-time at which the user is modiying the Device Type details
API should only allow creation of one record at a time and should restrict bulk creation
API should audit the relevant data when the API is called successfully or when an error is encountered
is_active - boolean - Mandatory
Validate if the Registration Center belongs to the Zone of Admin or belongs to a child Zone of the Admin's Zone
Validate if the Registration Center belongs to the Zone of Machine or belongs to a child Zone of the Machine's Zone
Validate if the Machine belongs to the Zone of Admin or belongs to a child Zone of the Admin's Zone
Validate if the Registration Center and Machine received are not in decommissioned state
If the above conditions in point 2, 3, 4 and 5 are not met, throw respective error messages. Refer messages section
If the Machine ID is already mapped to another Registration Center ID and the mapping is Active, throw an appropriate error
If the mapping is Inactive, create the new mapping
Store the default language code against the mapping
If the Registration Center ID - Machine ID mapping already exist but is in Inactive state, re-activate the mapping
In case of Exceptions/Success, system should trigger relevant messages. Refer “Messages” sectione.
Validate if the Registration Center belongs to the Zone of Admin or belongs to a child Zone of the Admin's Zone
Validate if the Machine belongs to the Zone of Admin or belongs to a child Zone of the Admin's Zone
If the above conditions in point 3 and 4 are not met, throw respective error messages. Refer messages section
If the mapping does not exist or is in inactive state, throw an appropriate error
In case of Exceptions/Success, system should trigger relevant messages. Refer “Messages” section
Validate if the Registration Center belongs to the Zone of Admin or belongs to a child Zone of the Admin's Zone
Validate if the Registration Center belongs to the Zone of Device or belongs to a child Zone of the Device's Zone
Validate if the Device belongs to the Zone of Admin or belongs to a child Zone of the Admin's Zone
Validate if the Registration Center and Device received are not in decommissioned state
If the above conditions in point 2, 3, 4 and 5 are not met, throw respective error messages. Refer messages section
If the Device ID is already mapped to another Registration Center ID and the mapping is Active, throw an appropriate error
If the mapping is Inactive, create the new mapping
Store the default language code against the mapping
If the Registration Center ID - Device ID mapping already exist but is in Inactive state, re-activate the mapping
In case of Exceptions/Success, system should trigger relevant messages. Refer “Messages” section
Validate if the Registration Center belongs to the Zone of Admin or belongs to a child Zone of the Admin's Zone
Validate if the Device belongs to the Zone of Admin or belongs to a child Zone of the Admin's Zone
If the above conditions in point 3 and 4 are not met, throw respective error messages. Refer messages section 5 If the mapping does not exist or is in inactive state, throw an appropriate error
In case of Exceptions/Success, system should trigger relevant messages. Refer “Messages” section
Date Timestamp - Mandatory
If the mandatory input parameters are missing, throws the appropriate message.
Validates if the response contains following attributes
Registration Center ID
Device ID
IsActive
Effective date
In case of Exceptions, system triggers relevant error messages
device_id - character (36) – Mandatory (refers to a Device stored in Device Masterdata)
is_active - boolean - Mandatory
Responds with the Device Id, Machine ID and Center ID for the mapping of Center, Machine and Device created successfully
The component restricts the bulk creation of Master Data
In case of Exceptions, system triggers error messages as received from the Database.
device_id - character (36) - Mandatory
Deleted record are not be deleted again
Responds with data not found error if deleted record is received in the request
Responds with the Device Id, Machine ID and Center ID for the mapping of Center, Machine and Device deleted successfully
In case of Exceptions, system triggers relevant error messages.
is_active - boolean - Mandatory
Validate if the Registration Center belongs to the Zone of Admin or belongs to a child Zone of the Admin's Zone
Validate if the Registration Center belongs to the Zone of User or belongs to a child Zone of the User's Zone
Validate if the User belongs to the Zone of Admin or belongs to a child Zone of the Admin's Zone
Validate if the Registration Center and User received are not in decommissioned state
If the above conditions in point 2, 3, 4 and 5 are not met, throw respective error messages. Refer messages section
If the User ID is already mapped to another Registration Center ID and the mapping is Active, throw an appropriate error
If the mapping is Inactive, create the new mapping
Store the default language code against the mapping
If the Registration Center ID - User ID mapping already exist but is in Inactive state, re-activate the mapping
In case of Exceptions/Success, system should trigger relevant messages. Refer “Messages” section
Validate if the Registration Center belongs to the Zone of Admin or belongs to a child Zone of the Admin's Zone
Validate if the User belongs to the Zone of Admin or belongs to a child Zone of the Admin's Zone
If the above conditions in point 3 and 4 are not met, throw respective error messages. Refer messages section
If the mapping does not exist or is in inactive state, throw an appropriate error
In case of Exceptions/Success, system should trigger relevant messages. Refer “Messages” section
If the mandatory input parameters are missing, throws the appropriate message.
In case of exceptions, system triggers relevant error messages.
If MISP Organization Name is received, fetches data against the MISP Organization Name from the database
If both MISP ID and MISP Organization Name is received, fetches data against the combination of both the input parameters (Complete match of Org name and MISP ID)
Fetches only active data from the database
If the input parameter received is null or empty, fetches all the data
If the mandatory input parameters are missing, throws the appropriate message.
If the data does not exist for input parameters received, throws the appropriate message.
In case of Exceptions, system triggers relevant error messages.
The system updates the data received against the data already existing in the database against the MISP ID received
If the mandatory input parameters are missing, throws the appropriate message.
In case of Exceptions, system triggers relevant error messages.
If the mandatory input parameters are missing, throws the appropriate message.
In case of exceptions, system triggers relevant error messages.
Update a Location
Verify Location
List of Holidays
Create Holiday
Update Holiday
Fetch List of Holidays based on a Registration Center ID, a Year and a Language Code
Biometric Authentication Type
Create Biometric Authentication Type
Fetch the List of Biometric Authentication Type based on a Language Code
Biometric Attribute Type
Create Biometric Attribute
Fetch the List of Biometric Attributes based on the Biometric Authentication Type and a Language Code
Gender
Create Gender Types
Update a Gender Type
Check the existence of a Gender in Master Database
Fetch the List of Gender Types based on a Language Code
Document Category
Create Document Category in Master Database
Update a Document Category in the Document Category Master Database
Fetch list of Document Categories based on a Language Code
Document Type
Create Document Type
Update a Document Type
Delete a Document Type
Applicant Type - Document Category - Document Type Mapping
Fetch list of Document Categories based on Applicant Type from Master Database
Fetch List of Document Category-Document Type mappings based on Applicant Type and a List of Language Codes
Delete a Document Category-Type mapping in the Document Category-Type mapping Master Database
Fetch applicant type based on Individual Type Code, Date of Birth, Gender Type Code and Biometric Exception Type
Check the mapping of Applicant Type-Document Category Name-Document Type Name
List of Rejection Reasons
Create a Rejection Reason in Reason List Master Database
Fetch the requested list of reasons based on Reason Category Code and Language Code
List of Languages
Create List of Languages
Fetch the List of Languages
Update and Delete a Language in the List of Languages Master Database
List of Titles
Create a Title
Update a Title
Fetch the List of Titles
Template File Format
Create Template File Format
Create Template File Format
List of Template Types
List of Templates
Create Template
Fetch Template based on a Template Type and a Language Code
Update a Template
List of Blacklisted Words
Create Blacklisted Words
Update a Blacklisted Word
Delete a Blacklisted Word
Fetch List of Blacklisted words based on a Language Code
List of Reason Categories
List of Applications
Create a List of Applications
Fetch List of Applications based on received input parameter
List of ID Types
Create an ID type
Fetch the List of ID Types based on Language Code
User Details
User Details
Fetch RID based on a User ID
Document Type to Category Mapping
Create a mapping record of Document Type and Document Category in Valid Document Mapping Master Database
Remove a mapping record of Document Type and Document Category in Valid Document Mapping Master Database
Working and Non-Working Days
API should be able to fetch working days for a Center based on a Center ID
Exceptional Holidays for a Center
API should be able to fetch any defined exceptional holiday dates for a Center based on a Center ID
Registration Management
Registration Center Type
Create Registration Center Type
Update a Registration Center Type
Registration Center
Create a Registration Center
Update a Registration Center
Decommission a Registration Center
Fetch Registration Center details based on a Registration Center ID and Language Code.
Fetch Registration Center record based on a Registration center ID, Date and Language Code from the Registration Center Updation/Creation History table
Fetch Registration Center details based on a Location Code and a Language Code
Fetch Registration Center details based on a Longitude and a Latitude, Proximity Distance and Language Code
Fetch the List of Registration Centers based on Location Hierarchy Level, text input and a Language Code
Validates whether a Registration Center is under working hours based on a timestamp received
List of Machine Types
Creation of a Machine Type
Update of a Machine Type
List of Machine Specifications
Create Machine Specifications
Update a Machine Specification
List of Machines
Create a Machine in Master Database
Update a Machine in the List of Machines Master Database
Decommission a Machine in the List of Machines Master Database
Fetch Machine Registration/Updation History detail based on a Machine ID and Language Code
Fetch Machine Details based on a Machine ID and a Language Code
Mappings of Registration Center, Machine and User Mappings
Create a mapping record of Center, User and Machine in Center-User-Machine Mapping Master Database
Delete a Center-Machine-User mapping in the Center-Machine-User mapping Master Database
Fetch Mapping History of Registration Center, Machine and User based on Registration Centre ID, Machine ID, User ID and Date
List of Devices
Create a Device
Update a Device
Decommission a Device
Fetch all the List of Devices based on Device Type and Language Code
Fetch Device Registration/Update History detail based on a Device ID and Language Code
List of Device Specifications
Create Device Specifications
Fetch List of Device Specifications based on a Language Code
Update a Device Specification
List of Device Types
Create Device Type
Update Device Type
Mappings of Registration Center and Machine
Create a mapping record of Machine and Center
Delete a Center-Machine mapping
Mappings of Registration Center and Device
Create a mapping record of Device and Center
Unmap a Center-Device mapping
Fetch Device-Center History record based on the timestamp received
Mappings of Registration Center, Machine, and Device
Create a mapping record of Center, Machine and Device
Delete a Center-Machine-Device mapping
Mappings of Registration Center and User
Create a mapping record of User and Center
Delete a Center-User mapping
MISP Management
License Key Allocation
Create MISP
Read MISP
Update MISP
Delete MISP
Registration Processor Audits
Registration Processor processes the data (demographic and biometric) of an Individual for quality and uniqueness and then issues a Unique Identification Number (UIN). It also provides functionality to update demographic and biometric data and issue a new UIN if lost.
All modules
System Events
The following events are triggered as part of System Event Type for all modules in Registration Processor
Failure response for System Event Type
Sl No.
Event ID
Event Type
Event Name
Description
Reference ID
Reference ID Type
The following events are triggered as part of User Event Type in Packet Receiver Stage
Sl No.
Event ID
Event Type
Event Name
Description
Reference ID
Reference ID Type
The following events are triggered as part of System Event Type in Packet Receiver Stage
Sl No.
Event ID
Event Type
Event Name
Description
Reference ID
Reference ID Type
The following events are triggered as part of User Event Type in OSI Validator Stage
Sl No.
Event ID
Event Type
Event Name
Description
Reference ID
Reference ID Type
The following events are triggered as part of System Event Type in OSI Validator Stage
Sl No.
Event ID
Event Type
Event Name
Description
Reference ID
Reference ID Type
The following events are triggered as part of User Event Type in Packet Classifier Stage
Sl No.
Event ID
Event Type
Event Name
Description
Reference ID
Reference ID Type
The following events are triggered as part of System Event Type in Packet Classifier Stage
Sl No.
Event ID
Event Type
Event Name
Description
Reference ID
Reference ID Type
The following events are triggered as part of User Event Type in Packet Uploader Stage
Sl No.
Event ID
Event Type
Event Name
Description
Reference ID
Reference ID Type
The following events are triggered as part of System Event Type in Packet Uploader Stage
Sl No.
Event ID
Event Type
Event Name
Description
Reference ID
Reference ID Type
The following events are triggered as part of User Event Type in Packet Validator Stage
Sl No.
Event ID
Event Type
Event Name
Description
Reference ID
Reference ID Type
The following events are triggered as part of System Event Type in Packet Validator Stage
Sl No.
Event ID
Event Type
Event Name
Description
Reference ID
Reference ID Type
The following events are triggered as part of User Event Type in Quality Checker Stage
Sl No.
Event ID
Event Type
Event Name
Description
Reference ID
Reference ID Type
The following events are triggered as part of System Event Type in Quality Checker Stage
Sl No.
Event ID
Event Type
Event Name
Description
Reference ID
Reference ID Type
The following events are triggered as part of User Event Type in Secure Zone Notification Stage
Sl No.
Event ID
Event Type
Event Name
Description
Reference ID
Reference ID Type
The following events are triggered as part of System Event Type in Secure Zone Notification Stage
Sl No.
Event ID
Event Type
Event Name
Description
Reference ID
Reference ID Type
The following events are triggered as part of User Event Type in Message Sender Stage
Sl No.
Event ID
Event Type
Event Name
Description
Reference ID
Reference ID Type
The following events are triggered as part of System Event Type in Message Sender Stage
Sl No.
Event ID
Event Type
Event Name
Description
Reference ID
Reference ID Type
The following events are triggered as part of User Event Type in Print Stage
Sl No.
Event ID
Event Type
Event Name
Description
Reference ID
Reference ID Type
The following events are triggered as part of System Event Type in Print Stage
Sl No.
Event ID
Event Type
Event Name
Description
Reference ID
Reference ID Type
The following events are triggered as part of User Event Type in Re-Processor Stage
Sl No.
Event ID
Event Type
Event Name
Description
Reference ID
Reference ID Type
The following events are triggered as part of System Event Type in Re-Processor Stage
Sl No.
Event ID
Event Type
Event Name
Description
Reference ID
Reference ID Type
The following events are triggered as part of User Event Type in ABIS Handler Stage
Sl No.
Event ID
Event Type
Event Name
Description
Reference ID
Reference ID Type
The following events are triggered as part of System Event Type in ABIS Handler Stage
Sl No.
Event ID
Event Type
Event Name
Description
Reference ID
Reference ID Type
The following events are triggered as part of User Event Type in Bio Dedupe Stage
Sl No.
Event ID
Event Type
Event Name
Description
Reference ID
Reference ID Type
The following events are triggered as part of System Event Type in Bio Dedupe Stage
Sl No.
Event ID
Event Type
Event Name
Description
Reference ID
Reference ID Type
The following events are triggered as part of User Event Type in Biometric Authentication Stage
Sl No.
Event ID
Event Type
Event Name
Description
Reference ID
Reference ID Type
The following events are triggered as part of System Event Type in Biometric Authentication Stage
Sl No.
Event ID
Event Type
Event Name
Description
Reference ID
Reference ID Type
The following events are triggered as part of User Event Type in Demo Dedupe Stage
Sl No.
Event ID
Event Type
Event Name
Description
Reference ID
Reference ID Type
The following events are triggered as part of System Event Type in Demo Dedupe Stage
Sl No.
Event ID
Event Type
Event Name
Description
Reference ID
Reference ID Type
The following events are triggered as part of User Event Type in Manual Verification Stage
Sl No.
Event ID
Event Type
Event Name
Description
Reference ID
Reference ID Type
The following events are triggered as part of System Event Type in Manual Verification Stage
Sl No.
Event ID
Event Type
Event Name
Description
Reference ID
Reference ID Type
The following events are triggered as part of User Event Type in UIN Generator Stage
Sl No.
Event ID
Event Type
Event Name
Description
Reference ID
Reference ID Type
The following events are triggered as part of System Event Type in UIN Generator Stage
Sl No.
Event ID
Event Type
Event Name
Description
Reference ID
Reference ID Type
This event specifies that there was a bad gateway
No ID
No ID Type
3
RPR_405
System
Exception
This event specifies that the service is unavailable
No ID
No ID Type
4
RPR_405
System
Exception
This event specifies that an internal server error has occured
No ID
No ID Type
5
RPR_405
System
Exception
This event specifies that a time out error has occured
No ID
No ID Type
6
RPR_405
System
Exception
This event specifies that there was an error while mapping the identity json
No ID
No ID Type
7
RPR_405
System
Exception
This event specifies that there was an error while creating an object of Json value class
No ID
No ID Type
8
RPR_405
System
Exception
This event specifies that the field could not be found
No ID
No ID Type
9
RPR_405
System
Exception
This event specifies that there was an error while parsing the json
No ID
No ID Type
10
RPR_405
System
Exception
This event specifies that there was an error while converting the input streams to bytes
No ID
No ID Type
11
RPR_405
System
Exception
This event specifies that there was an error while parsing the date value
No ID
No ID Type
12
RPR_405
System
Exception
This event specifies that there was an IO exception
No ID
No ID Type
13
RPR_405
System
Exception
This event specifies that there was a data access exception
No ID
No ID Type
14
RPR_405
System
Exception
This event specifies that there was a API resource exception
No ID
No ID Type
15
RPR_405
System
Exception
This event specifies that there was a illegal access exception
No ID
No ID Type
16
RPR_405
System
Exception
This event specifies that there was a invocation target exception
No ID
No ID Type
17
RPR_405
System
Exception
This event specifies that there was a introspection exception
No ID
No ID Type
18
RPR_405
System
Exception
This event specifies that the object store was not accessible
No ID
No ID Type
19
RPR_405
System
Exception
This event specifies that the copying of packet tags to message events failed
No ID
No ID Type
Add/Save
This event specifies that the packet receiver validation is successful.
No ID
No ID Type
2
RPR_407
User
Add/Save
This event specifies that the Packet is received and uploaded to landing zone
No ID
No ID Type
Exception
This event specifies that the size of the packet is invalid
No ID
No ID Type
2
RPR_405
System
Exception
This event specifies that the packet format is invalid
No ID
No ID Type
3
RPR_405
System
Exception
This event specifies that the packet validation has failed
No ID
No ID Type
4
RPR_405
System
Exception
This event specifies that a duplicate packet request has been received
No ID
No ID Type
5
RPR_405
System
Exception
This event specifies that the packet is not available in the request
No ID
No ID Type
6
RPR_405
System
Exception
This event specifies that an unknown exception was found
No ID
No ID Type
7
RPR_405
System
Exception
This event specifies that the virus scan service is not responding
No ID
No ID Type
8
RPR_405
System
Exception
This event specifies that the Packet Hash Sequence did not match
No ID
No ID Type
9
RPR_405
System
Exception
This event specifies that there was a virus found in packet
No ID
No ID Type
10
RPR_405
System
Exception
This event specifies that the API resource is not accessible
No ID
No ID Type
11
RPR_405
System
Exception
This event specifies that the database is not accessible
No ID
No ID Type
12
RPR_405
System
Exception
This event specifies that the packet size is not matching
No ID
No ID Type
13
RPR_405
System
Exception
This event specifies that the Registration Packet HashSequence is not equal to the synced packet HashSequence
No ID
No ID Type
14
RPR_405
System
Exception
This event specifies that the packet decryption has failed
No ID
No ID Type
Update
This event specifies that the OSI validation was successful.
No ID
No ID Type
Exception
This event specifies that the OSI validation has failed
No ID
No ID Type
2
RPR_405
System
Exception
This event specifies that the packet store is not accessible
No ID
No ID Type
3
RPR_405
System
Exception
This event specifies that the API resource is not accessible
No ID
No ID Type
4
RPR_405
System
Exception
This event specifies that there was biometric type exception.
No ID
No ID Type
5
RPR_405
System
Exception
This event specifies that the request could not be processed and should be tried again.
No ID
No ID Type
Update
This event specifies that the packet classifier was successful.
No ID
No ID Type
Exception
This event specifies that the packet classifier has failed
No ID
No ID Type
2
RPR_405
System
Exception
This event specifies that the packet classification has failed
No ID
No ID Type
3
RPR_405
System
Exception
This event specifies that the tag generation has failed
No ID
No ID Type
4
RPR_405
System
Exception
This event specifies that getting the required Id object field names from tag generator has failed.
No ID
No ID Type
5
RPR_405
System
Exception
This event specifies that the Idobject mapping file field was not accessible
No ID
No ID Type
6
RPR_405
System
Exception
This event specifies that the Field's schema data type is not supported.
No ID
No ID Type
7
RPR_405
System
Exception
This event specifies that the JSON parsing of field value according to the schema type has failed.
No ID
No ID Type
8
RPR_405
System
Exception
This event specifies that the JSON parsing to java object has failed.
No ID
No ID Type
9
RPR_405
System
Exception
This event specifies that the JSON parsing of meta info has failed.
No ID
No ID Type
10
RPR_405
System
Exception
This event specifies that the Mapping field name is not present in identity mapping json.
No ID
No ID Type
11
RPR_405
System
Exception
This event specifies that the required value is not available in the configured language for field.
No ID
No ID Type
12
RPR_405
System
Exception
This event specifies that the FieldDTO or non string field value is null.
No ID
No ID Type
13
RPR_405
System
Exception
This event specifies that the sync registration entity is not available.
No ID
No ID Type
14
RPR_405
System
Exception
This event specifies that the Exception Biometrics entry is not available in metainfo map.
No ID
No ID Type
15
RPR_405
System
Exception
This event specifies that the Operations data entry is not avaiable in metainfo map.
No ID
No ID Type
16
RPR_405
System
Exception
This event specifies that the Meta data entry is not avaiable in metainfo map.
No ID
No ID Type
17
RPR_405
System
Exception
This event specifies that the Age Group Range Map configuration does not contain age group for given age.
No ID
No ID Type
18
RPR_405
System
Exception
This event specifies that the captured registered devices entry is not avaiable in the metainfo map.
No ID
No ID Type
Update
This event specifies that the packet is uploaded to the file system successfully.
No ID
No ID Type
2
RPR_402
User
Packet Archiving
This event specifies that the packet is successfully archived.
No ID
No ID Type
Exception
This event specifies that the packet was not found in the landing zone
No ID
No ID Type
2
RPR_405
System
Exception
This event specifies that the file is already exists in file store and its now deleted from landing zone
No ID
No ID Type
3
RPR_405
System
Exception
This event specifies that the Packet store set by the System is not accessible
No ID
No ID Type
4
RPR_405
System
Exception
This event specifies that the registration packet virus scan has failed
No ID
No ID Type
5
RPR_405
System
Exception
This event specifies that the Virus scanner service has failed
No ID
No ID Type
6
RPR_405
System
Exception
This event specifies that the JSCH connection has failed
No ID
No ID Type
7
RPR_405
System
Exception
This event specifies that the packet could not be retreived from the nginx URL
No ID
No ID Type
8
RPR_405
System
Exception
This event specifies that the Registration packet is not in Sync with Sync table
No ID
No ID Type
9
RPR_405
System
Exception
This event specifies that the Registration packet decryption has failed
No ID
No ID Type
10
RPR_405
System
Exception
This event specifies that the packet upload has failed during cleanup
No ID
No ID Type
11
RPR_405
System
Exception
This event specifies that the packet upload failed during the archival
No ID
No ID Type
12
RPR_405
System
Exception
This event specifies that the there was a failure in uploading the packet to Packet Store
No ID
No ID Type
Update
This event specifies that the packet validation was successful.
No ID
No ID Type
Exception
This event specifies that the structural validation has failed
No ID
No ID Type
2
RPR_405
System
Exception
This event specifies that the data is not available in Master DB
No ID
No ID Type
3
RPR_405
System
Exception
This event specifies that the attribute is not available in ID JSON for master data validation
No ID
No ID Type
4
RPR_405
System
Exception
This event specifies that the resource was not found for master data validation
No ID
No ID Type
5
RPR_405
System
Exception
This event specifies that there was an invalid attribute value for master data validation
No ID
No ID Type
6
RPR_405
System
Exception
This event specifies that the the API resource was not accessible
No ID
No ID Type
7
RPR_405
System
Exception
This event specifies that the ID Schema validation has failed
No ID
No ID Type
8
RPR_405
System
Exception
This event specifies that the document type was invalid for document validation
No ID
No ID Type
9
RPR_405
System
Exception
This event specifies that the ID Json was not found
No ID
No ID Type
10
RPR_405
System
Exception
This event specifies that the document validation failed for applicant
No ID
No ID Type
11
RPR_405
System
Exception
This event specifies that the packet was rejected by the supervisor.
No ID
No ID Type
12
RPR_405
System
Exception
This event specifies that the an error has occured in the packet manager.
No ID
No ID Type
13
RPR_405
System
Exception
This event specifies that the ID Schema validation has failed.
No ID
No ID Type
14
RPR_405
System
Exception
This event specifies that the UIN is deactivated
No ID
No ID Type
15
RPR_405
System
Exception
This event specifies that the mandatory field validation has failed
No ID
No ID Type
16
RPR_405
System
Exception
This event specifies that there was a registration type mismatch
No ID
No ID Type
17
RPR_405
System
Exception
This event specifies that the UIN is invalid
No ID
No ID Type
Update
This event specifies that the Quality check was successful.
No ID
No ID Type
Exception
This event specifies that the Registration table was not accessible
No ID
No ID Type
2
RPR_405
System
Exception
This event specifies that the result was not found
No ID
No ID Type
3
RPR_405
System
Exception
This event specifies that there was a invalid QC User Id
No ID
No ID Type
4
RPR_405
System
Exception
This event specifies that the Registration ID was invalid
RID
Registration Id
5
RPR_405
System
Exception
This event specifies that it was unable to find Biometric file name in ID JSON
No ID
No ID Type
6
RPR_405
System
Exception
This event specifies that it was unable to find Biometric file in the Packet
No ID
No ID Type
7
RPR_405
System
Exception
This event specifies that a Biometric Exception was received form IDA
No ID
No ID Type
8
RPR_405
System
Exception
This event specifies that the requested biometric type was not found
No ID
No ID Type
9
RPR_405
System
Exception
This event specifies that the Individual Biometric Parameter was not found in the ID JSON
No ID
No ID Type
10
RPR_405
System
Exception
This event specifies that the Quality ccore of the Biometrics captured was below the threshold
No ID
No ID Type
11
RPR_405
System
Exception
This event specifies that the Packet store set by the System is not accessible
No ID
No ID Type
12
RPR_405
System
Exception
This event specifies that an unknown exception has occured
No ID
No ID Type
13
RPR_405
System
Exception
This event specifies that an exception has occured in the packet manager
No ID
No ID Type
Add/Save
This event specifies that the secure zone notification was successful.
No ID
No ID Type
Exception
This event specifies that an exception has occured in secure zone notification stage
No ID
No ID Type
2
RPR_405
System
Exception
This event specifies that the Registration table was not accessible
No ID
No ID Type
Update
This event specifies that the message sending stage was successfully executed.
No ID
No ID Type
Exception
This event specifies that the template was not found
No ID
No ID Type
2
RPR_405
System
Exception
This event specifies that the processing of template has failed
No ID
No ID Type
3
RPR_405
System
Exception
This event specifies that the packet store set by the system is not accessible
No ID
No ID Type
4
RPR_405
System
Exception
This event specifies that the template generation has failed
No ID
No ID Type
5
RPR_405
System
Exception
This event specifies that the phone number was not found
No ID
No ID Type
6
RPR_405
System
Exception
This event specifies that the Email ID was not found
No ID
No ID Type
7
RPR_405
System
Exception
This event specifies that the configuration and language code was not found
No ID
No ID Type
8
RPR_405
System
Exception
This event specifies that it was unable to send the notification since UIN was not found for the lost packet
UIN
UIN
9
RPR_405
System
Exception
This event specifies that the template configuration and language was not found
No ID
No ID Type
10
RPR_405
System
Exception
This event specifies that the Message Sender Stage has failed
No ID
No ID Type
11
RPR_405
System
Exception
This event specifies that either Email ID or Phone or Template or Notification Type is Missing
No ID
No ID Type
12
RPR_405
System
Exception
This event specifies that the email sending has failed
No ID
No ID Type
13
RPR_405
System
Exception
This event specifies that the SMS sending has failed
No ID
No ID Type
Update
This event specifies that the print request was submitted successfully.
No ID
No ID Type
2
RPR_402
User
Update
This event specifies that the print and post event was completed successfully.
No ID
No ID Type
Exception
This event specifies that there was an error while generating the PDF for UIN Card
No ID
No ID Type
2
RPR_405
System
Exception
This event specifies that the UIN was not found in the database
No ID
No ID Type
3
RPR_405
System
Exception
This event specifies that the PDF generation has Failed
No ID
No ID Type
4
RPR_405
System
Exception
This event specifies that the Queue connection is null
No ID
No ID Type
5
RPR_405
System
Exception
This event specifies that there was an error while generating the QR Code
No ID
No ID Type
6
RPR_405
System
Exception
This event specifies that there was an error while setting up the applicant photo
No ID
No ID Type
7
RPR_405
System
Exception
This event specifies that there was an error while setting the QR Code for UIN card
No ID
No ID Type
8
RPR_405
System
Exception
This event specifies that the ID Repo response is null
No ID
No ID Type
9
RPR_405
System
Exception
This event specifies that the ID Repo response has no documents
No ID
No ID Type
10
RPR_405
System
Exception
This event specifies that there was an error while getting response from Print and Postal service provider
No ID
No ID Type
11
RPR_405
System
Exception
This event specifies that there was an error while print data validation
No ID
No ID Type
12
RPR_405
System
Exception
This event specifies that it was a Invalid CardType
UIN
UIN
13
RPR_405
System
Exception
This event specifies that it was a Invalid IdType
UIN,VID,RID
UIN,VID,RID
14
RPR_405
System
Exception
This event specifies that the UIN is not valid
UIN
UIN
15
RPR_405
System
Exception
This event specifies that the VID is not valid
VID
VID
16
RPR_405
System
Exception
This event specifies that the RID is not valid
RID
RID
17
RPR_405
System
Exception
This event specifies that there was an error while creating the VID
No ID
No ID Type
18
RPR_405
System
Exception
This event specifies that it could not generate/regenerate VID as per policy,Please use existing VID
VID
VID
19
RPR_405
System
Exception
This event specifies that the input parameter was missing
No ID
No ID Type
20
RPR_405
System
Exception
This event specifies that there was a invalid input parameter
No ID
No ID Type
21
RPR_405
System
Exception
This event specifies that the Pdf was not added to queue due to queue failure
No ID
No ID Type
22
RPR_405
System
Exception
This event specifies that the uin card was resent for printing
No ID
No ID Type
23
RPR_405
System
Exception
This event specifies that there was an error while QR Code generation
No ID
No ID Type
24
RPR_405
System
Exception
This event specifies that there was an error while creating the VID
No ID
No ID Type
25
RPR_405
System
Exception
This event specifies that there was a PDF signature error
No ID
No ID Type
26
RPR_405
System
Exception
This event specifies that the print request has failed
No ID
No ID Type
27
RPR_405
System
Exception
This event specifies that the API resource was not accessible
No ID
No ID Type
Update
This event specifies that the packet reprocessing was successfull.
No ID
No ID Type
2
RPR_402
User
Update
This event specifies that the request sent to reprocessor was successfull.
No ID
No ID Type
3
RPR_402
User
Update
This event specifies that the packet reprocessing has failed
No ID
No ID Type
Exception
This event specifies that the Reprocessor stage has failed
No ID
No ID Type
Update
This event specifies that the ABIS handler stage was successfull.
No ID
No ID Type
2
RPR_402
User
Update
This event specifies that the Abis insert Requests was sucessfully sent to the Queue.
No ID
No ID Type
Exception
This event specifies that the Abis Queue details are not found
No ID
No ID Type
2
RPR_405
System
Exception
This event specifies that the potential match records are not found for demo dedupe potential match
No ID
No ID Type
3
RPR_405
System
Exception
This event specifies that there was an internal error occured in Abis handler identify request
No ID
No ID Type
4
RPR_405
System
Exception
This event specifies that it was unable to find ABIS Reference ID
No ID
No ID Type
5
RPR_405
System
Exception
This event specifies that it was unable to find latest Transaction ID
No ID
No ID Type
6
RPR_405
System
Exception
This event specifies that it was unable to find Identify Request
No ID
No ID Type
7
RPR_405
System
Exception
This event specifies that it was unable to find ABIS Connection Properties
No ID
No ID Type
8
RPR_405
System
Exception
This event specifies that an unknown exception was found
No ID
No ID Type
9
RPR_405
System
Exception
This event specifies that it was unable to find ABIS Batch ID
No ID
No ID Type
10
RPR_405
System
Exception
This event specifies that it was unable to connect with the ABIS Queue
No ID
No ID Type
11
RPR_405
System
Exception
This event specifies that an Internal error has occured
No ID
No ID Type
12
RPR_405
System
Exception
This event specifies that a duplicate insert response is received from abis for same request id
No ID
No ID Type
13
RPR_405
System
Exception
This event specifies that a duplicate identify response is received from abis for same request id
No ID
No ID Type
Update
This event specifies that the packet dedupe was successfull.
No ID
No ID Type
2
RPR_402
User
Update
This event specifies that a potential match was found while processing bio dedupe.
No ID
No ID Type
3
RPR_402
User
Update
This event specifies that a unique match was found for the Biometrics Received.
No ID
No ID Type
Exception
This event specifies that the Bio Dedupe has failed
No ID
No ID Type
2
RPR_405
System
Exception
This event specifies that it was unable to access the packet from Packet Store
No ID
No ID Type
3
RPR_405
System
Exception
This event specifies that the Biometric Insertion has failed in ABIS
No ID
No ID Type
4
RPR_405
System
Exception
This event specifies that an ABIS Internal error has occurred
No ID
No ID Type
5
RPR_405
System
Exception
This event specifies that a Datashare exception has occured
No ID
No ID Type
Update
This event specifies that the Biometric Authentication was successfull.
No ID
No ID Type
Exception
This event specifies that the Biometric Authentication has failed
No ID
No ID Type
2
RPR_405
System
Exception
This event specifies that there was a IO exception
No ID
No ID Type
3
RPR_405
System
Exception
This event specifies that the API resource was not accessible
No ID
No ID Type
4
RPR_405
System
Exception
This event specifies that the request could not be processed
No ID
No ID Type
5
RPR_405
System
Exception
This event specifies that the registration table was not accessible
No ID
No ID Type
Update
This event specifies that the demo dedupe was successfull.
No ID
No ID Type
Exception
This event specifies that a Potential duplicate packet was found for registration id
RID
Registration ID
2
RPR_402
System
Exception
This event specifies that the Demographic Deduplication was Skipped
No ID
No ID Type
3
RPR_405
System
Exception
This event specifies that an ABIS response details was found.Hence sending to manual adjudication
No ID
No ID Type
4
RPR_405
System
Exception
This event specifies that the API resource was not accessible
No ID
No ID Type
Update
This event specifies that the Manual verification was approved.
No ID
No ID Type
Exception
This event specifies that there was a Invalid file request
No ID
No ID Type
2
RPR_405
System
Exception
This event specifies that the requested file is not present
No ID
No ID Type
3
RPR_405
System
Exception
This event specifies that there was a invalid status update
No ID
No ID Type
4
RPR_405
System
Exception
This event specifies that no assigned record was found
No ID
No ID Type
5
RPR_405
System
Exception
This event specifies that the fields can not be empty
No ID
No ID Type
6
RPR_405
System
Exception
This event specifies that there was a missing input parameter - requesttime
No ID
No ID Type
7
RPR_405
System
Exception
This event specifies that there was a missing input parameter - id
No ID
No ID Type
8
RPR_405
System
Exception
This event specifies that there was a invalid input parameter - version
No ID
No ID Type
9
RPR_405
System
Exception
This event specifies that there was a invalid input parameter - requesttime
No ID
No ID Type
10
RPR_405
System
Exception
This event specifies that there was a invalid input parameter - id
No ID
No ID Type
11
RPR_405
System
Exception
This event specifies that there was a invalid argument exception
No ID
No ID Type
12
RPR_405
System
Exception
This event specifies that an unknown exception has occured
No ID
No ID Type
13
RPR_405
System
Exception
This event specifies that there was a request decoding exception
No ID
No ID Type
14
RPR_405
System
Exception
This event specifies that the User Id does not exists in the master list
No ID
No ID Type
15
RPR_405
System
Exception
This event specifies that the User is not in ACTIVE status
No ID
No ID Type
16
RPR_405
System
Exception
This event specifies that the Registration Id should not be null or empty
RID
Registration ID
17
RPR_405
System
Exception
This event specifies that the User Id should not be empty or null
No ID
No ID Type
18
RPR_405
System
Exception
This event specifies that the Packet was not found in Packet Store
No ID
No ID Type
19
RPR_405
System
Exception
This event specifies that there was a missing input parameter - version
No ID
No ID Type
20
RPR_405
System
Exception
This event specifies that the match type is Invalid
No ID
No ID Type
21
RPR_405
System
Exception
This event specifies that the manual verification was rejected
No ID
No ID Type
22
RPR_405
System
Exception
This event specifies that the Registration Id should not be empty or null
RID
Registration ID
23
RPR_405
System
Exception
This event specifies that the No matched reference id found for given RID
RID
Registration ID
24
RPR_405
System
Exception
This event specifies that there was a table not accessible exception in manual verification
No ID
No ID Type
25
RPR_405
System
Exception
This event specifies that an invalid message was received from the queue
No ID
No ID Type
Update
This event specifies that the UIN generation was successful.
UIN
UIN
2
RPR_402
User
Update
This event specifies that the UIN generation was successful.
UIN
UIN
3
RPR_402
User
Update
This event specifies that the UIN generation was successful.
UIN
UIN
4
RPR_402
User
Update
This event specifies that the UIN generation was successful.
UIN
UIN
5
RPR_402
User
Update
This event specifies that the UIN generation was successful.
UIN
UIN
Exception
This event specifies that the packet store set by the System is not accessible
No ID
No ID Type
2
RPR_405
System
Exception
This event specifies that there was an error while parsing the Json
No ID
No ID Type
3
RPR_405
System
Exception
This event specifies that the API resource was not accessible
No ID
No ID Type
4
RPR_405
System
Exception
This event specifies that there was an IO exception
No ID
No ID Type
5
RPR_405
System
Exception
This event specifies that the VID status is not active
VID
Virtual ID
6
RPR_405
System
Exception
This event specifies that the UIN updation has failed
UIN
UIN
7
RPR_405
System
Exception
This event specifies that the UIN is already activated
UIN
UIN
8
RPR_405
System
Exception
This event specifies that the UIN is already deactivated
UIN
UIN
9
RPR_405
System
Exception
This event specifies that the UIN activation has failed
UIN
UIN
10
RPR_405
System
Exception
This event specifies that the UIN reactivation has failed
UIN
UIN
11
RPR_405
System
Exception
This event specifies that the UIN deactivation has failed
UIN
UIN
12
RPR_405
System
Exception
This event specifies that the VID creation has failed
VID
Virtual ID
13
RPR_405
System
Exception
This event specifies that the UIN was not found for the matched RID
UIN
UIN
14
RPR_405
System
Exception
This event specifies that the UIN Generation has failed
UIN
UIN
1
RPR_405
System
Exception
This event specifies that there was an unexpected exception occured
No ID
No ID Type
2
RPR_405
System
1
RPR_407
1
RPR_405
1
RPR_402
1
RPR_405
1
RPR_402
1
RPR_405
1
RPR_402
1
RPR_405
1
RPR_402
1
RPR_405
1
RPR_402
1
RPR_405
1
RPR_401
1
RPR_405
1
RPR_402
1
RPR_405
1
RPR_402
1
RPR_405
1
RPR_402
1
RPR_405
1
RPR_402
1
RPR_405
1
RPR_402
1
RPR_405
1
RPR_402
1
RPR_405
1
RPR_402
1
RPR_402
1
RPR_402
1
RPR_405
1
RPR_402
1
RPR_405
Packet Receiver Stage
User Events
Success response for User Event Type in Packet Receiver Stage
System Events
Failure response for System Event Type in Packet Receiver Stage
OSI Validator Stage
User Events
Success response for User Event Type in OSI Validator Stage
System Events
Failure response for System Event Type in OSI Validator Stage
Packet Classifier Stage
User Events
Success response for User Event Type in Packet Classifier Stage
Failure response for System Event Type in Packet Classifier Stage
Packet Uploader Stage
User Events
Success response for User Event Type in Packet Uploader Stage
Failure response for System Event Type in Packet Uploader Stage
Packet Validator Stage
User Events
Success response for User Event Type in Packet Validator Stage
Failure response for System Event Type in Packet Validator Stage
Quality Checker Stage
User Events
Success response for User Event Type in Quality Checker Stage
Failure response for System Event Type in Quality Checker Stage
Secure Zone Notification Stage
User Events
Success response for User Event Type in Secure Zone Notification Stage
Failure response for System Event Type in Secure Zone Notification Stage
Message Sender Stage
User Events
Success response for User Event Type in Message Sender Stage
Failure response for System Event Type in Message Sender Stage
Print Stage
User Events
Success response for User Event Type in Print Stage
Failure response for System Event Type in Print Stage
Re-Processor Stage
User Events
Success response for User Event Type in Re-Processor Stage
Failure response for System Event Type in Re-Processor Stage
ABIS Handler Stage
User Events
Success response for User Event Type in ABIS Handler Stage
Failure response for System Event Type in ABIS Handler Stage
Bio Dedupe Stage
User Events
Success response for User Event Type in Bio Dedupe Stage
Failure response for System Event Type in Bio Dedupe Stage
Biometric Authentication Stage
User Events
Success response for User Event Type in Biometric Authentication Stage
Failure response for System Event Type in Biometric Authentication Stage
Demo Dedupe Stage
User Events
Success response for User Event Type in Demo Dedupe Stage
Failure response for System Event Type in Demo Dedupe Stage
Manual Verification Stage
User Events
Success response for User Event Type in Manual Verification Stage
Failure response for System Event Type in Manual Verification Stage
UIN Generator Stage
User Events
Success response for User Event Type in UIN Generator Stage
Failure response for System Event Type in UIN Generator Stage


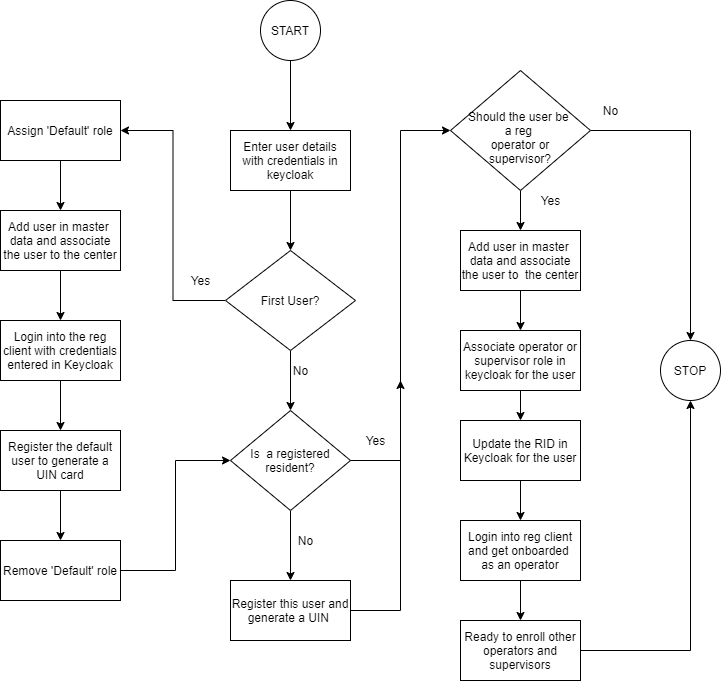


